
Welcome to AiHouse!
We are thrilled to announce that our August update is now ready, introducing a range of exciting new features and enhancements designed to elevate your experience~
Join us as we explore these new capabilities and how they bring greater convenience and efficiency to your work and daily life!😆
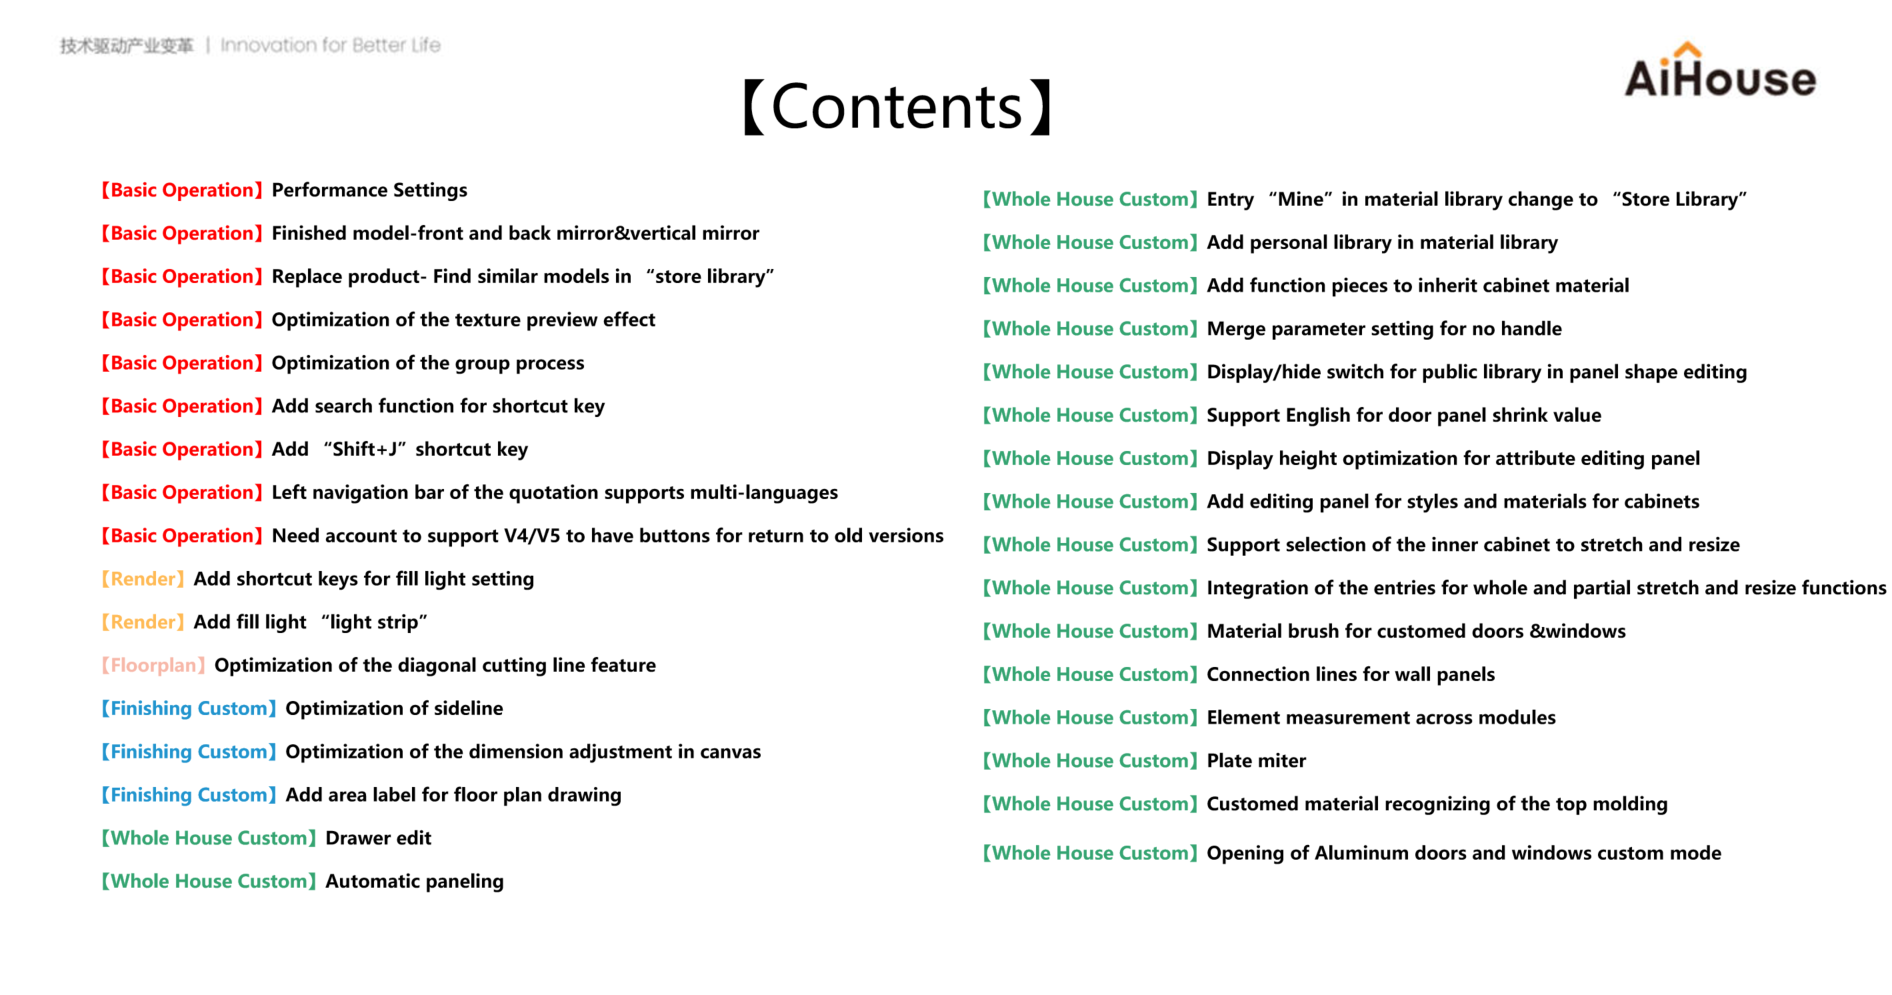
----------------------------------------------------------------------------------------------------------------------------------------------------------------------------------------------------------------------------------------------------------------------------
【Basic Opeartion】
01 Performance Settings(for all)---New feature
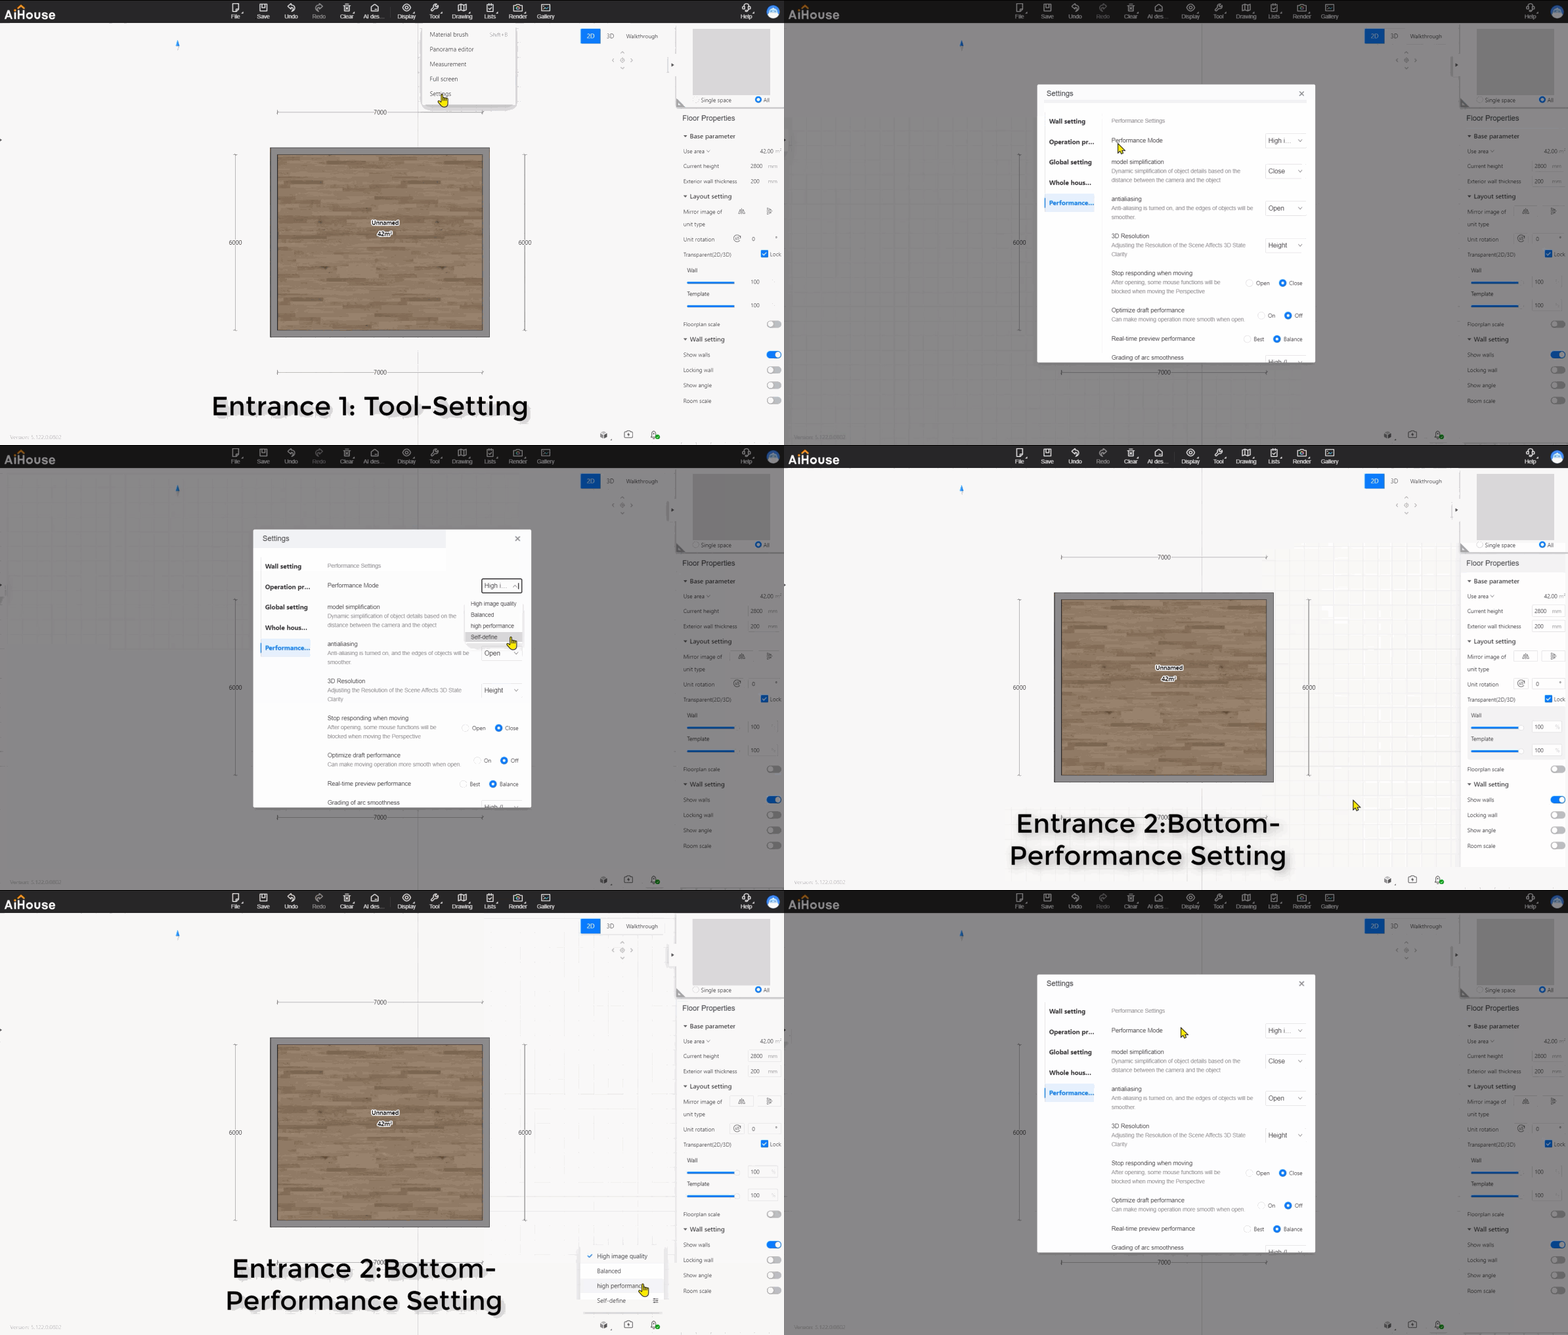
Feature Introduction: To address the issue of lag in large projects, a software performance settings panel has been added.
Feature Operations:
Feature Entrance 1: Top Menu - Tools - Settings - Performance Settings
1.Performance Modes: High image quality, Balanced, High performance, self-define. The default is “self-define”. Users are advised to choose according to their preferences.
2.Real-time preview performance, and optimize draft performance, grading of arc smoothness have been moved under [Performance Settings].
Feature Entrance 2: Bottom - Performance Settings
1.Supports quick switching of performance modes.
2.When performance is low, the icon will display an orange warning.
02 Finished model-front and back mirror&vertical mirror(for all)---New Feature
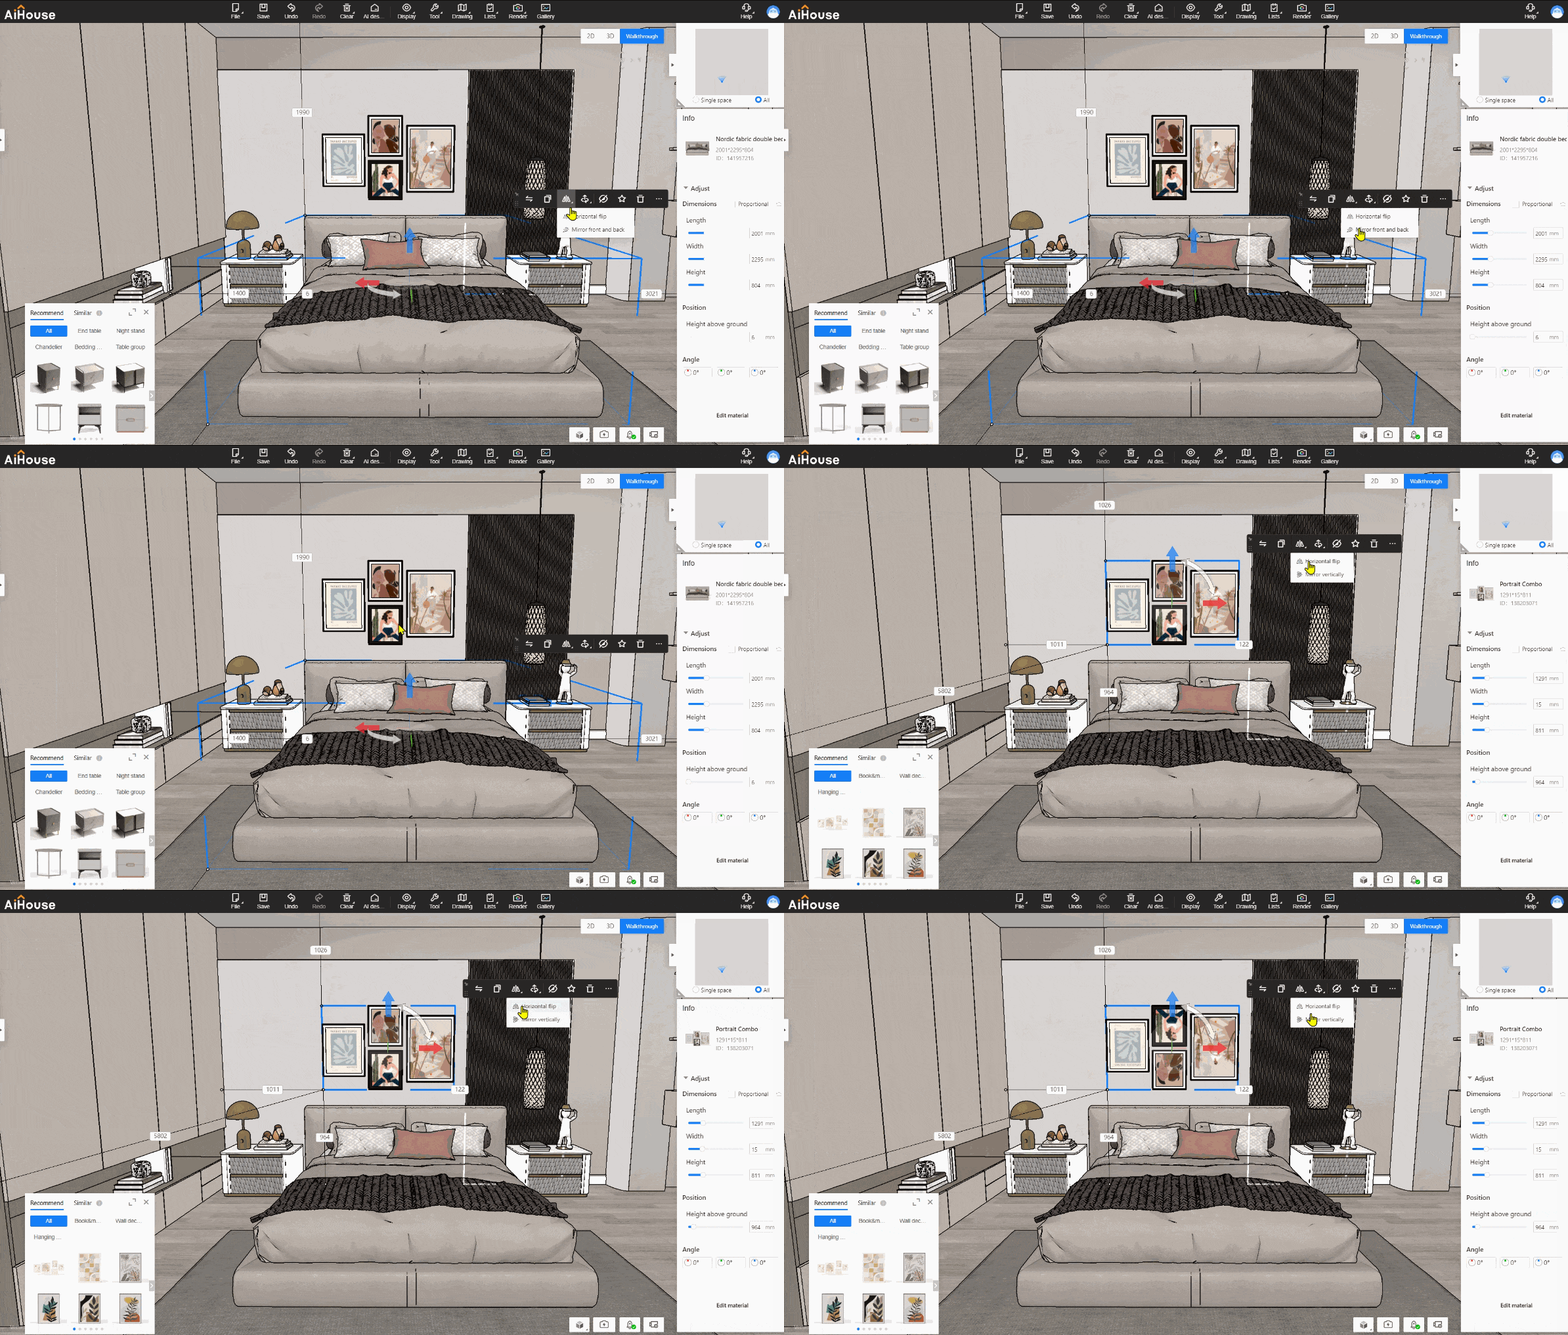
Feature Introduction: For finished single models, finished combinations, and temporary combinations, add mirror image capabilities for both front&back and vertical orientations.
Feature Operations:
1.Click the model, ground model, and ceiling model (mirrored along the Y-axis). The mirror function on the object toolbar supports "front&back mirroring". For wall-mounted models (mirrored along the Z-axis), the mirror function on the object toolbar supports "vertical mirroring".
03 Replace product- Find similar models in “store library”---Enhancement
Feature Introduction:
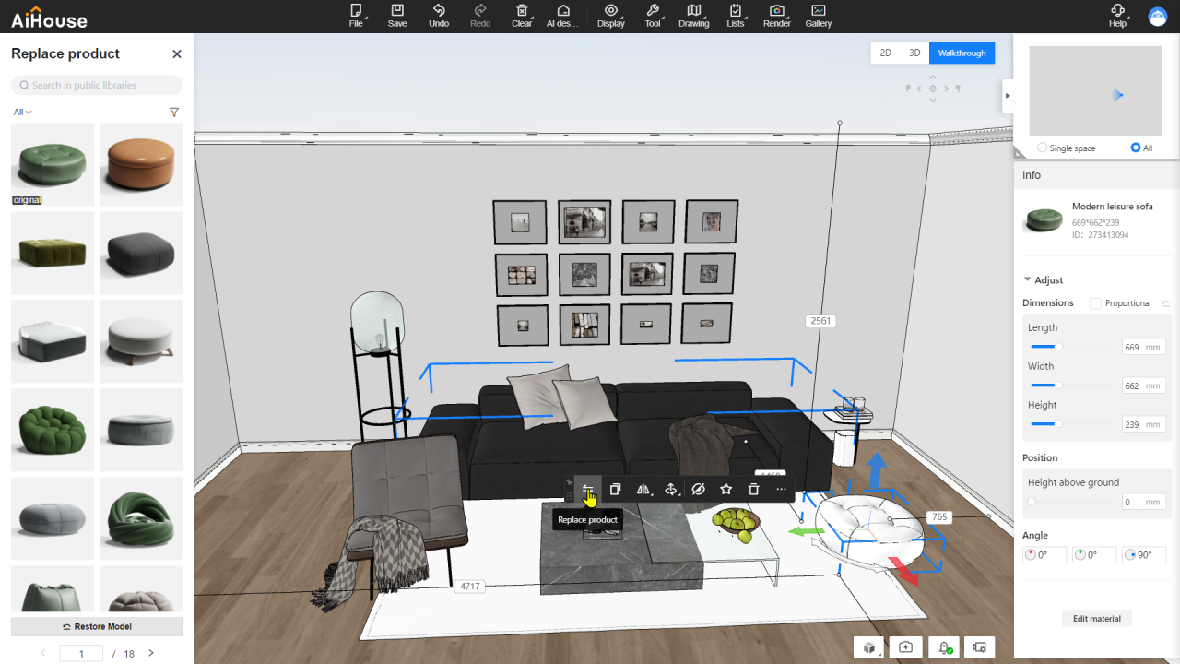
1.Product Replacement: Recommend similar materials for replacement from public library, enterprise library, store library, and my uploaded models library.
2.Add Search Feature in "Replace Product - Store Library" Interface
Feature Operations:
1.Select a material, then click "Replace Product". If the material belongs to the store library, the system will recommend similar materials from the store library.
2.Support searching for material models within the store library in the "Replace Product" - Store Library" interface.
04 Optimization of the texture preview effect(for all)---Enhancement
Feature Introduction: Enhanced texture preview effect: Display textures proportionally according to actual dimensions. Scope of Optimization: Applies to all lists and preview images displaying textures throughout the aihouse.
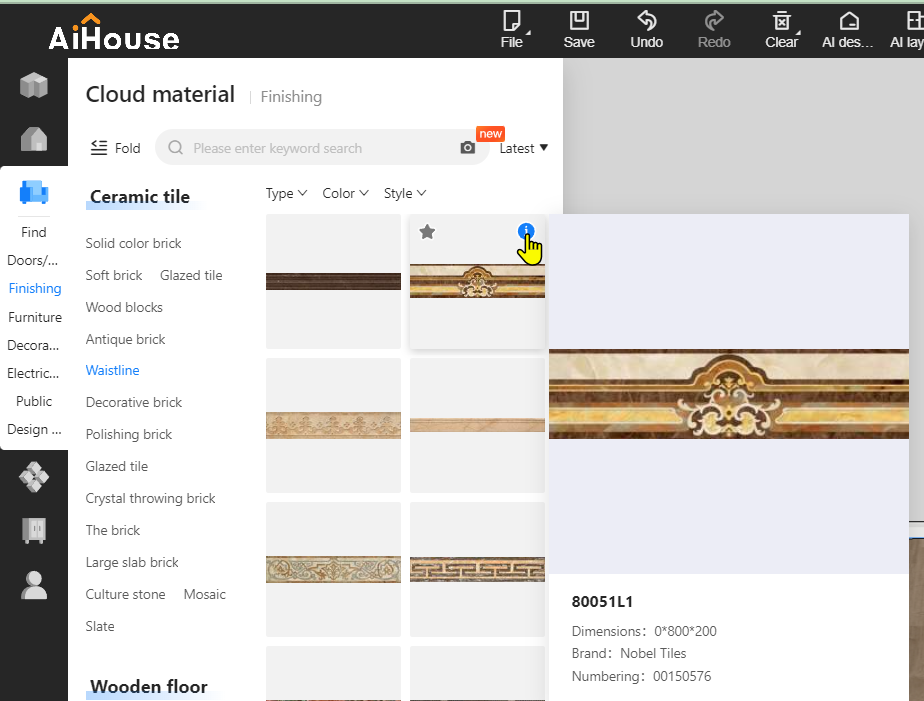
Feature Operations: Click on "Left Menu - Cloud Materials - Finishing - Ceramic tile-waistline".
05 Optimization of the group process(for all)---Enhancement
Feature Introduction: Enhanced User Experience: Addresses the issue where the popup-box disrupts workflow every time users attempt to group items.
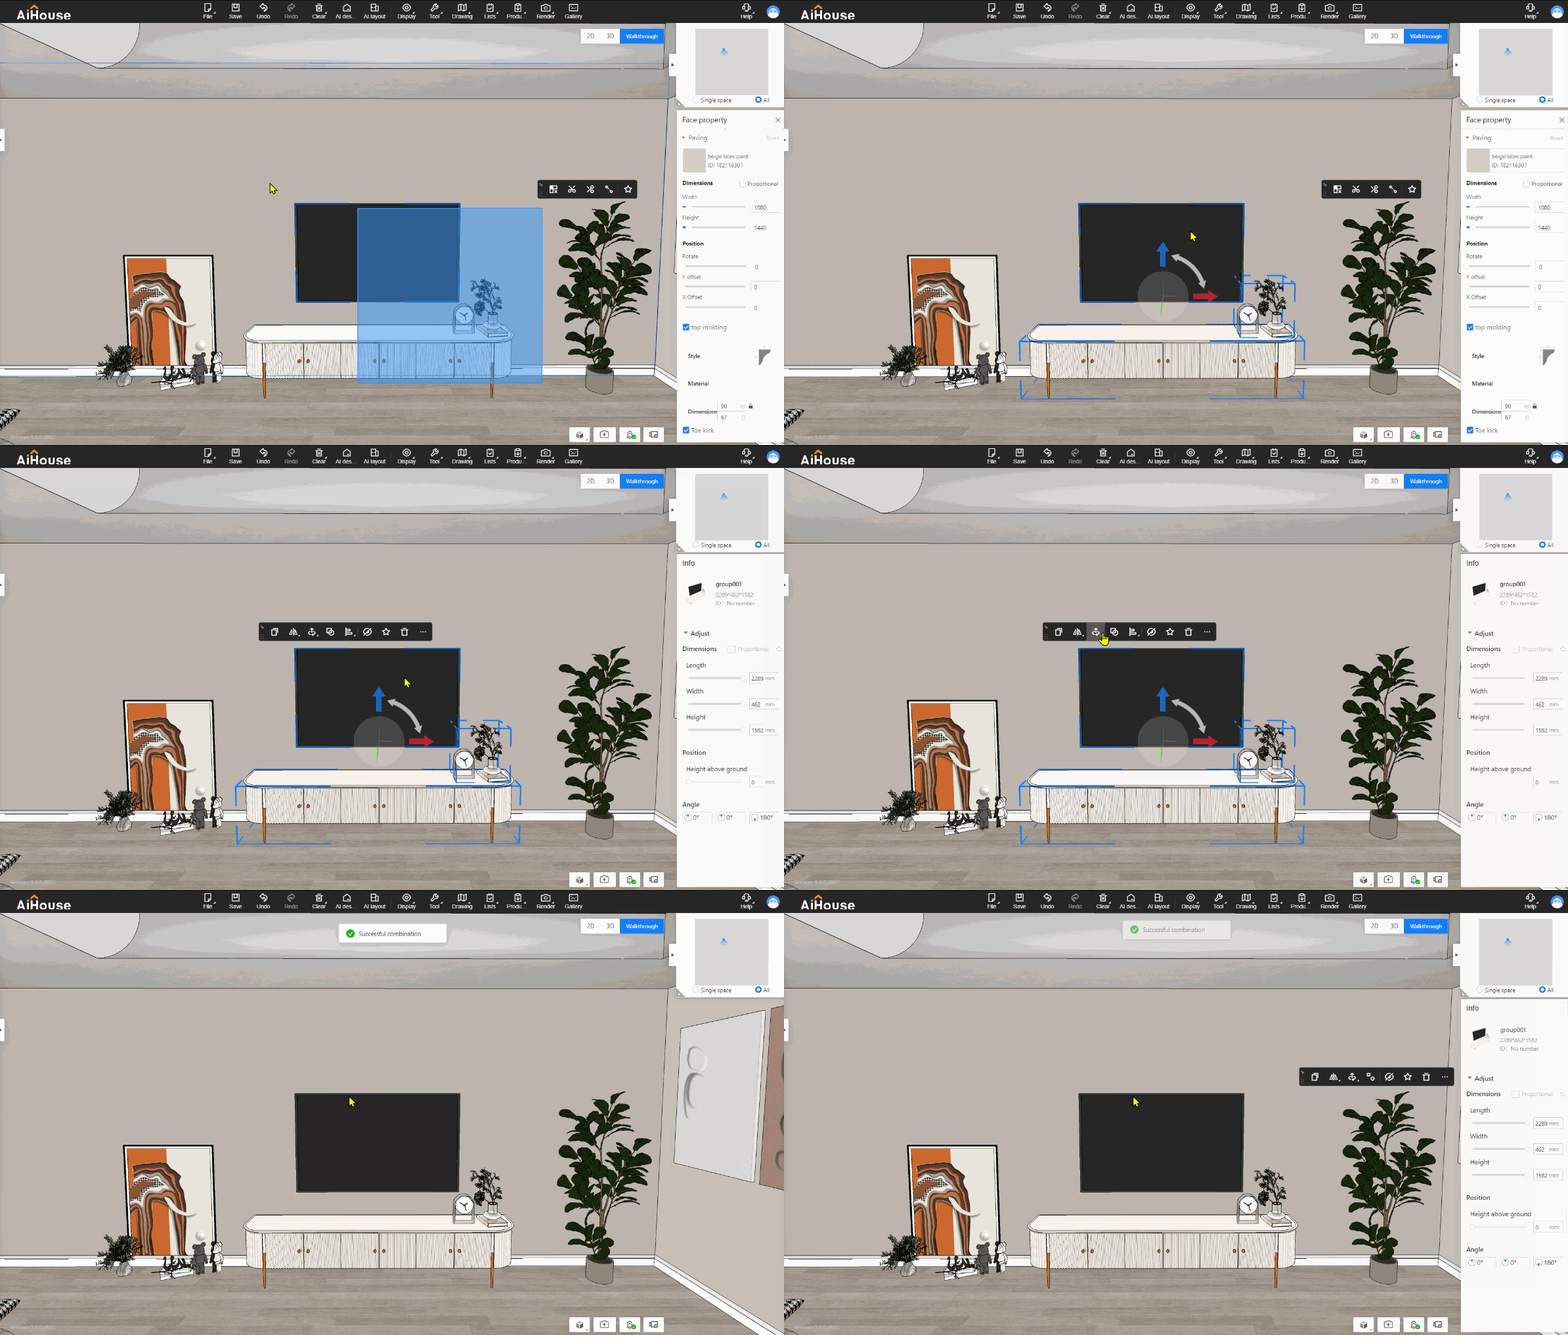
Feature Operations:
1.Select multiple finished models to group without encountering the popup-box.
2.When collect(favorite) temporary combinations, you can rename them before saving.
06 Add search function for shortcut key(for all) ---New Feature
Feature Introduction: Address the issue of inconvenience and low efficiency in finding shortcuts.
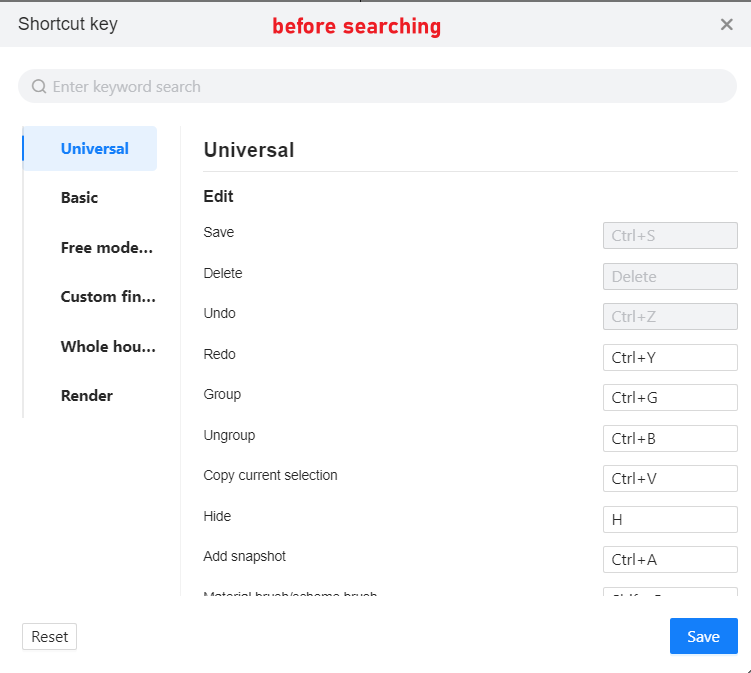
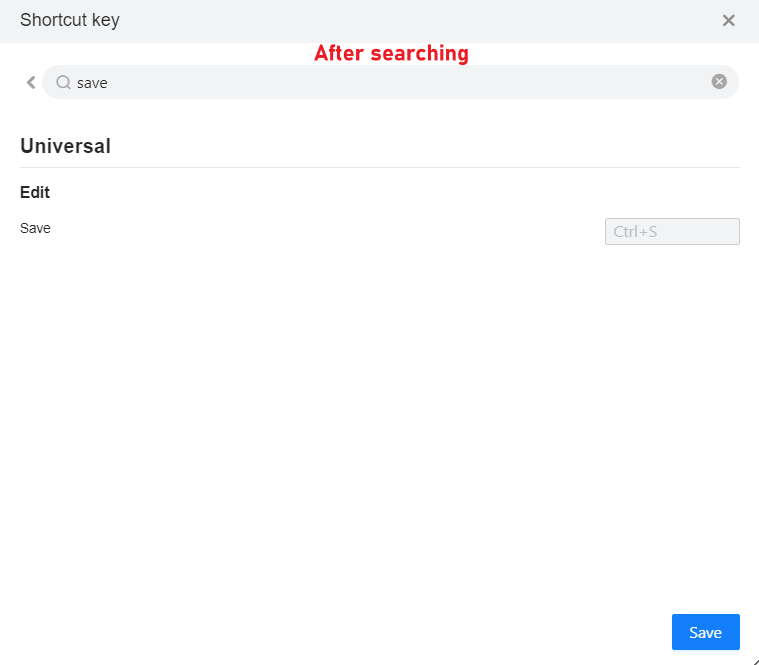
Feature Operations:
1.Access Point: Top Menu - Help - Shortcut key
2.Add search function, supporting fuzzy and partial match precision search. For example, searching "save" will list all options containing "save" in the search results.
07 Add “Shift+J”shortcut key (for all)to toggle visibility of furniture accessories ---New Feature
Feature Introduction: Add a shortcut key "Shift+J" to toggle visibility of furniture accessories, with support for user customization.
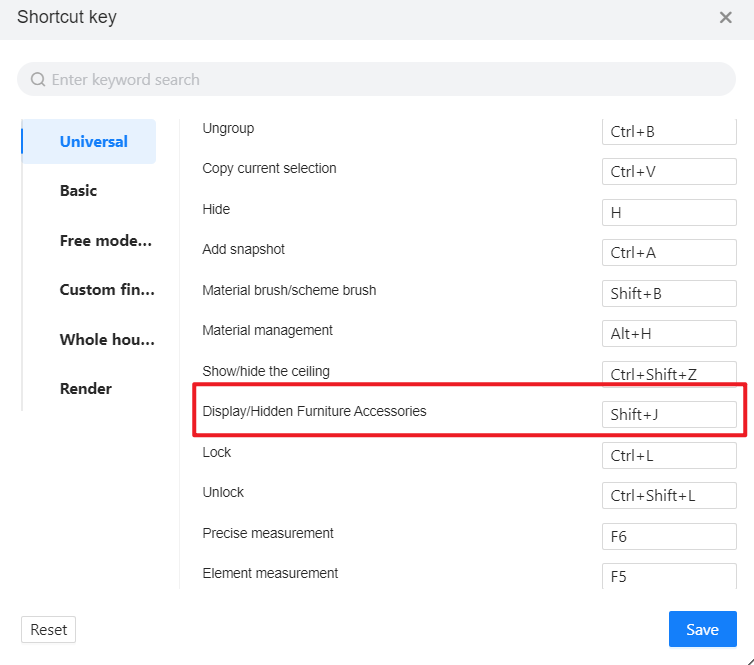
Feature Operations:
1. Click "Shift+J" to show/hide all furniture accessories
2. Entrance: Top Menu - Help - Shortcut key, where users can customize this shortcut key.
08 Left navigation bar of the quotation supports multi-languages (for all) ---Enhancement
Feature Operations:
1. Go to the upper toolbar-tool-settings-global setting-language, change language at here;
2.The language for the left navigation bar of the quotation page will be the same as the one you set in AiHouse.
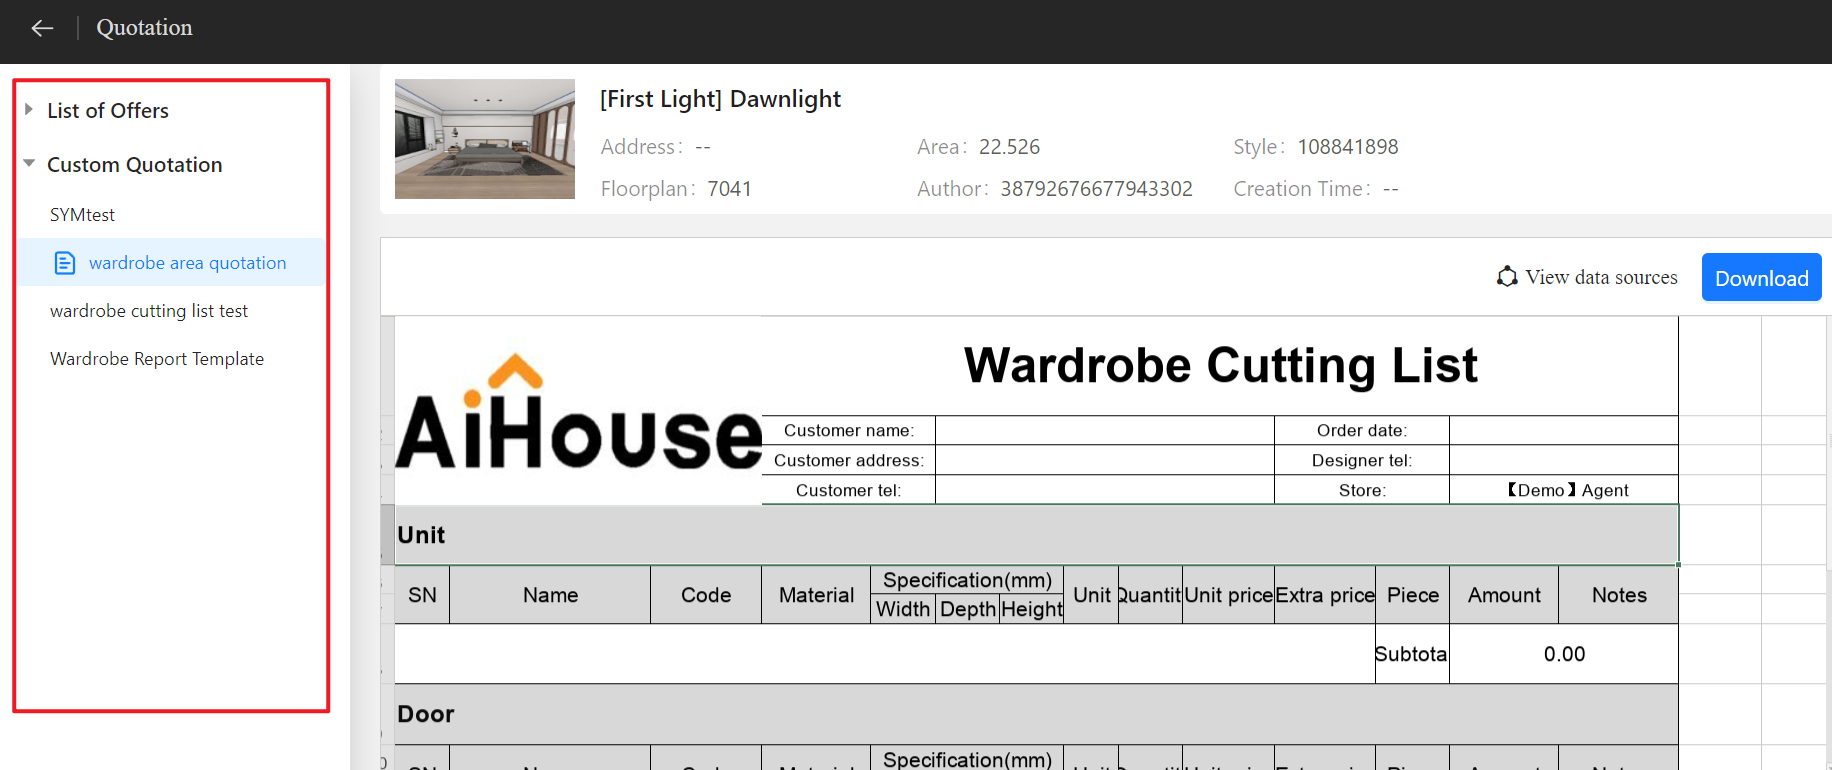
Feature Introduction:
1. Go to the upper toolbar-tool-settings-global setting-language, change language at here;
2.The language for the left navigation bar of the quotation page will be the same as the one you set in AiHouse.
09 Need account to support V4/V5 to have buttons for return to old versions (for all) ---Enhancement
Feature Introduction: Need account to support V4/V5 to have buttons for return to old versions; If your account does not support V4/V5 versions, no return buttons will show.
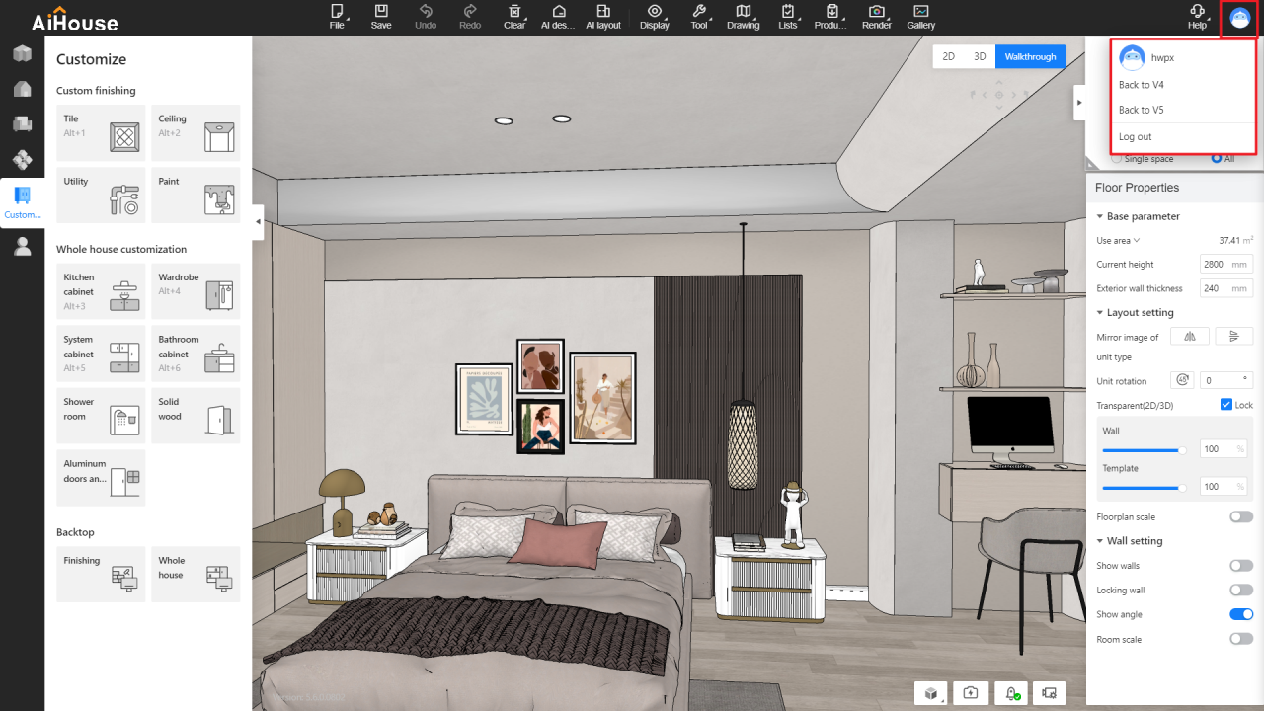
Feature Operations: None
【Render】
01 Add shortcut keys for fill light setting(for all)---New Feature
Feature Introduction: Quickly set up lighting with the use of shortcut keys 1-2-3-4-5, corresponding to spotlights, surface lights, sphere lights, model lights, and strip lights.
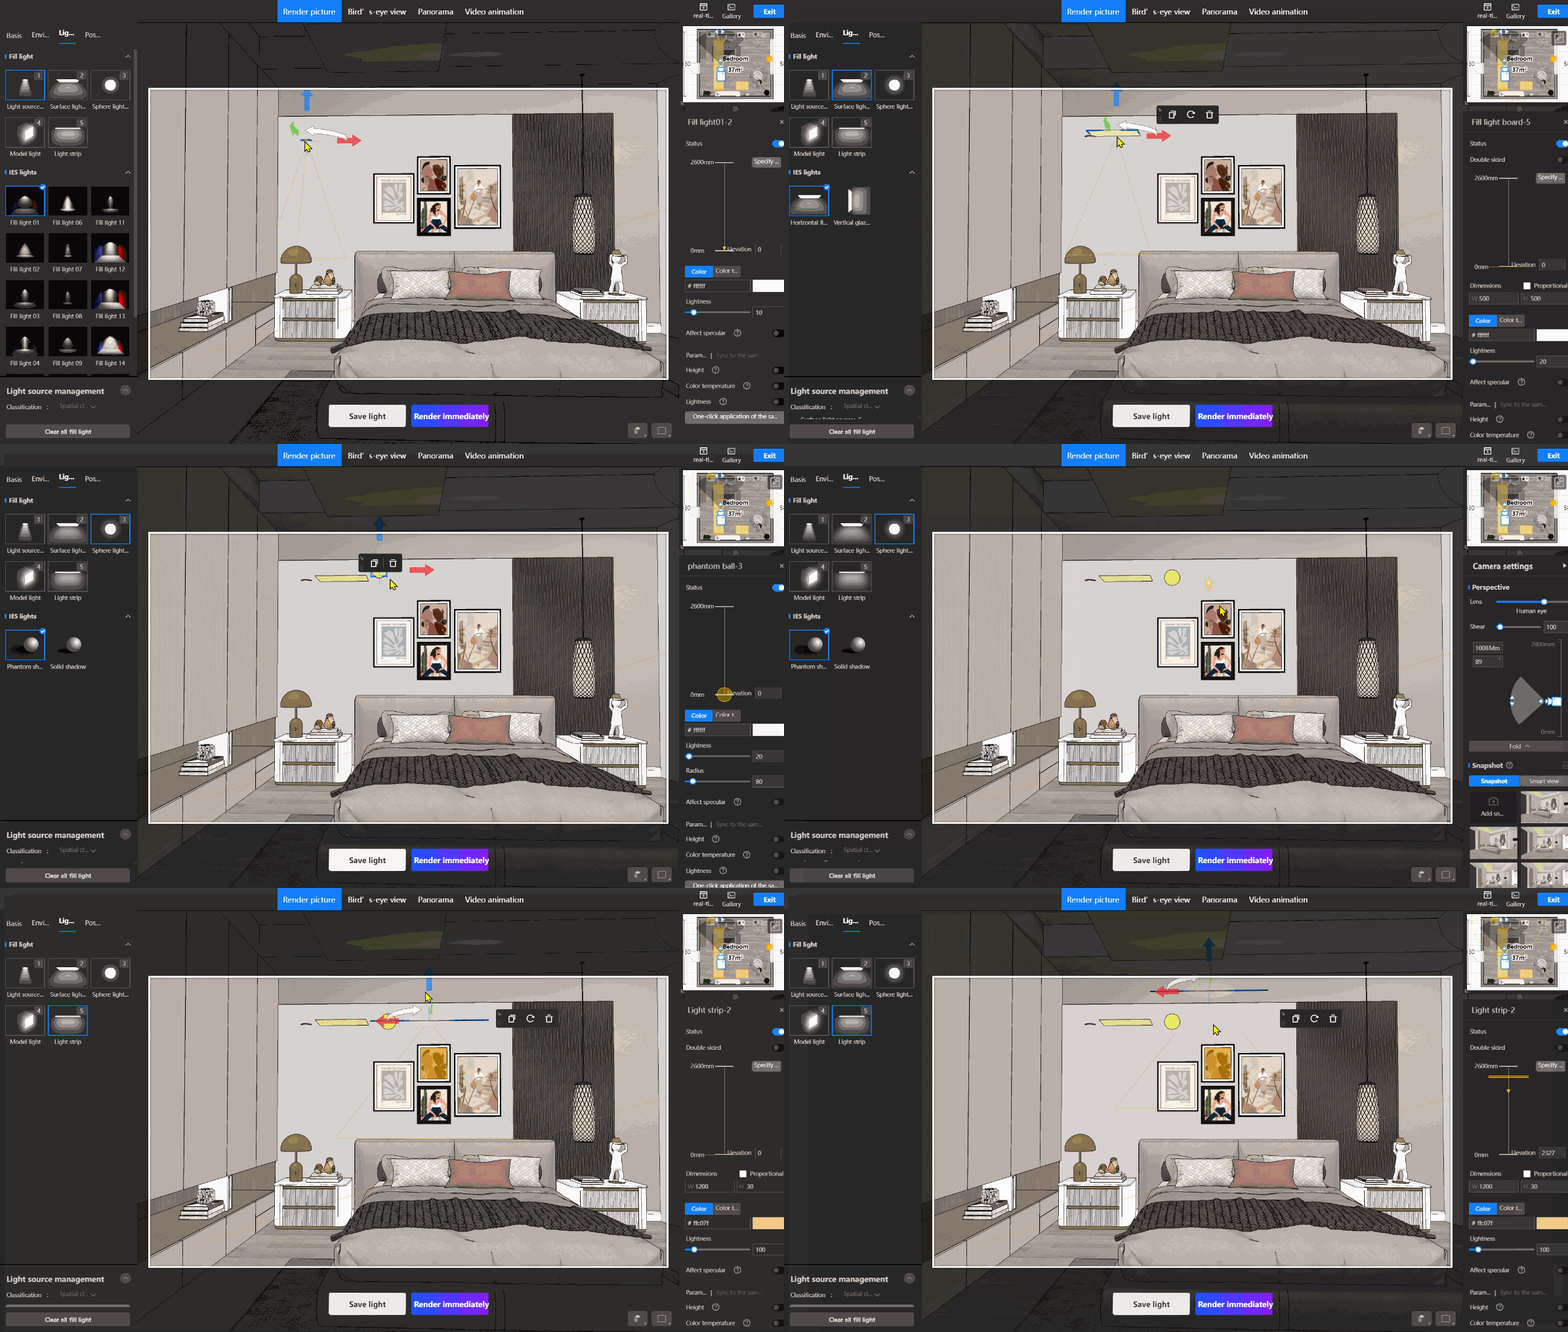
Feature Operations:
1.Enter rendering mode.
2.Use the keyboard number "1/2/3/4/5".
3.Click to place them in the rendering scene.
02 Add fill light “light strip”(for all) ---New Feature
Feature Introduction: Addressing the issue of having to adjust the dimensions of rectangular lights each time when user wants to use strip lights. Now enabling users to easily place strip lights with a single click.
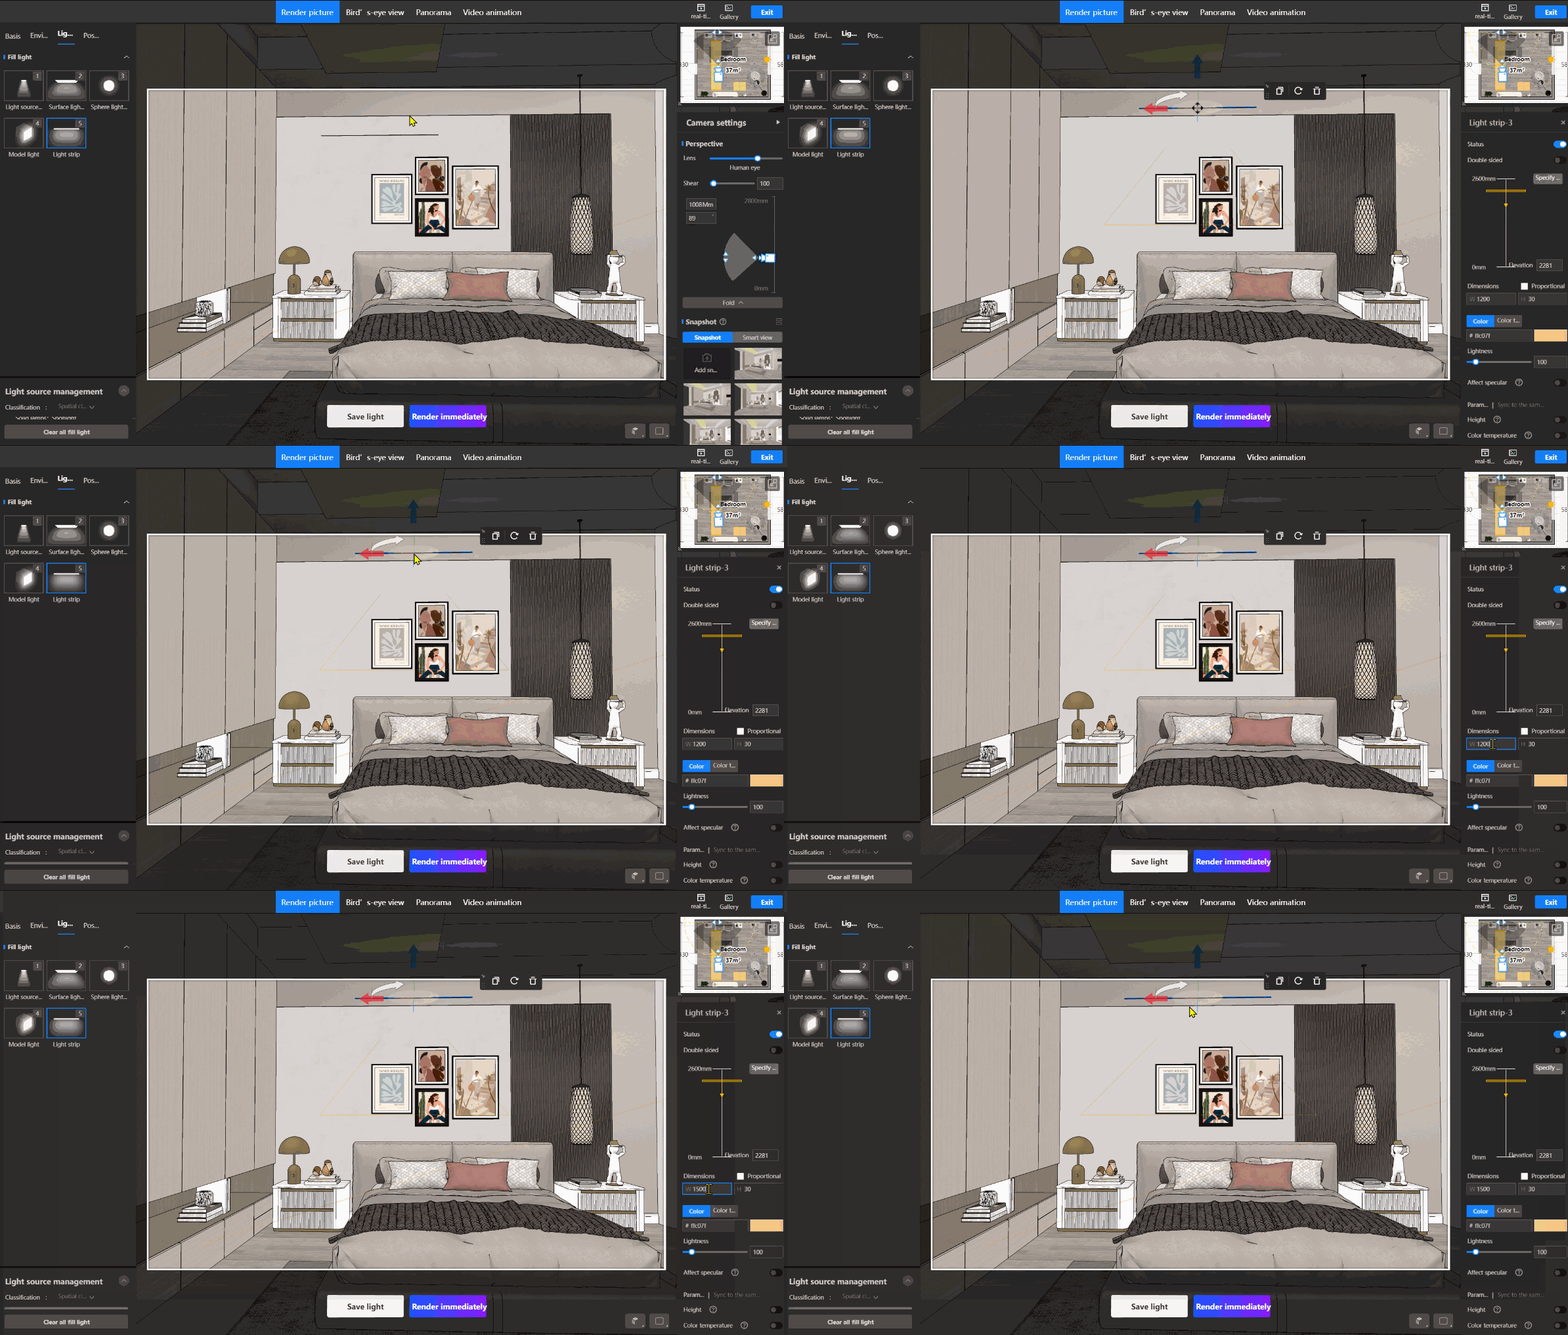
Feature Operations:
1.Enter rendering mode.
2.Use the keyboard number key "5".
3.Click to place them in the rendering scene.
【FloorPlan】
01 Optimization of the diagonal cutting line feature(for all) ---Enhancement
Feature Introduction: Enhance the use experience of the diagonal cutting line feature
1.Display ruler distance from the starting point.
2.Add mouse snap functionality
(1)Support snapping to other cutting lines.
(2)Support snapping to midpoints and intersections of cutting lines.
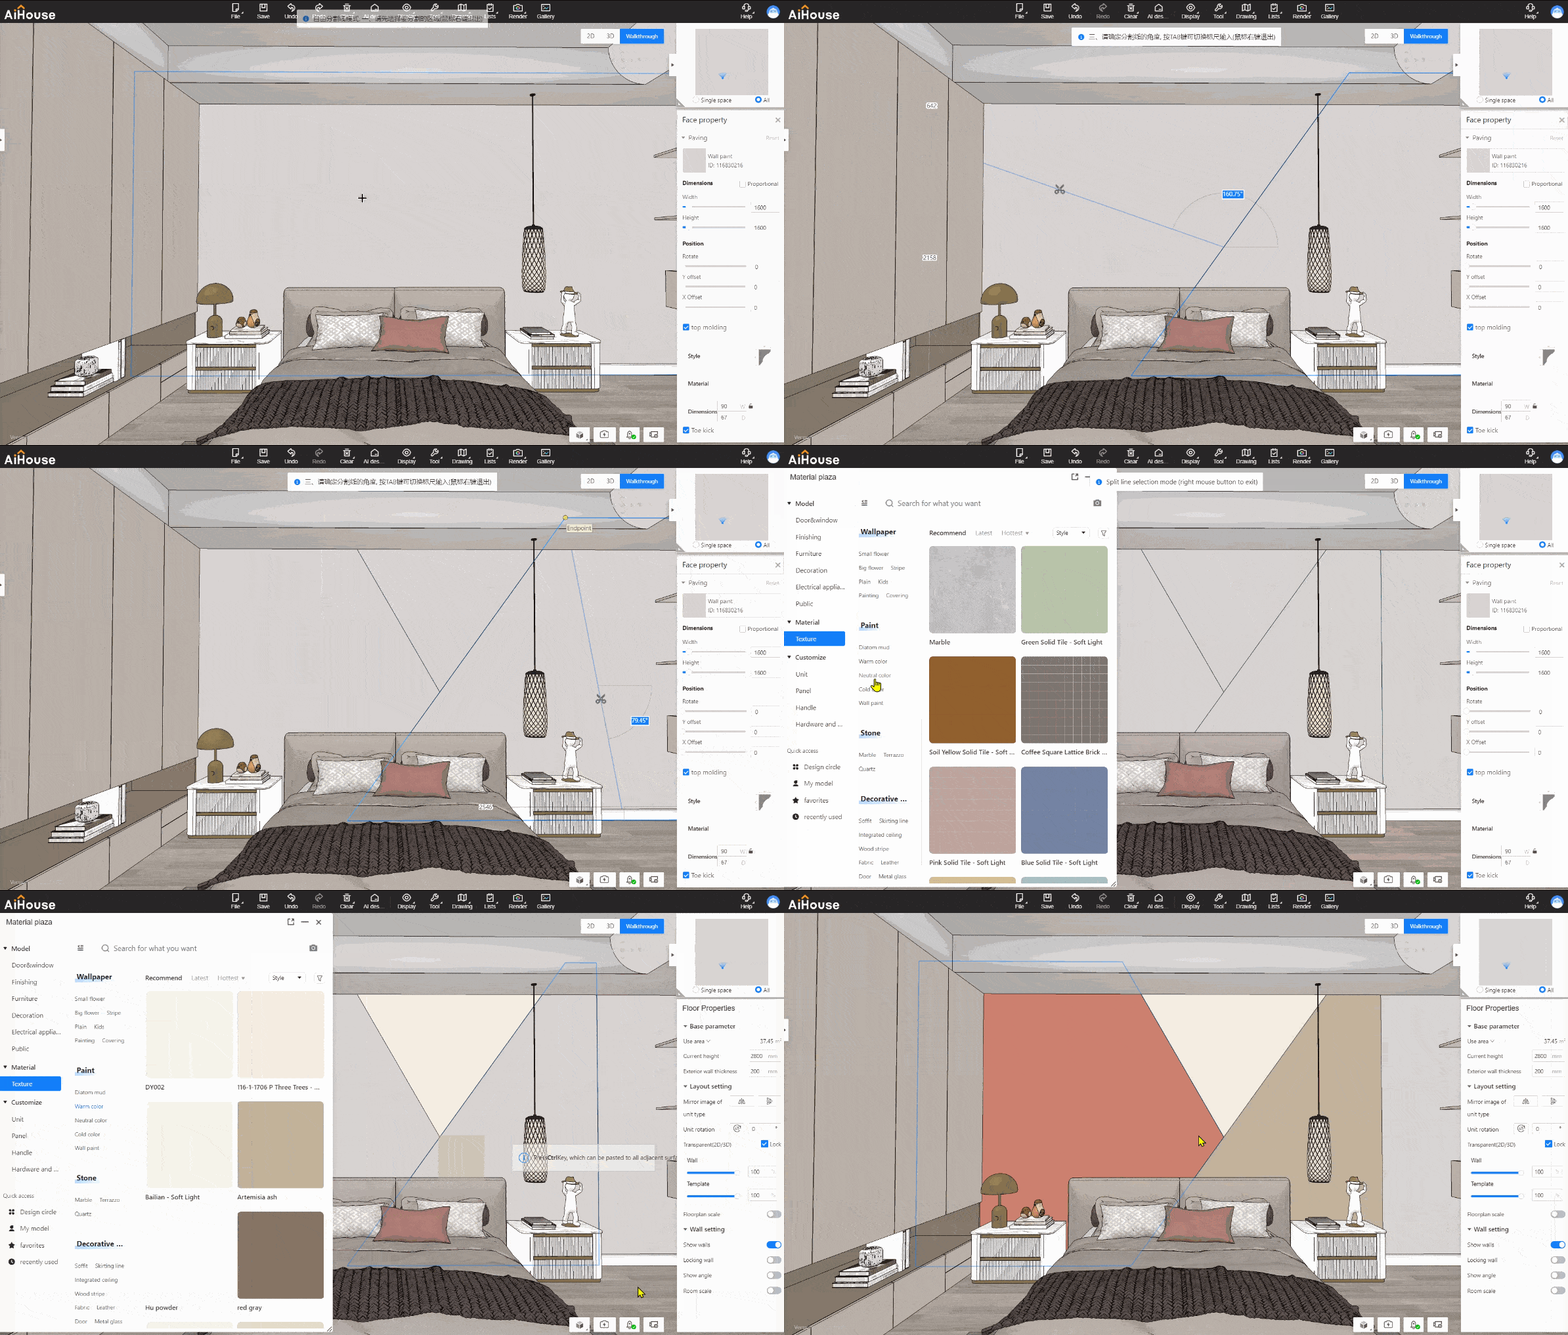
Feature Operations:
1.Open the project, select the area to be cut.
2.Enter “free division”, confirm the anchor point location.
3.Able to use Tab to switch ruler parameter values, and to snap to midpoints or intersections of cutting lines.
4.Confirm the position of the cutting line, right-click to exit the mode.
【Finishing Custom】
01 Optimization of sideline (for all) ---Enhancement
Feature Introduction: Address issues with misplaced top wall sideline and non-displaying profile editor lines
1.Add a shortcut key "Tab" for "internal/ external layout switching" to support user customization.
2.Optimize the placement of sideline in areas and along edges.
3.In 2D and 3D modes, click on sideline, show the profile editing function in the line panel, enabling single-edge lines to display in the profile editor.
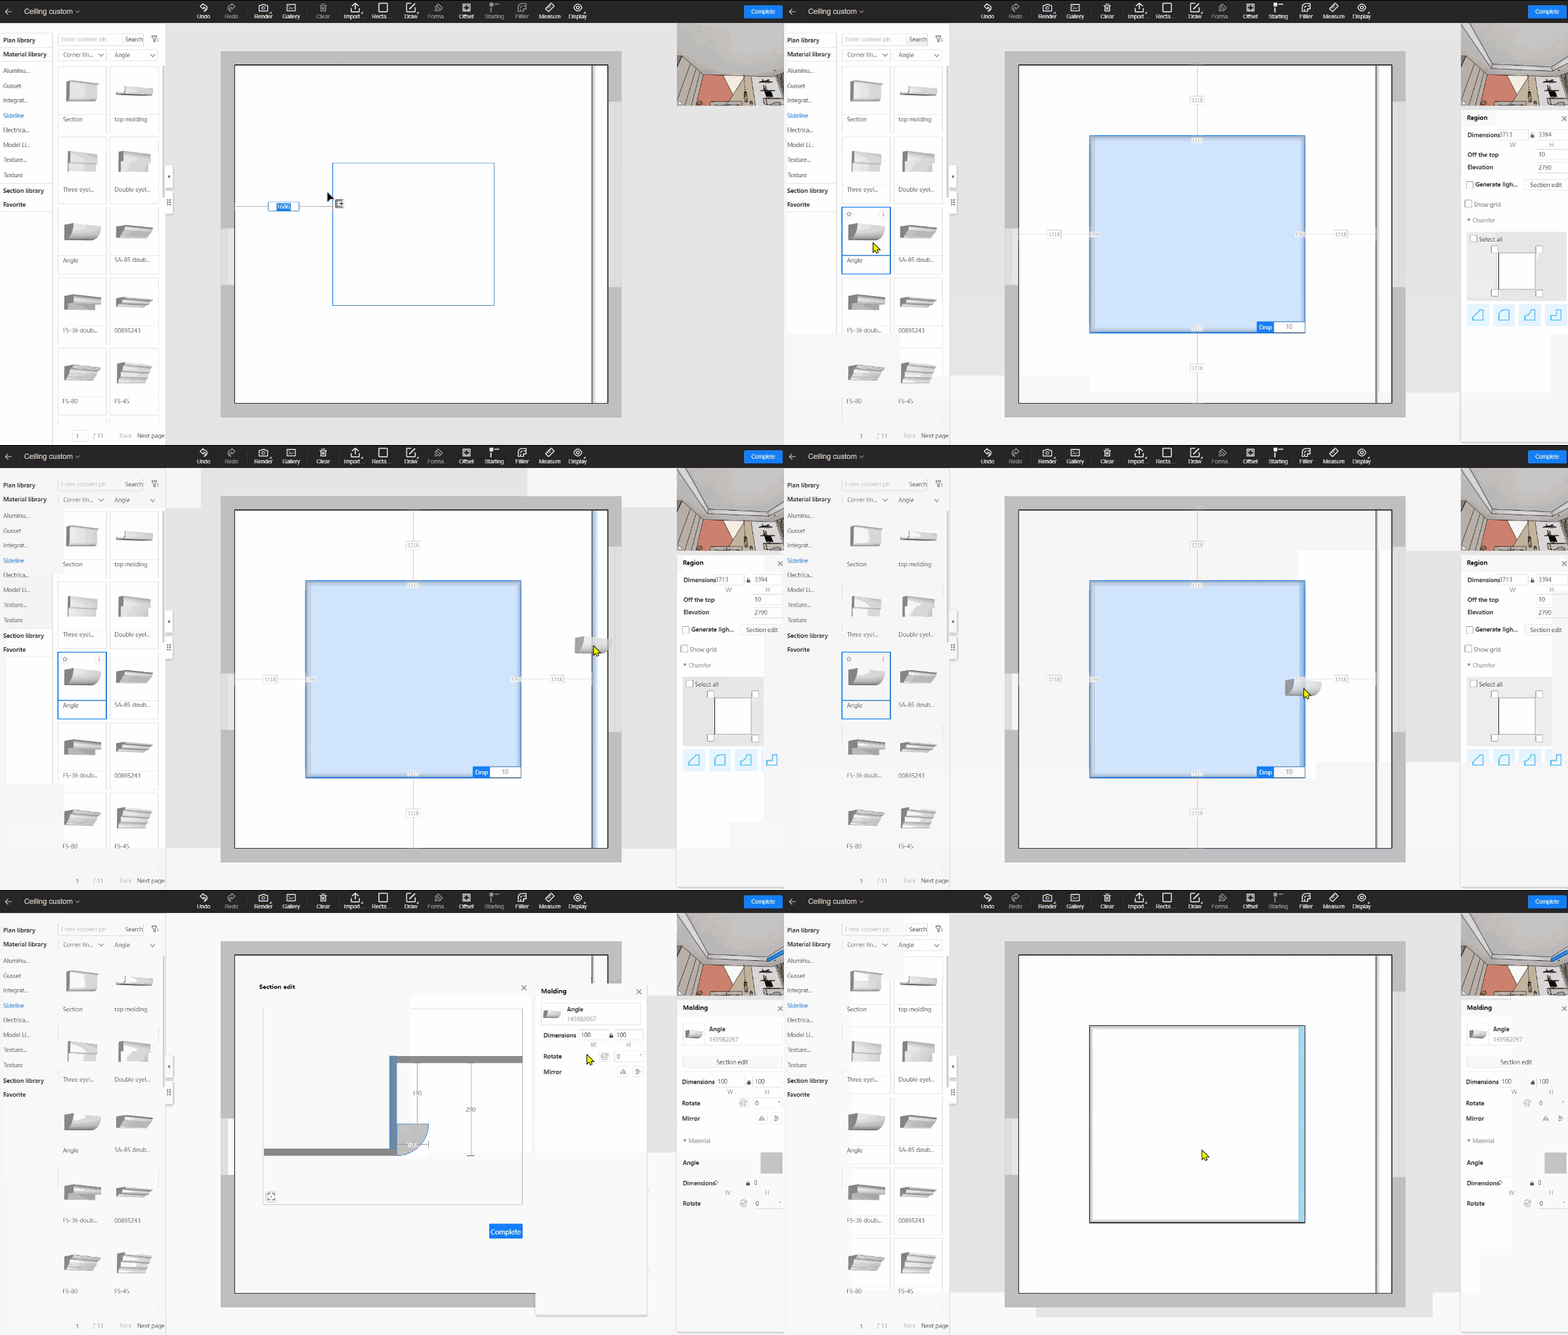
Feature Operations:
1.Open the project, enter the ceiling custom, and access the 2D design mode
2.Drag sideline into areas/edges, and use the "Tab" key to switch between internal and external layouts.
3.In the 2D design mode, click on the profile editing function for sideline, enabling single-edge lines to display.
02 Optimization of the dimension adjustment in canvas(for all) ---Enhancement
Feature Introduction: Address the issues of inability to resize polyline segments and some tiling materials on the canvas.
1.Supported types:wallboard, gusset, honeycomb panel, e-appliances, polyline segments.
2.When materials are rotated to non-vertical angles, resizing is only supported through the right-side panel.
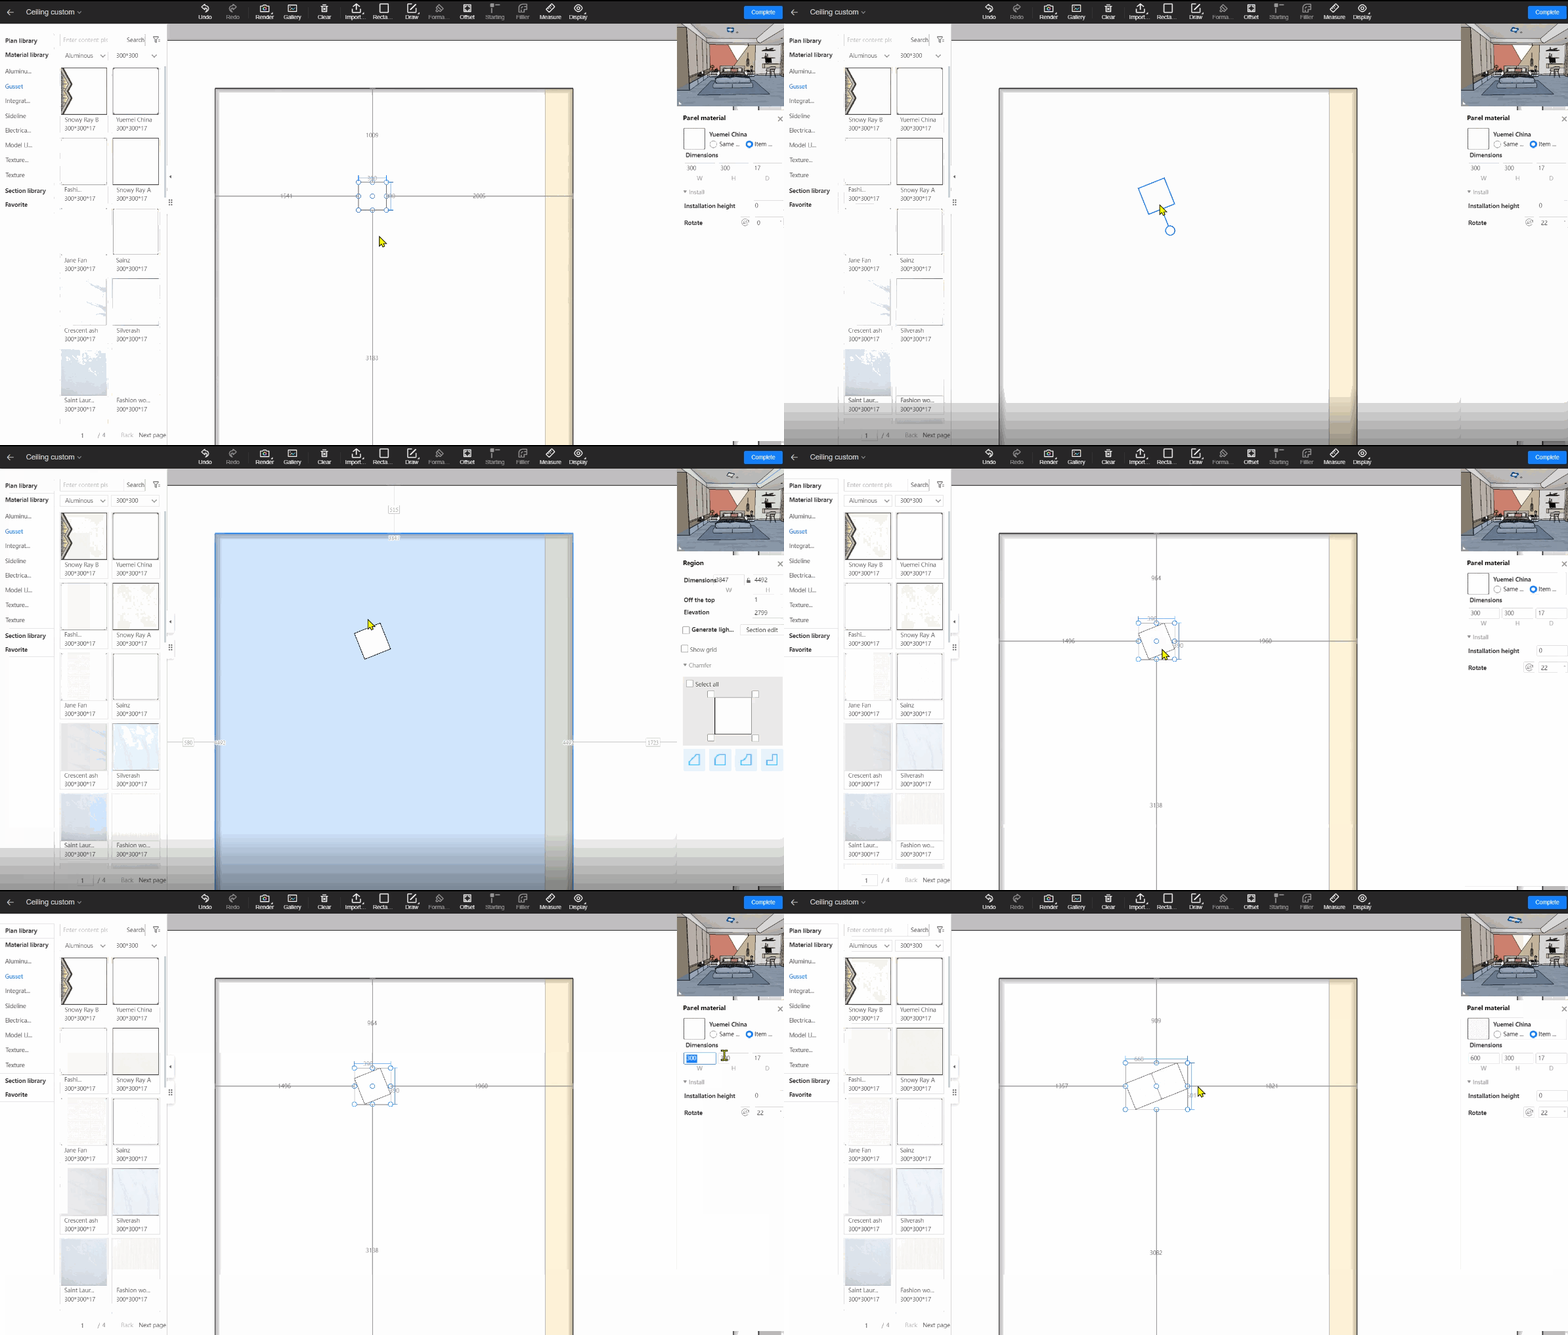
Feature Operations:
1.Open the project and enter the ceiling custom.
2.Double-click to enter 2D design mode.
3.Drag in materials and edit their dimensions.
4.When rotated to non-vertical angles, materials cannot be resized directly; resizing must be done via the right-side panel.
03 Add area label for floor plan drawing(for all)---New Feature
Feature Introduction: Add area labels to the colored floor plan for tiling, allowing users to show or hide room or area information via the right-side panel.
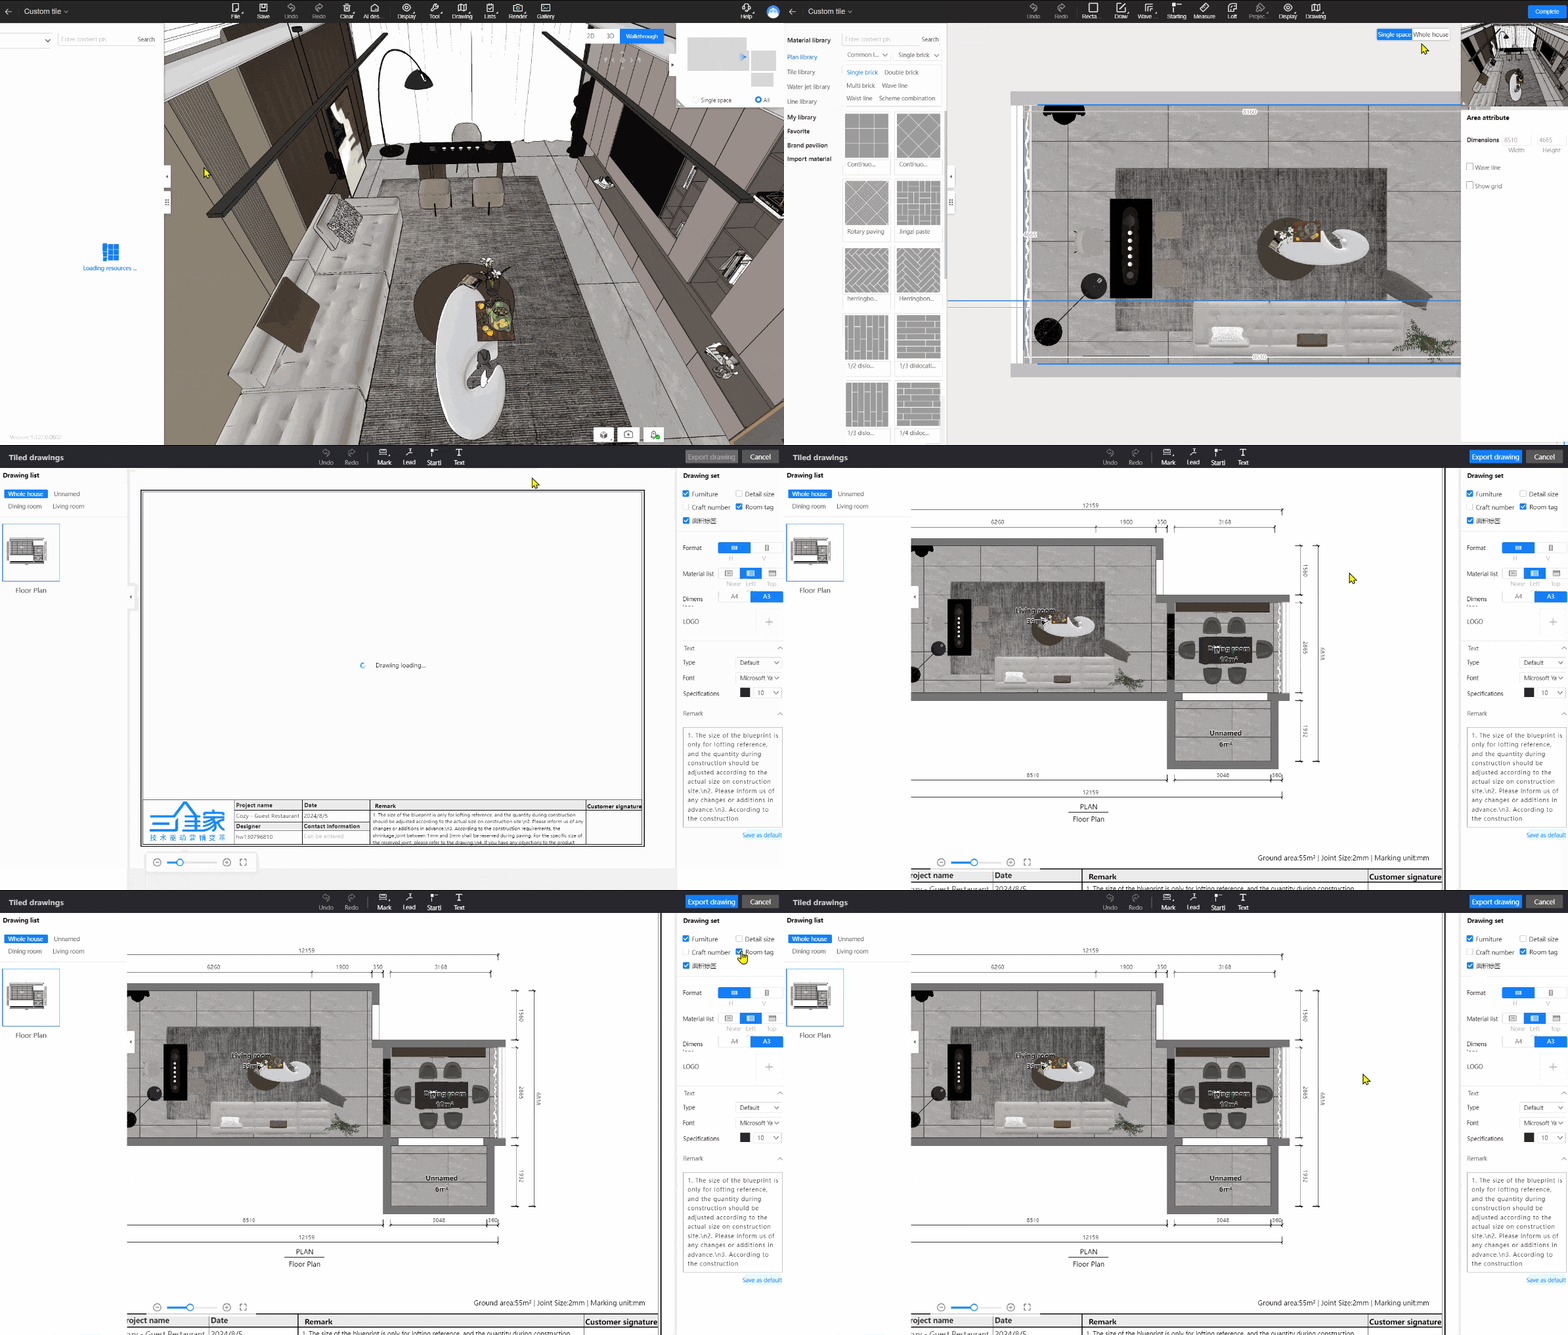
Feature Operations:
1.Open the project and enter the tile custom
2.Access the 2D canvas
3.Click on the top menu -drawing-floor plan
4.Enter the floor plan; select the area label at the right panel
5.Confirm the content and export
【Whole House Custom】
01 Drawer edit(for all) ---New Feature
Feature Introduction:
1.Select drawers ,allowing the editing of configuration , functional components of drawers, drawer parameters, and styles, supporting batch settings.
2. Default styles for drawer generation can be set.
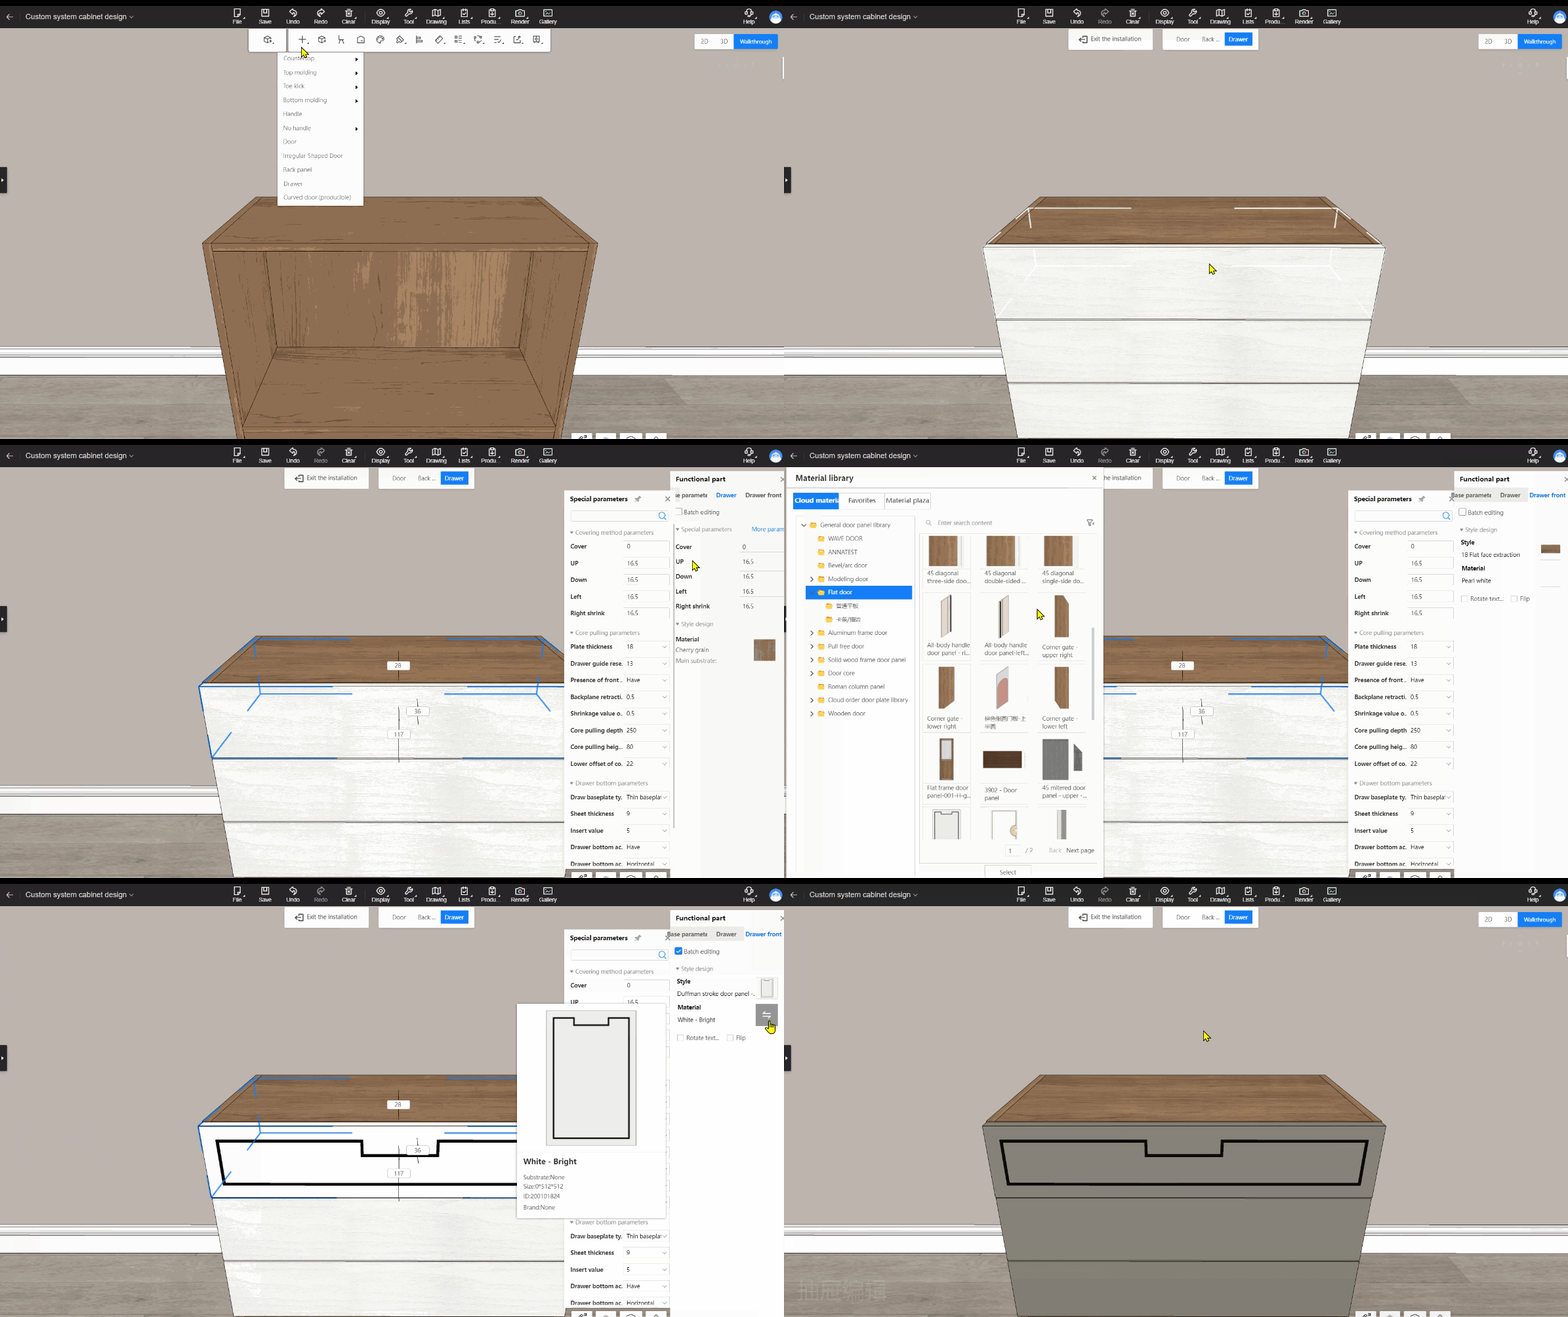
Feature Operations:
Generating Drawers:
1.Open the custom
2.Click on the top menu Installation - Drawer
3.After generation, select drawers to set parameters and styles.
4.Check batch editing to modify groups of drawers together.
Setting Default Drawer Styles: (Enterprise Only) 3D Backstage- Resource configuration - Default material configuration - universal default materials
02 Automatic paneling(for all) ---New Feature
Feature Introduction: When dragging combinations or cabinets from the library, the top panel will be generated. When against a wall, the side panel will be automatically created.
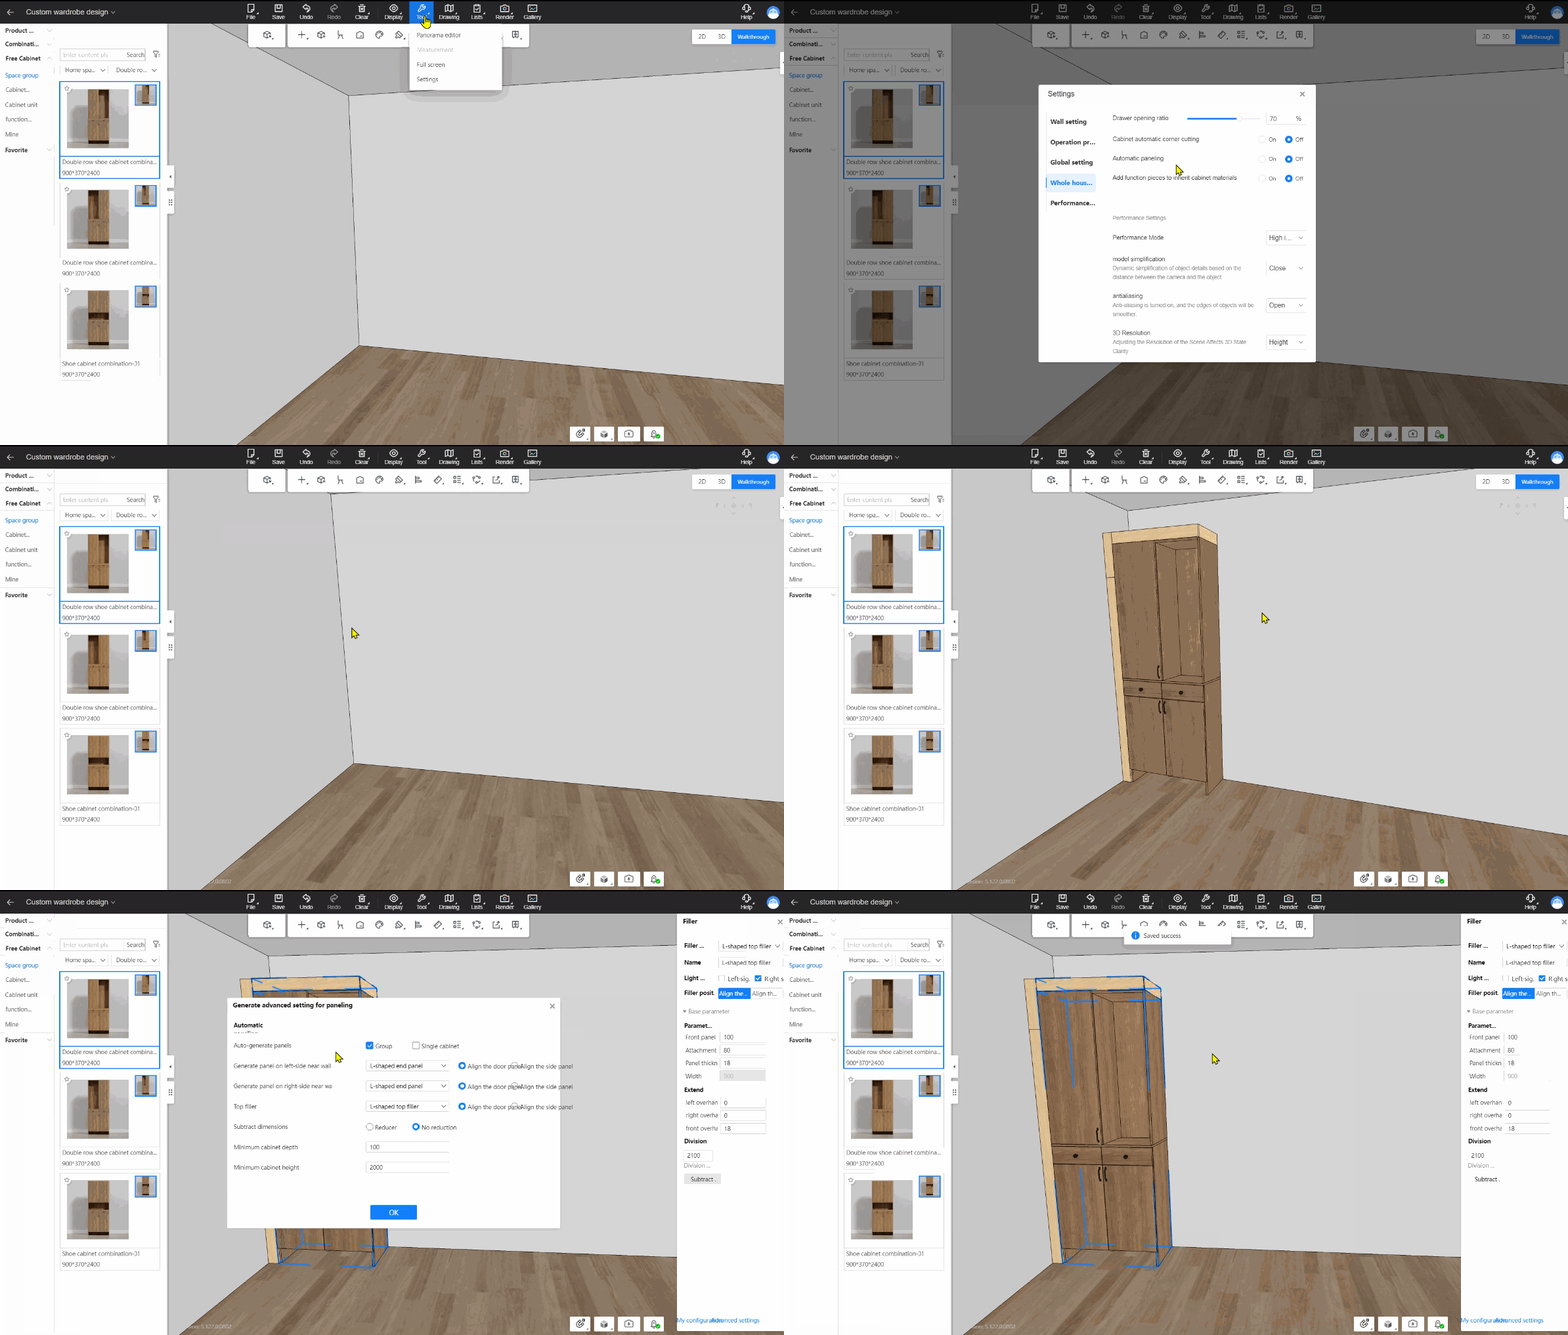
Feature Operations:
1.Open the customization mode.
2.Click on the top menu "Tools - Settings - Whole House Customization - Automatic paneling" and set it to “On”.
3. Drag combinations from the material panel will automatically generate top panels; when against a wall, side panels are generated.
4.In the panel editing interface, click on the bottom menu "Advanced Settings" to adjust settings related to automatic paneling.
03 Entry “Mine”in material library change to “Store Library”(for personal) ---New Feature
Feature Introduction: The "My" entry for material library is renamed to "Store Library."
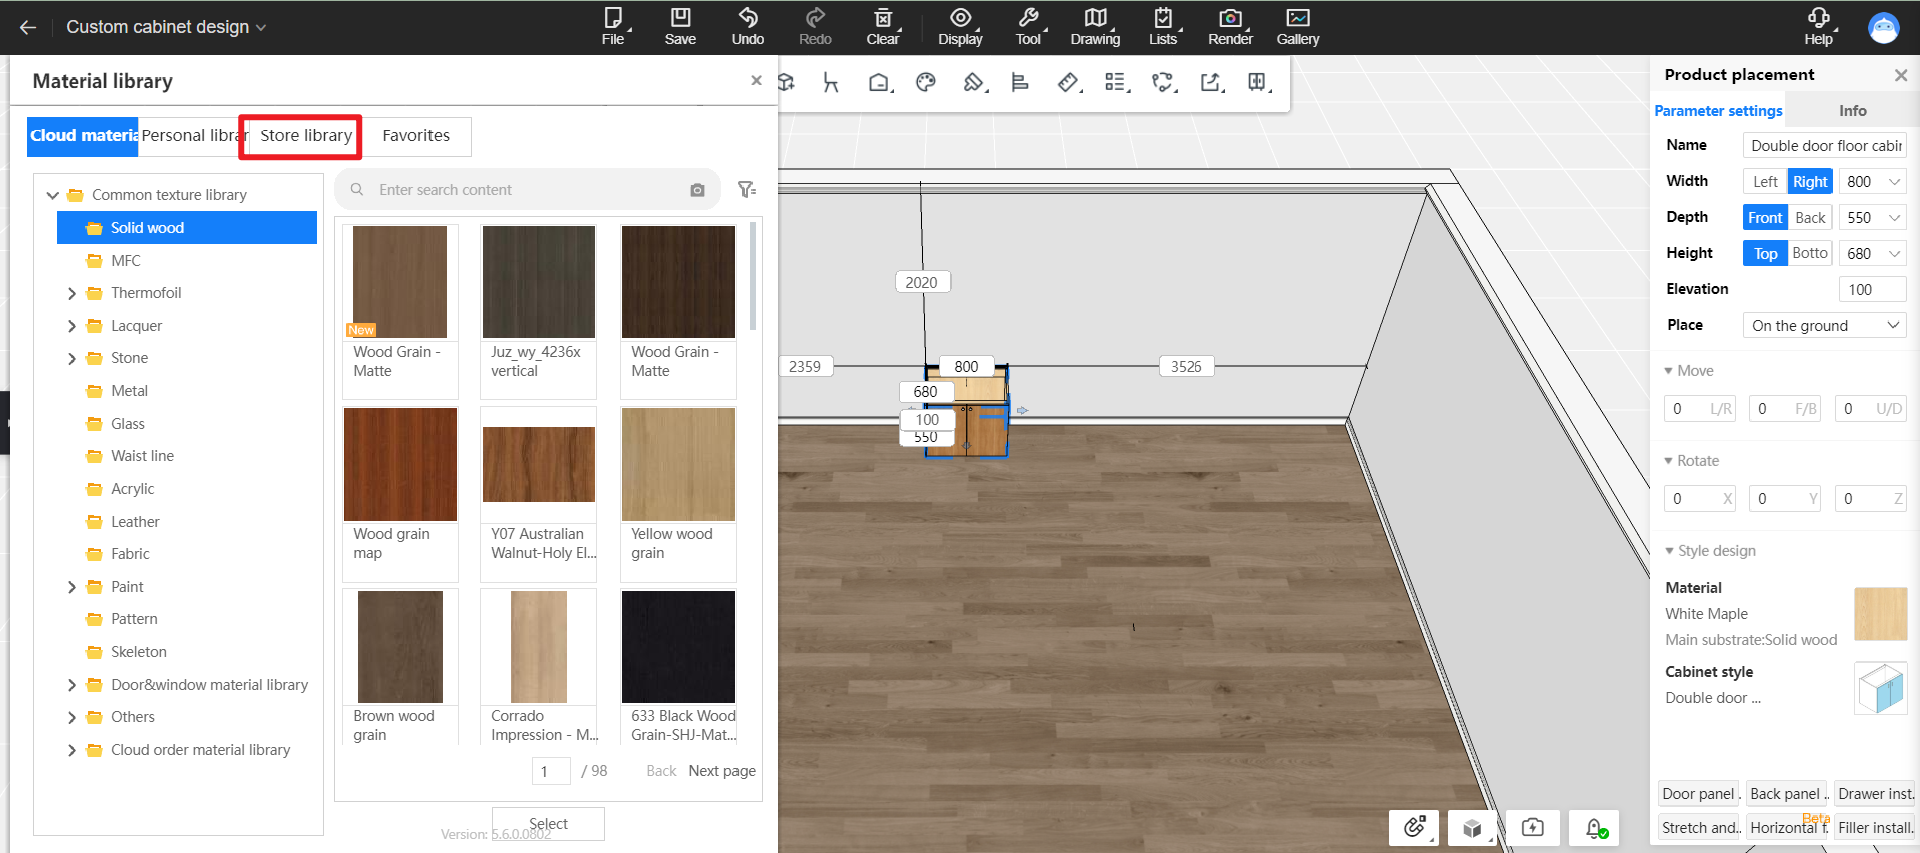
Feature Operations:
Material Replacement: 1.Open the customization mode. 2.Select cabinets, right-click-material , or click on the right panel to replace materials.
Editing Classification and Texture Entries:
Classification: Workbench - Product Management - Classification Management - Store category- Finished Products - Textures
Materials: Workbench - Product Management - Material Management - Store Materials - Finished Products - Texture
04 Add personal library in material library(for all) ---New Feature
Feature Introduction: The material library now includes a Personal Library.
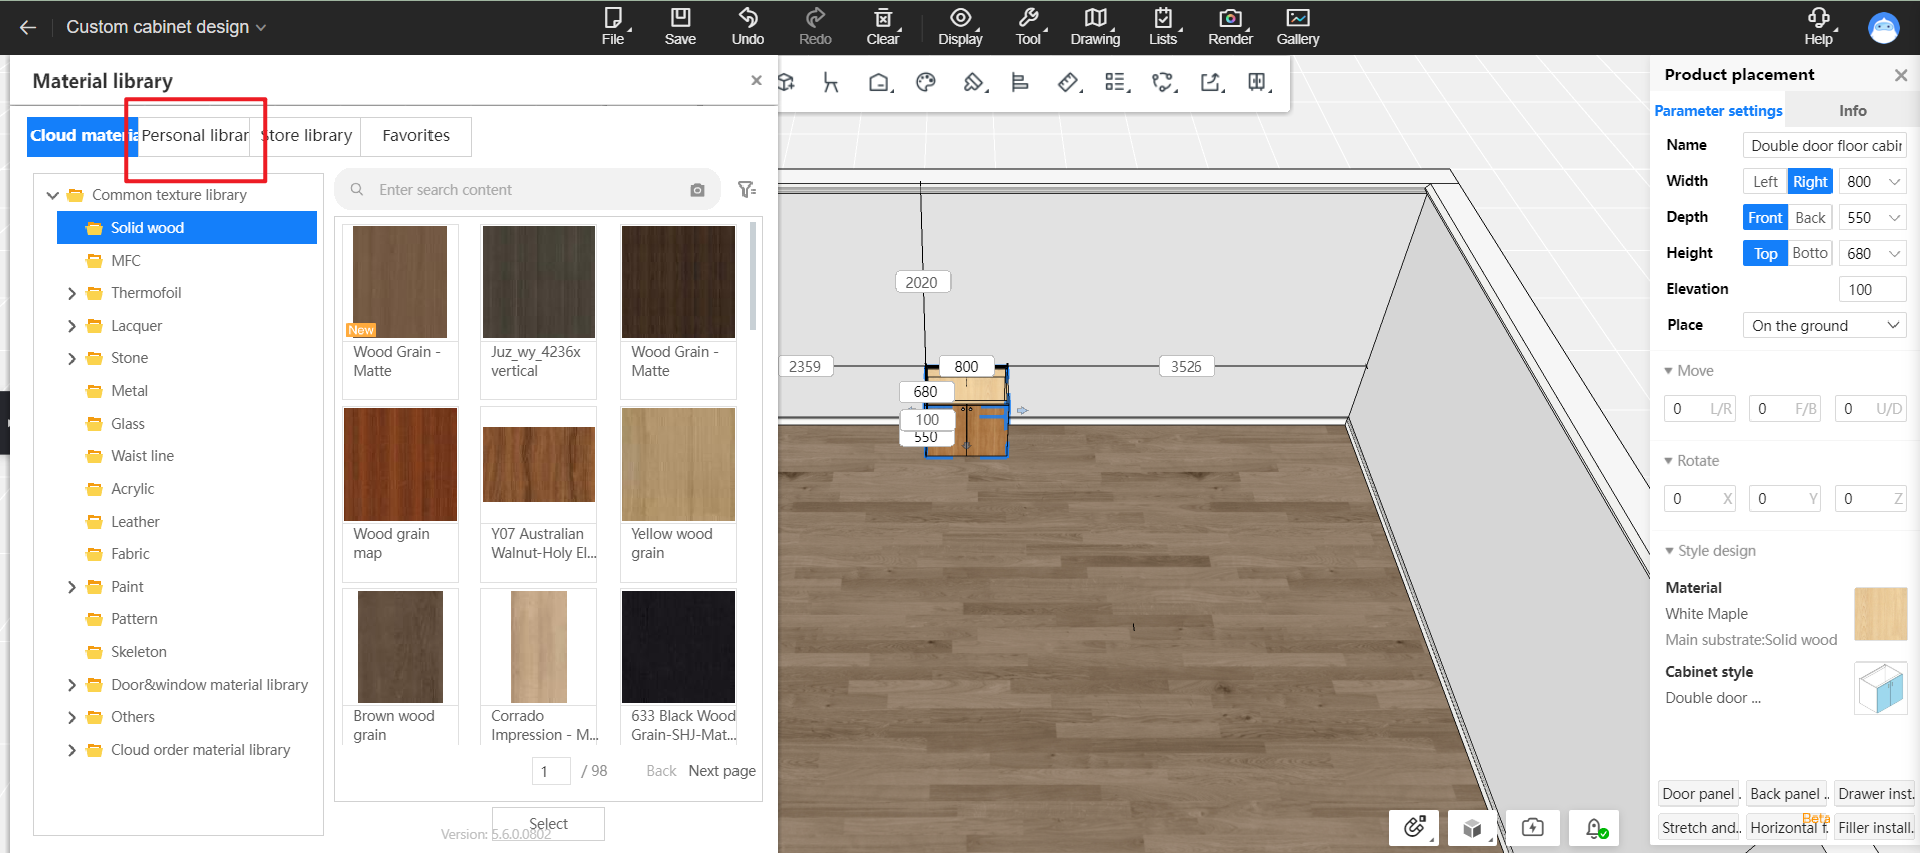
Feature Operations:
Material Replacement: 1.Open the customization mode. 2.Select cabinets, right-click-material , or click on the right panel to replace materials.
Editing Classification and Texture Entries:
Classification: Workbench - Product Management - Classification Management - personal category- Finished Products - Textures
Materials: Workbench - Product Management - Material Management - Personal Materials - Finished Products - Texture
05 Add function pieces to inherit cabinet material (for all) ---New Feature
Feature Introduction: Components such as functional parts, door panels, and drawers will automatically inherit the material of the cabinets.
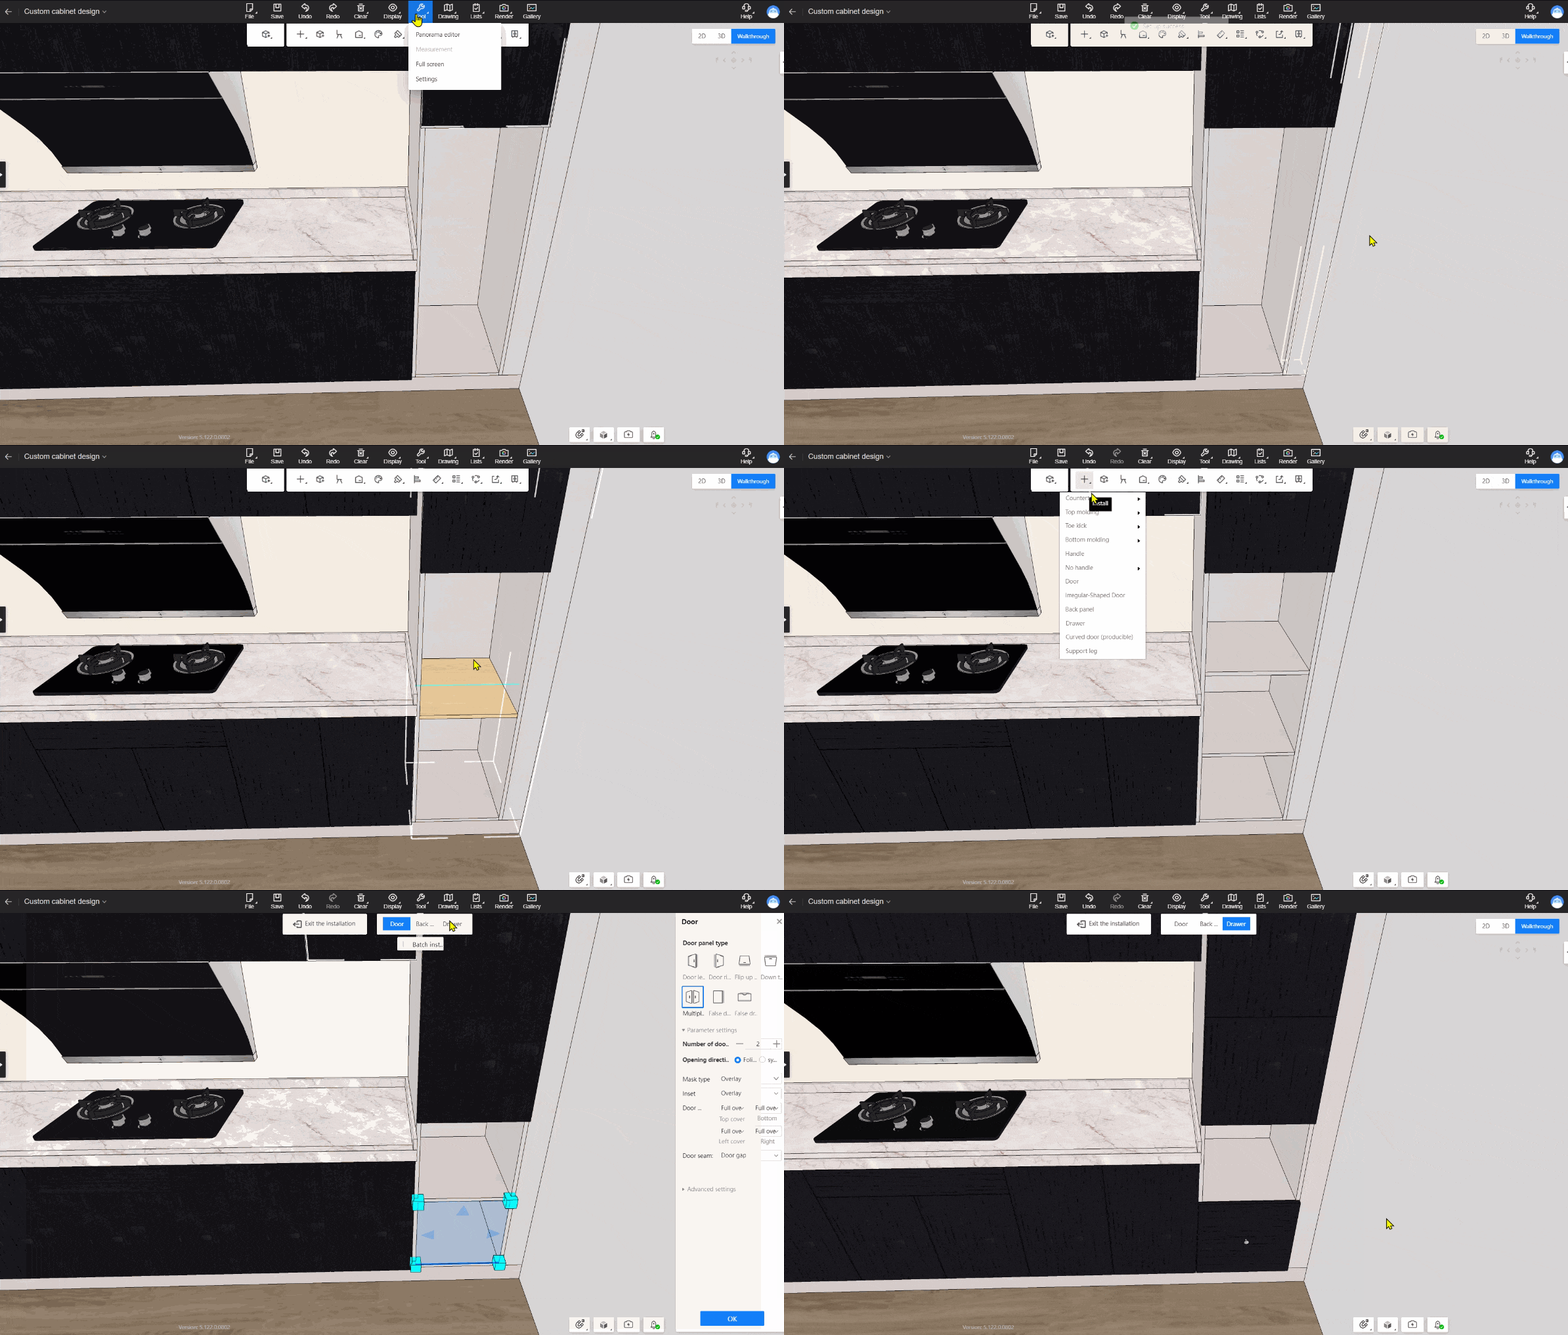
Feature Operations:
1.Open the customization mode.
2.Enable the feature switch: Tools - Settings - Whole House Customization-Add function pieces to inherit cabinet material, set to On.
3.Select cabinets, press G, add components, or generate door panels and drawers. They will inherit the existing material of the cabinets.
06 Merge parameter setting for no handle(for all) ---New Feature
Feature Introduction: Generate handle-less can set maximum division length and merge spacing for calculating values when merging handle-less profiles.
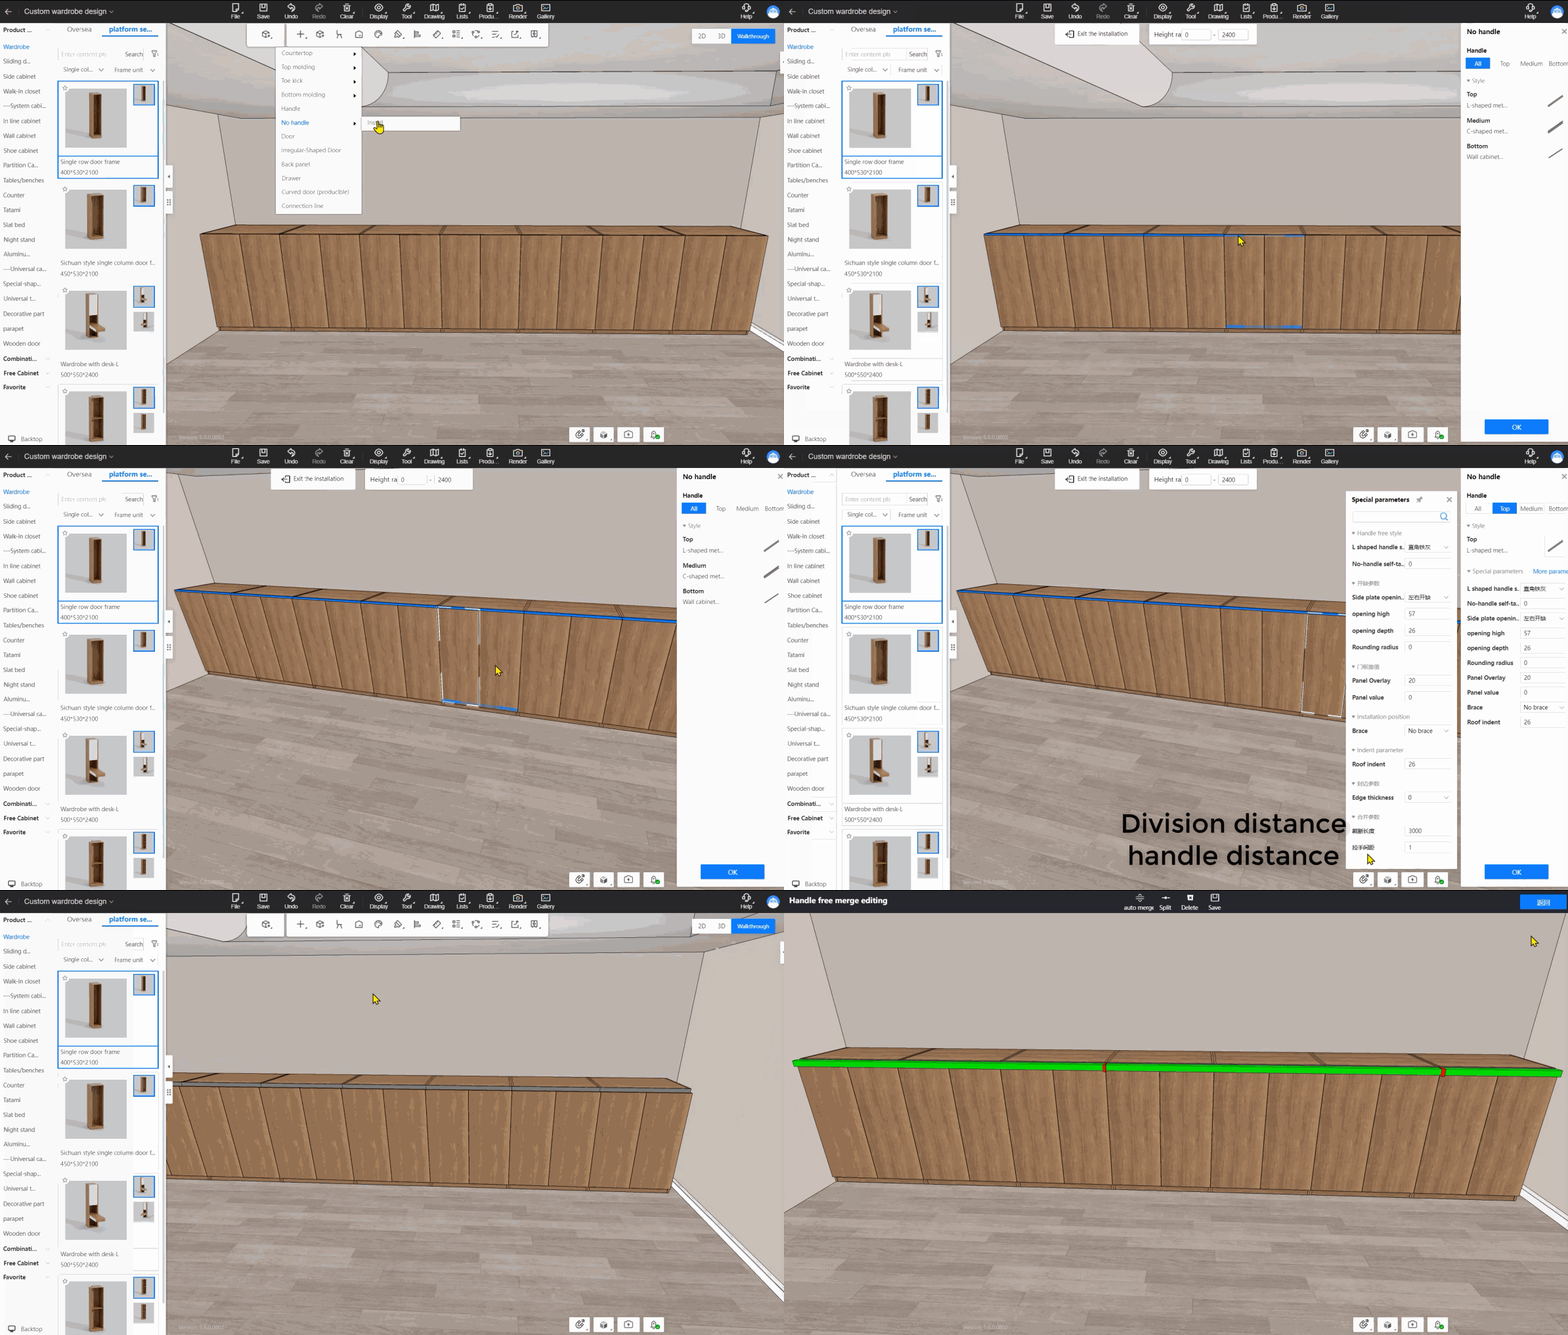
Feature Operations:
1.Open the cabinet custom mode.
2.Click on the top menu Installation-No Handle-Install
3.Select door panel line to install handle-less part and set parameters such as "division distance" and "handle distance" in the handle-less panel settings.
Auto Merge: Right-click the wall- all handles- Handle free merge editing, enter the merge interface, and click on the top menu for auto merging.
07 Display/hide switch for public library in panel shape editing(enterprise only)---New Feature
Feature Introduction: The public library for panel shape editing now includes a new display/hide switch.
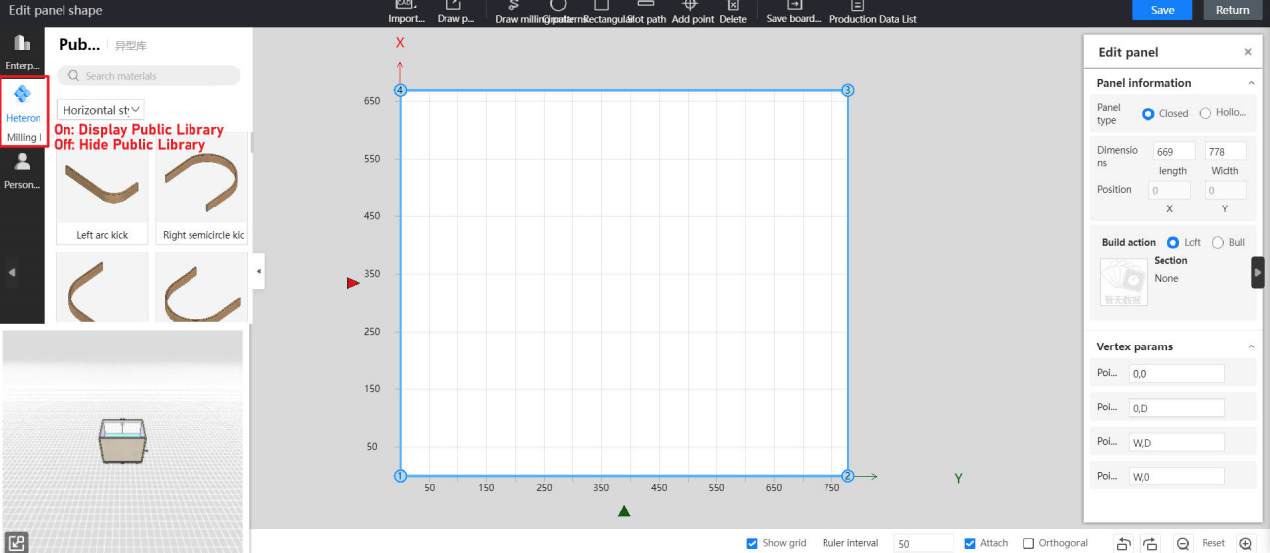
Feature Operations:
1.Access the switch settings: Workbench - Whole House Backstage Management - Advanced Customization Settings Management - 3D Function Settings - Panel Shape Editing.
2.By default, administrator accounts can modify switch settings.
Other accounts require the following permissions to modify switch settings: Workbench - Whole House Backstage Management - Advanced Customization Settings Management - 3D Function Settings: Edit, Browse.
08 Support English for door panel shrink value(enterprise only) ---New Feature
Feature Introduction: The global parameter for door panel shrinkage now supports system variables in English, and after the new system deployment, English will be the default value
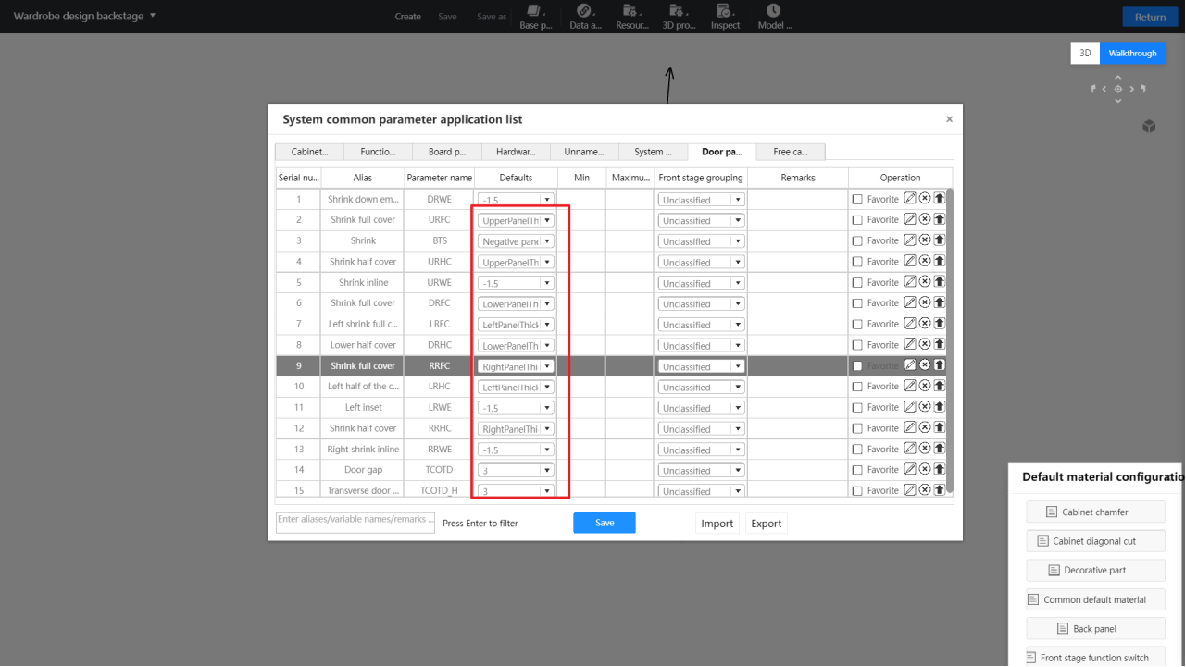
Issue Resolution: Previously, calculations used Chinese values, which could be translated incorrectly in the aihouse, leading to errors in door panel shrinkage calculations.
Feature Operation:
Parameters:
Upper plate thinckness:S_UPH
Bottom plate thickness:S_DPH
Left plate thinckness:S_LPH
Right plate thinckness:S_RPH
Neagtive plate thinckness:S_NEGH
09 Display height optimization for attribute editing panel(for all) ---Enhancement
Feature Introduction: 1.The activation of the attribute editing panel will display at the maximum height of the screen. 2.Moving and rotating are now separated into two distinct setting items.
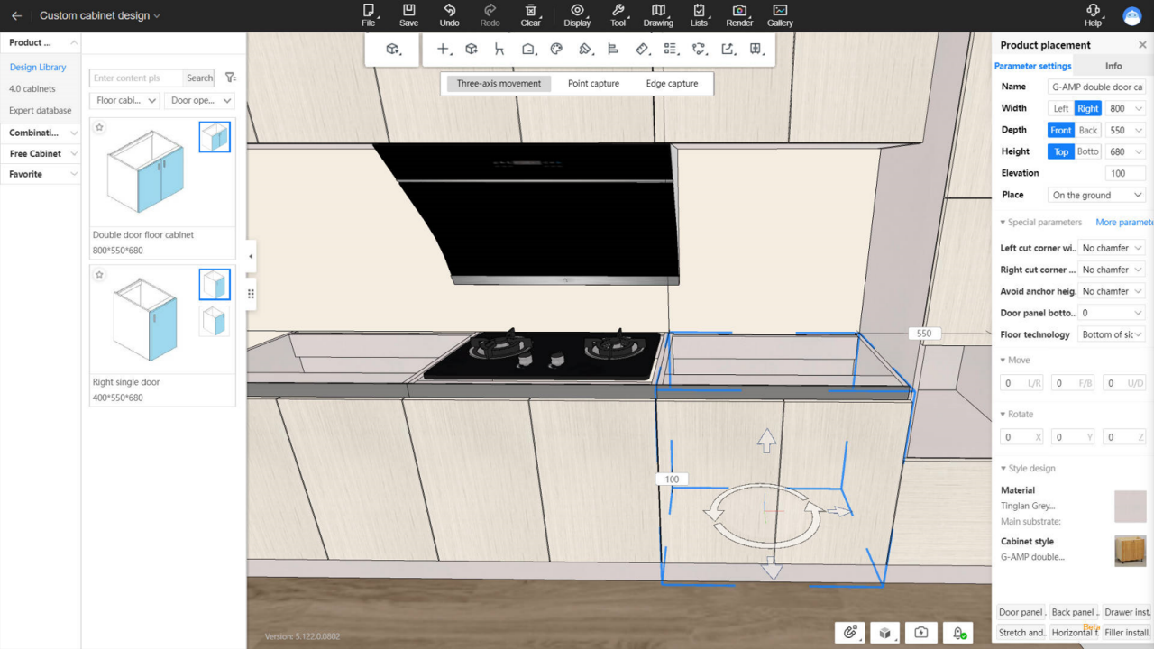
Feature Operation: None
10 Add editing panel for styles and materials for cabinets(for all) ---Enhancement
Feature Introduction:
1. Add multi-style and materials editing, supporting independent and batch modifications.
2. Add node indicators for quick navigation when handling numerous items.
3. Add shortcut key “Shift + T”.
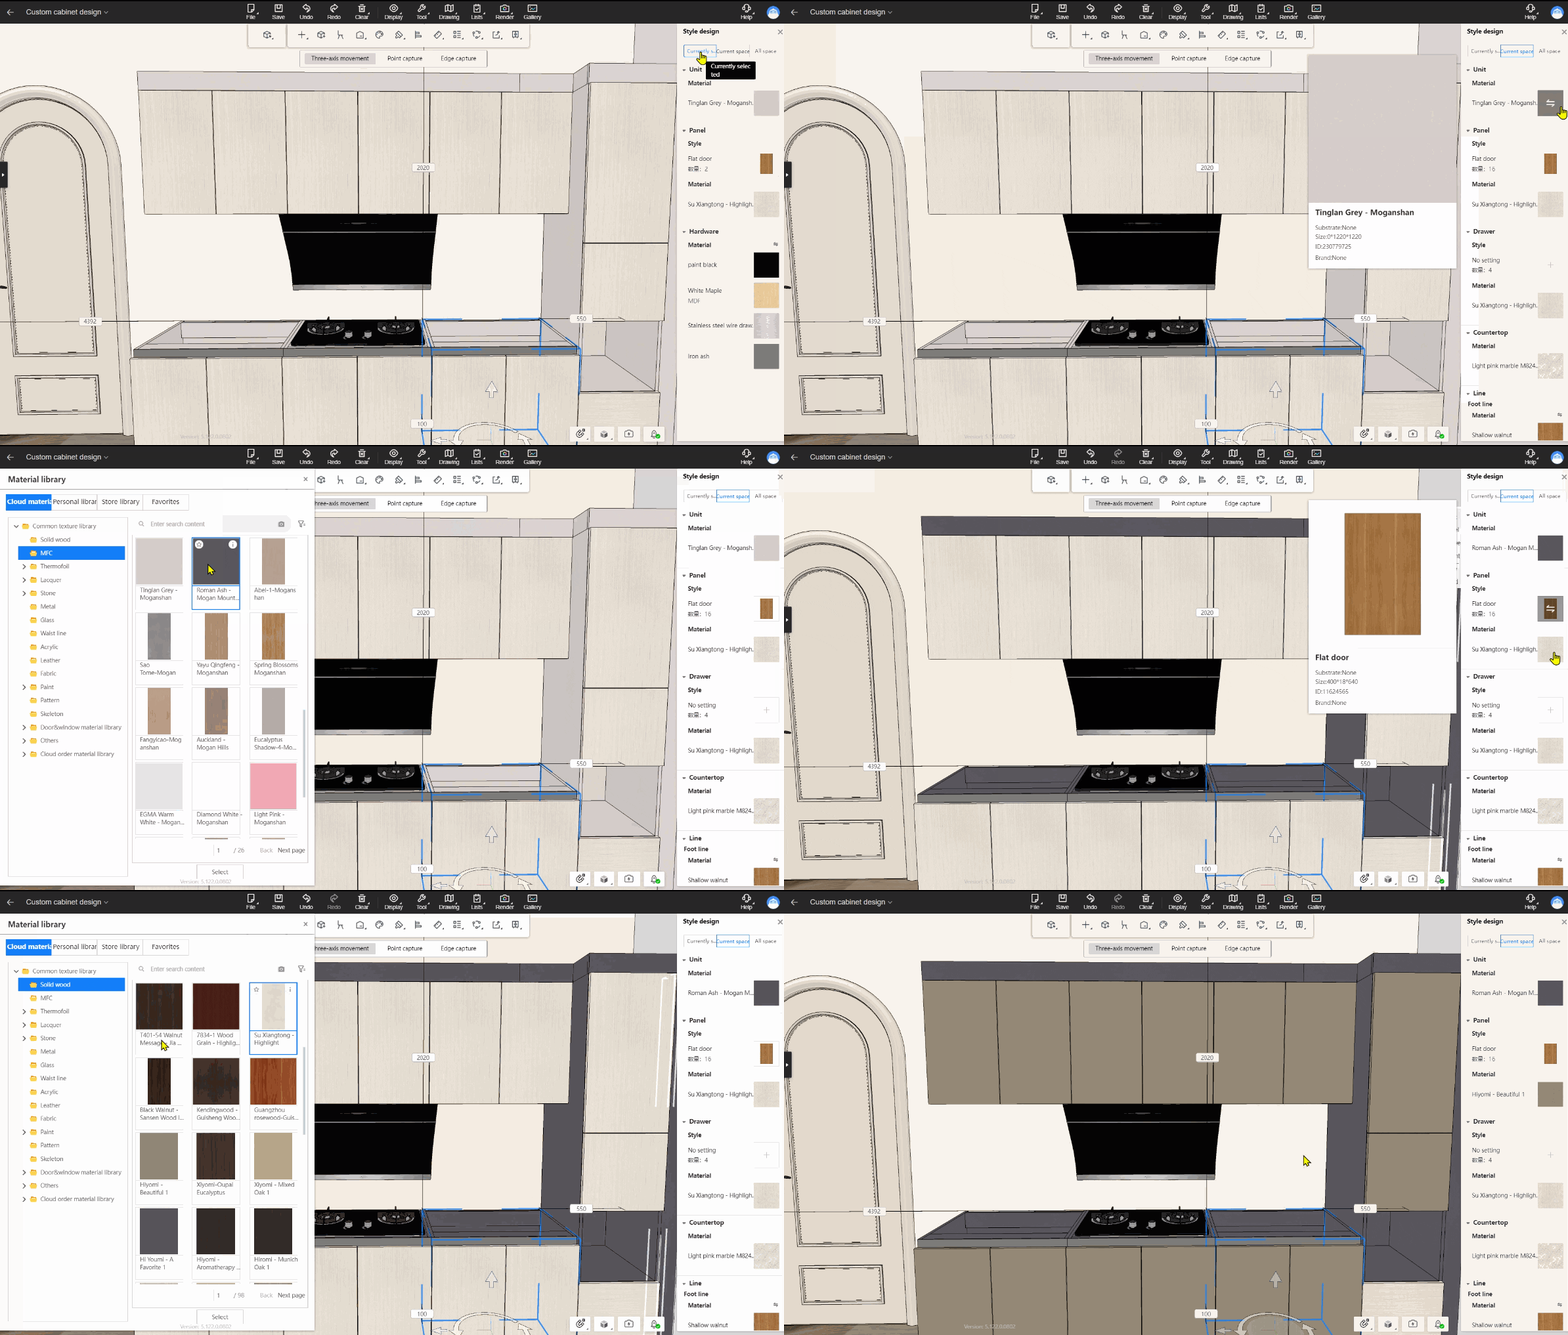
Feature Operation:
1.Open the customization mode.
2.Press shortcut key Shift + T or click on the top menu- Global Edit- Style replacement
11 Support selection of the inner cabinet to stretch and resize(for all)---New Feature
Feature Introduction:
1.In the stretch and resize mode, it's possible to select interior panels of cabinets for resizing or stretching.
2.The stretch and resize mode includes walls, columns, etc., as references during stretching.
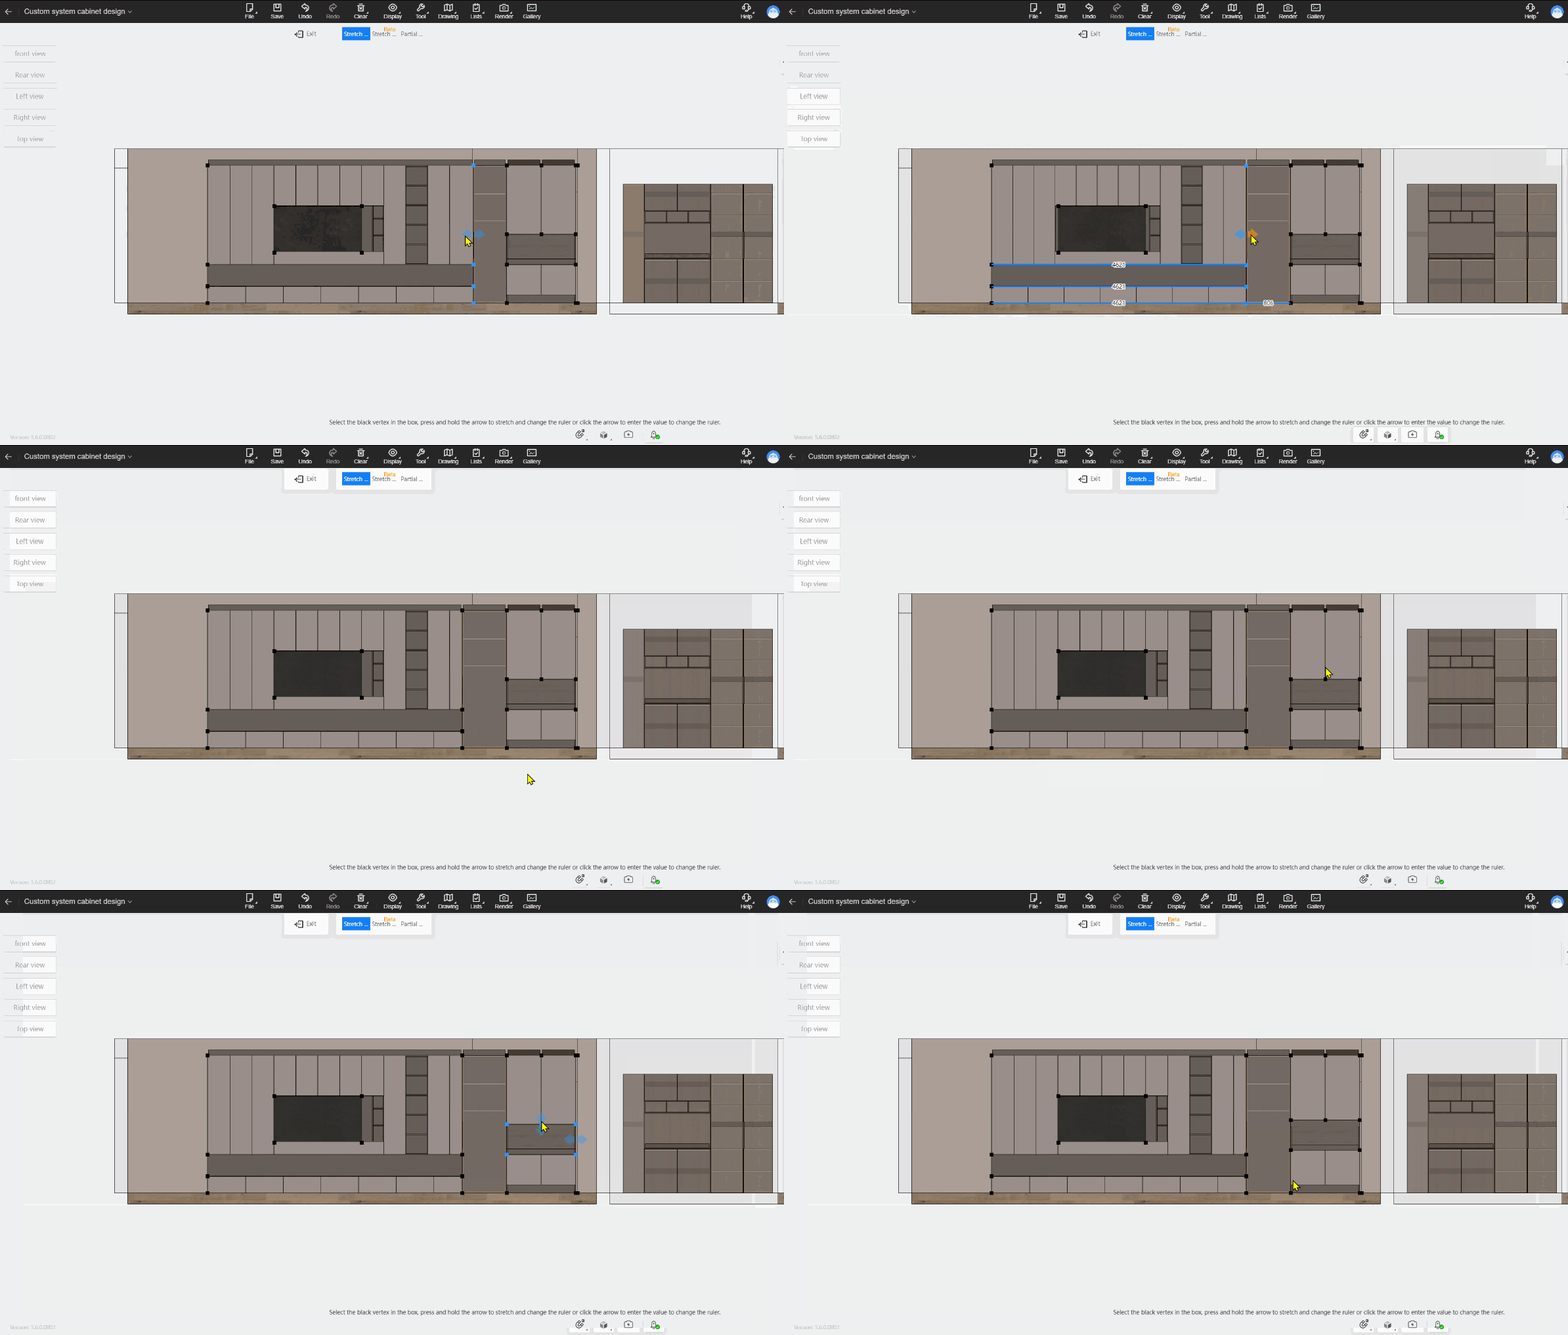
Feature Operation:
1.Open the customization mode
2.Select the cabinet, then click on the right panel to stretch and resize the cabinet in the stretch and resize mode.
Notes: 1.Stretched components do not participate in size adaptation. 2.Combination is not supported currently.
12 Integration of the entries for whole and partial stretch and resize functions(for all) ---Enhancement
Feature Introduction:
1.Integrate the whole and partial stretch and resize functions into a unified entry point; localize resizing can now be toggled at the top.
2.The top resizing mode retains its state, so subsequent clicks on "stretch and resize" on panels will enter the last selected mode.
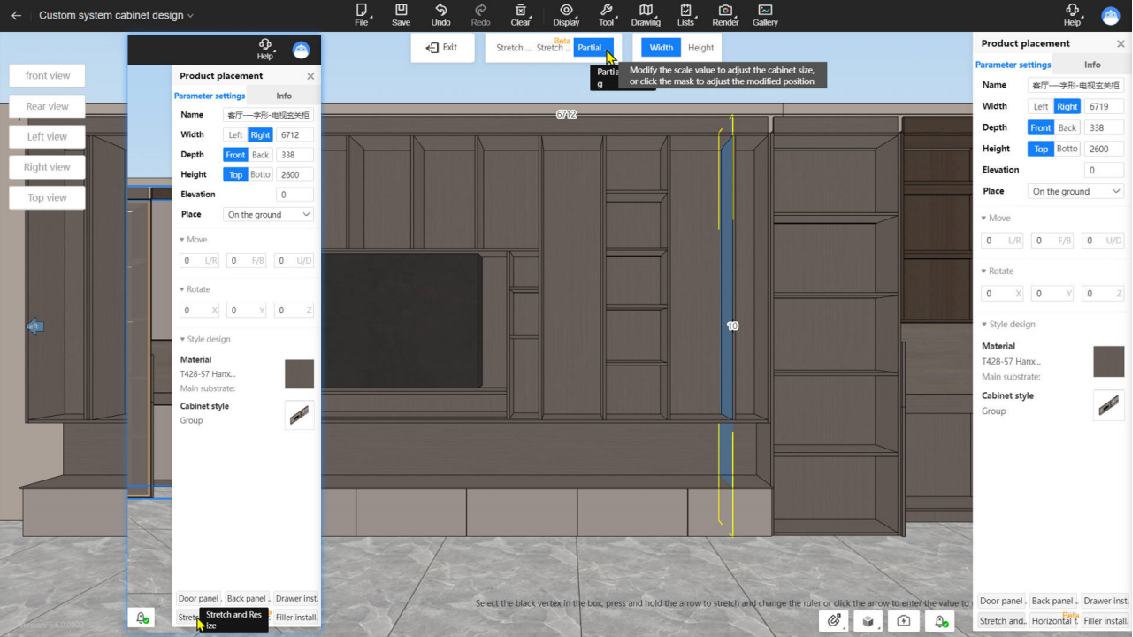
Feature Operation:
1.Open the customization mode
2.Select the cabinet, then click on the right panel to stretch and resize the cabinet in the stretch and resize mode.
13 Material brush for customed doors &windows(Personal only) ---Enhancement
Feature Introduction: Material Brush for Doors, Windows, Wardrobes, and Whole Wood modes
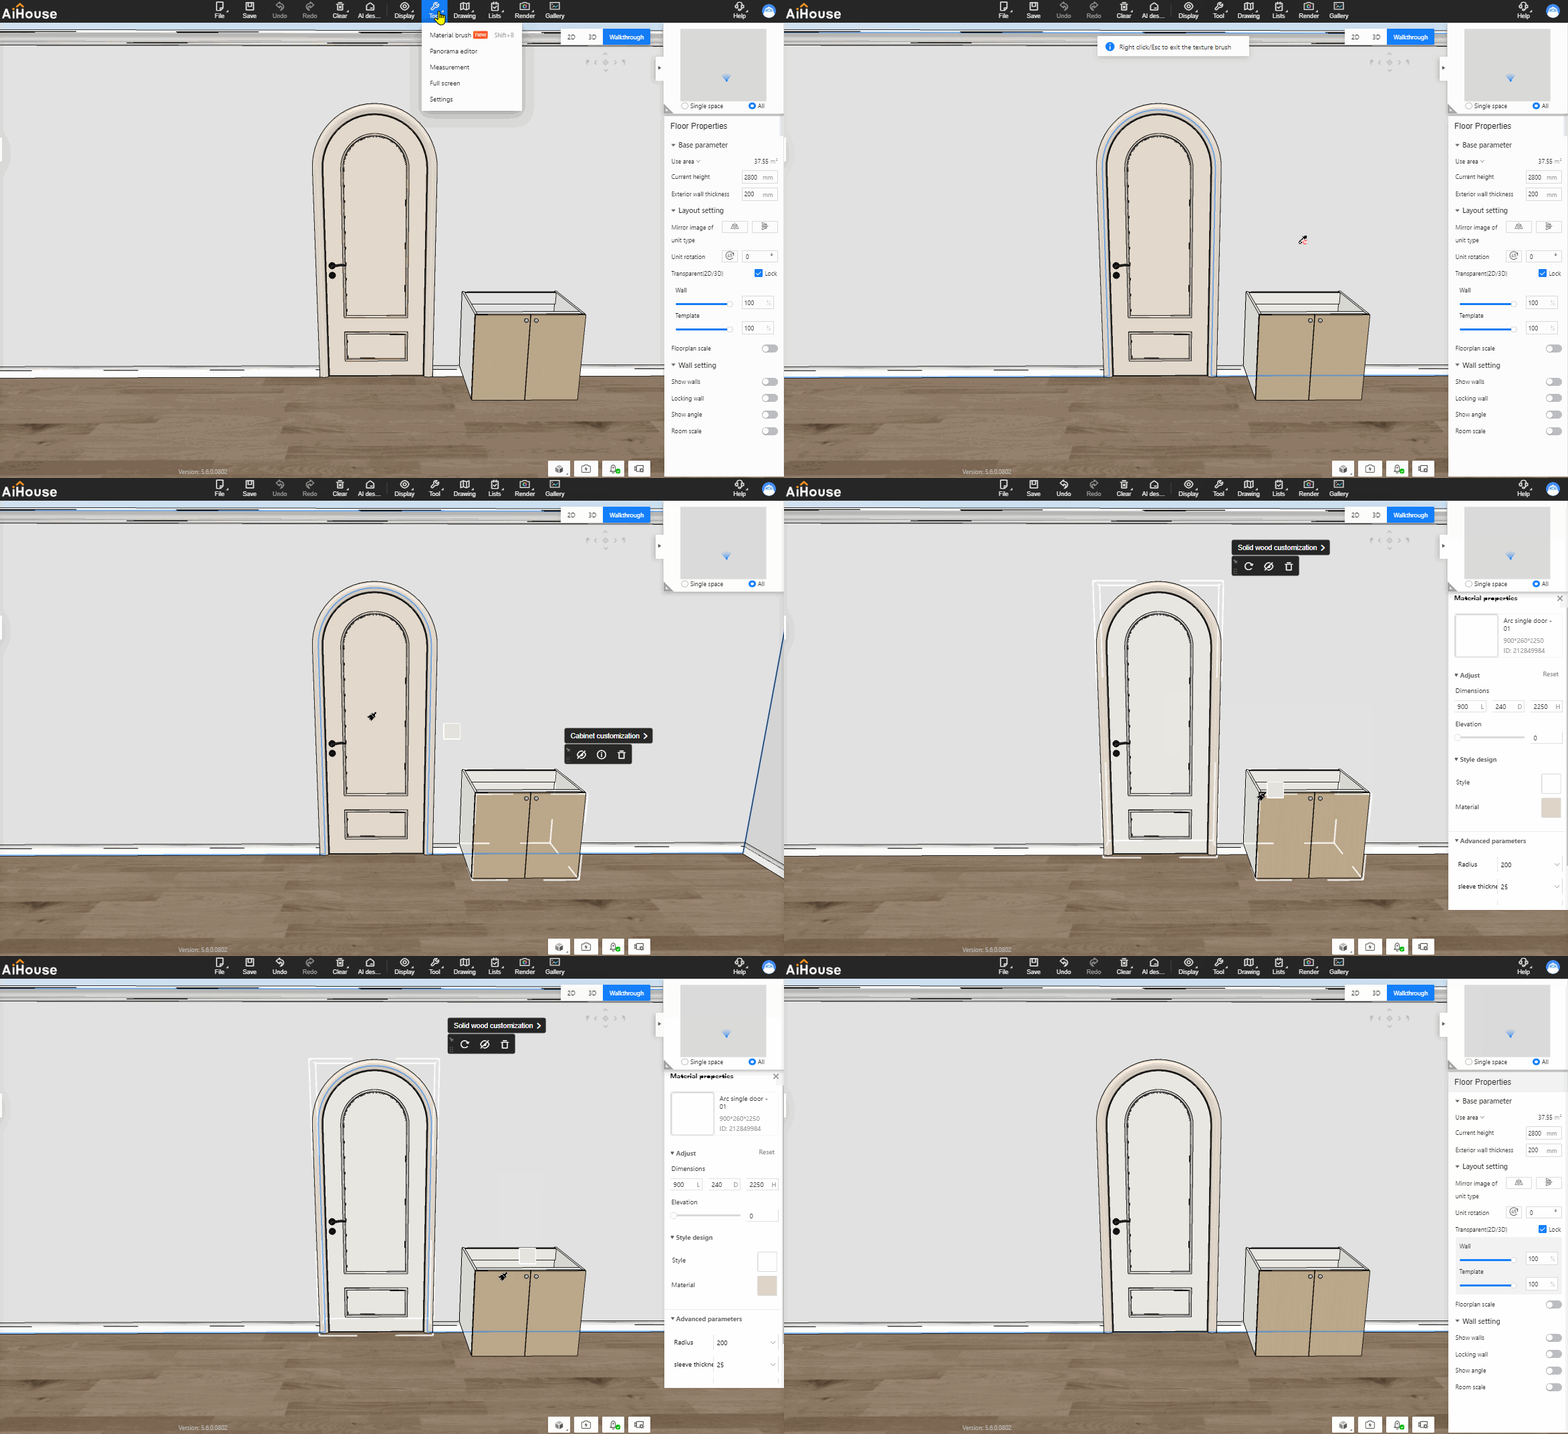
Feature Operation:
1.Open the 3D project.
2.Click on the basic top menu - Tool- Material Brush, or enter the wardrobe/whole wood module, click on the module menu - Format Brush - material brush.
3.Absorb the cabinet material, then click on doors, windows, or whole wood materials to apply the it.
14 Connection lines for wall panels(enterprise only) ---New Feature
Feature Introduction: Problem Solution: Wardrobe custom mode allows for designing door-wall cabinets and setting up connection lines for installing wall panels, satifying the real design scenarios of panel-style door-wall cabinets.
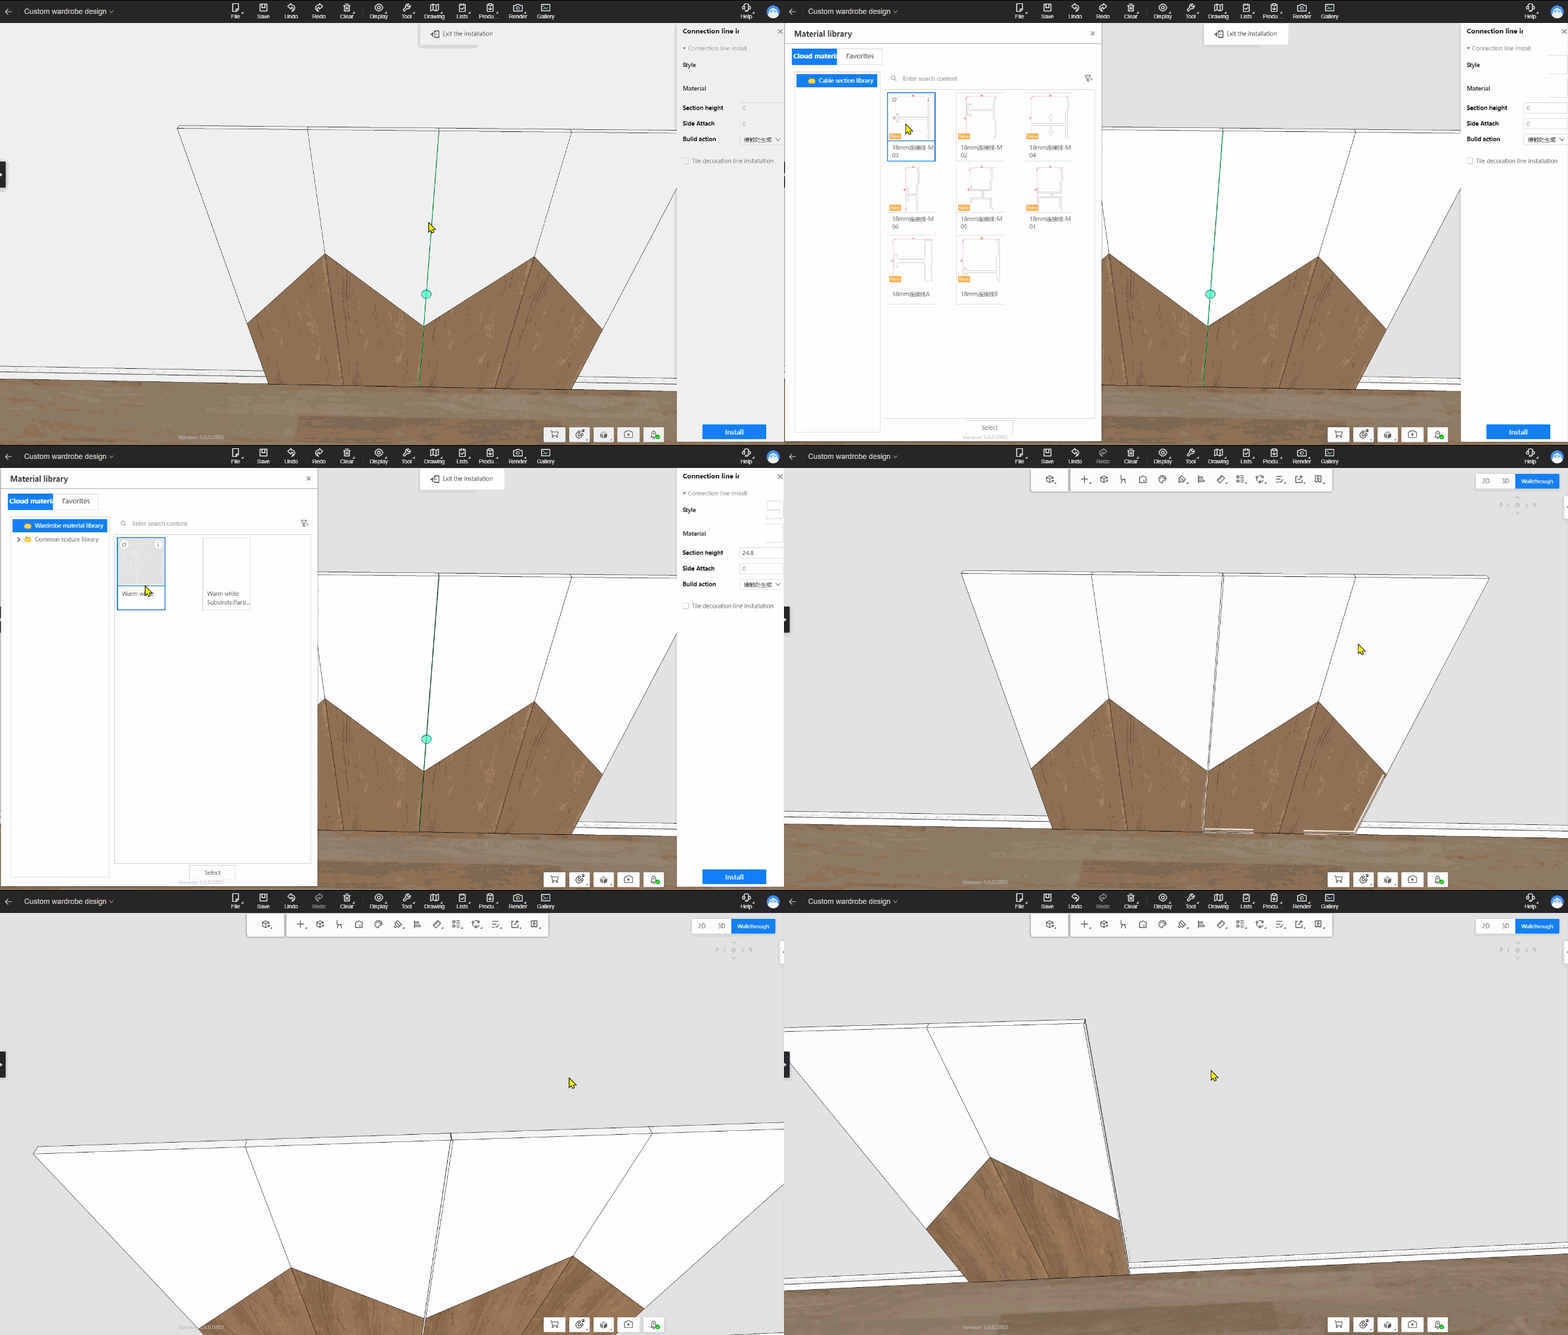
Feature Operation:
1.Open the customization project and enter the wardrobe custom mode.
2.Drag and drop multiple wall panels onto the wall, positioning them adjacent to each other.
3.Click on the wardrobe module's top menu, then on Installation - Connection Lines. Based on overlay display, set installation rules in the connection line panel: generate between panels/contact points.
4.Click to install. After generating the connection lines, the panel dimensions will be calculated and adjusted according to the rules.
15 Element measurement across modules(for all)---New Feature
Feature Introduction: Enhances interactive experience for element measurement, enabling measurements across modules to boost designer efficiency.
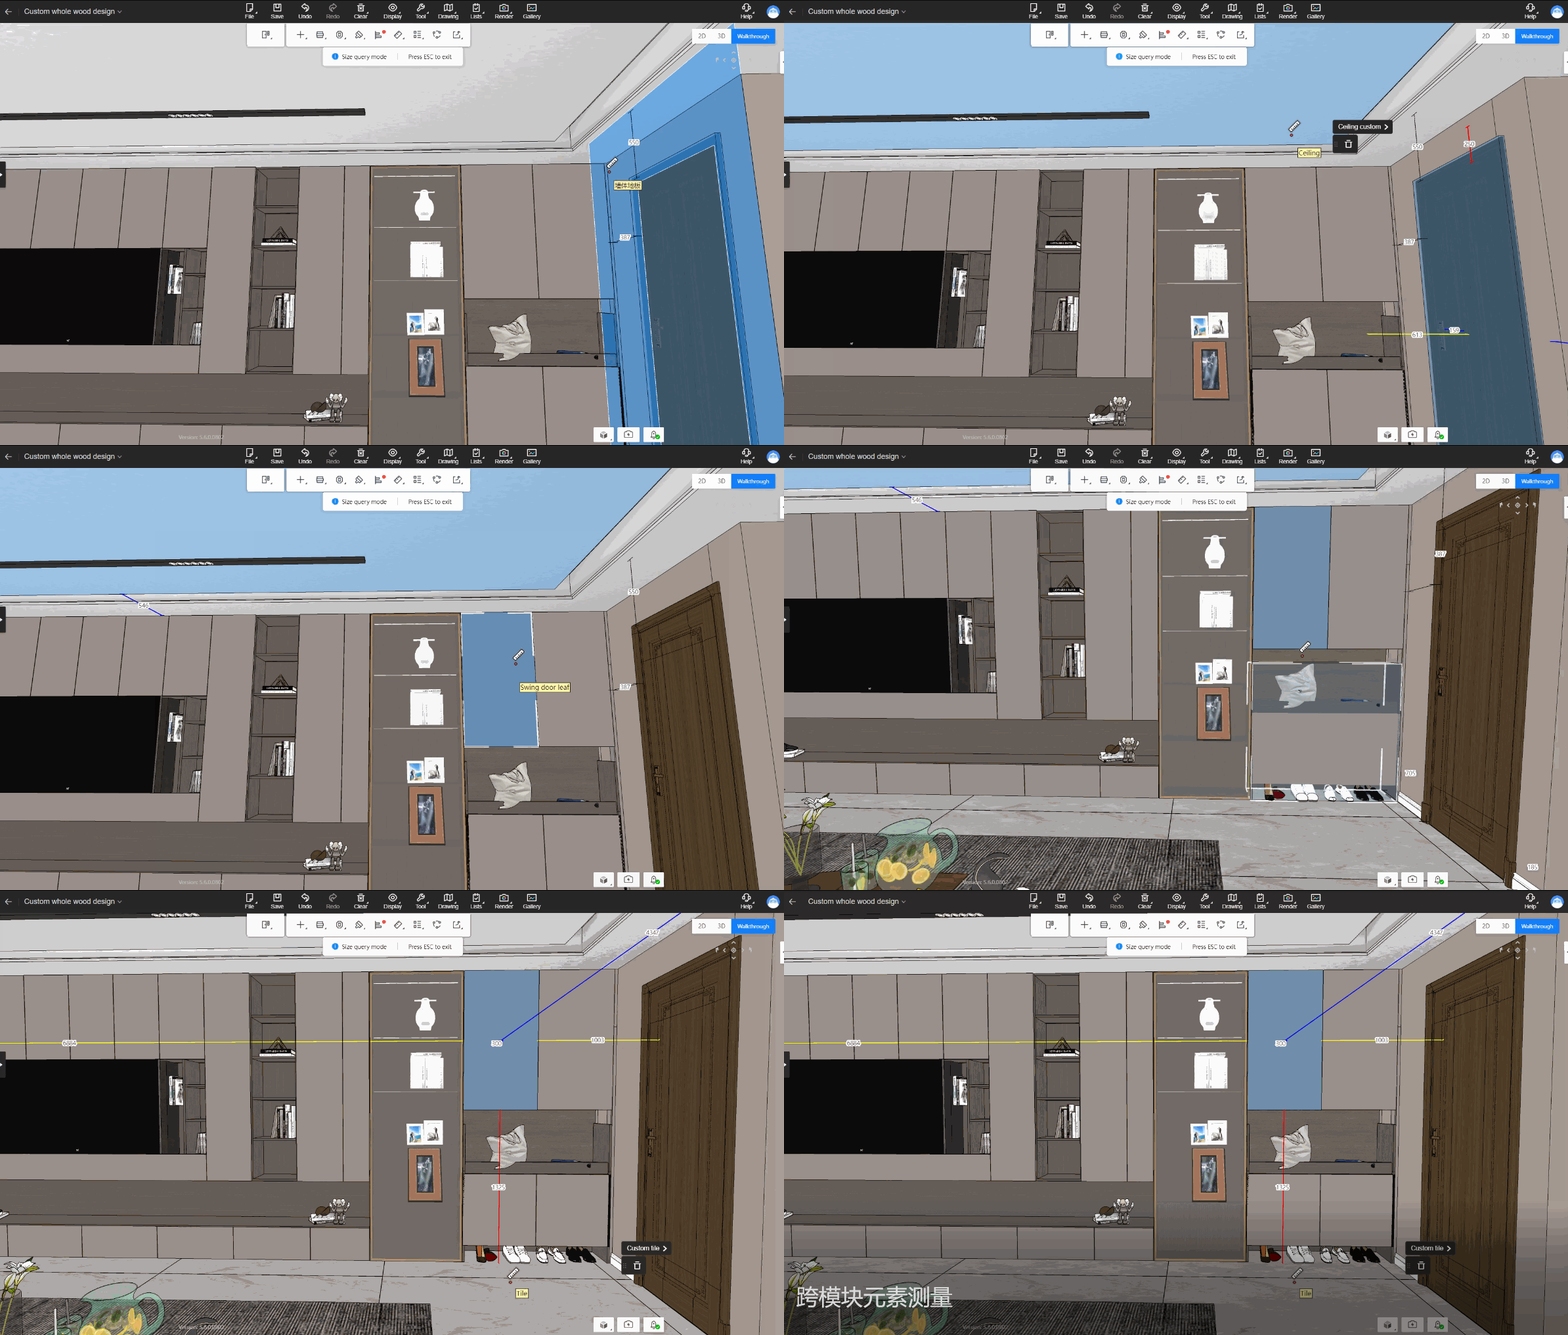
Feature Operation:
1.Open customization project and access cabinet mode.
2.Click module menu bar - Measure - Elements
3.Select Objects: (Supports measurement between ceiling, floorplan, tiling, cabinet customs), allowing multiple measurements.
16 Plate miter(for all) ---New Feature
Feature Introduction: Allow for designing panel and door panel miter processes in the customization module, meeting the market demand for angled cabinet designs and improving design efficiency.
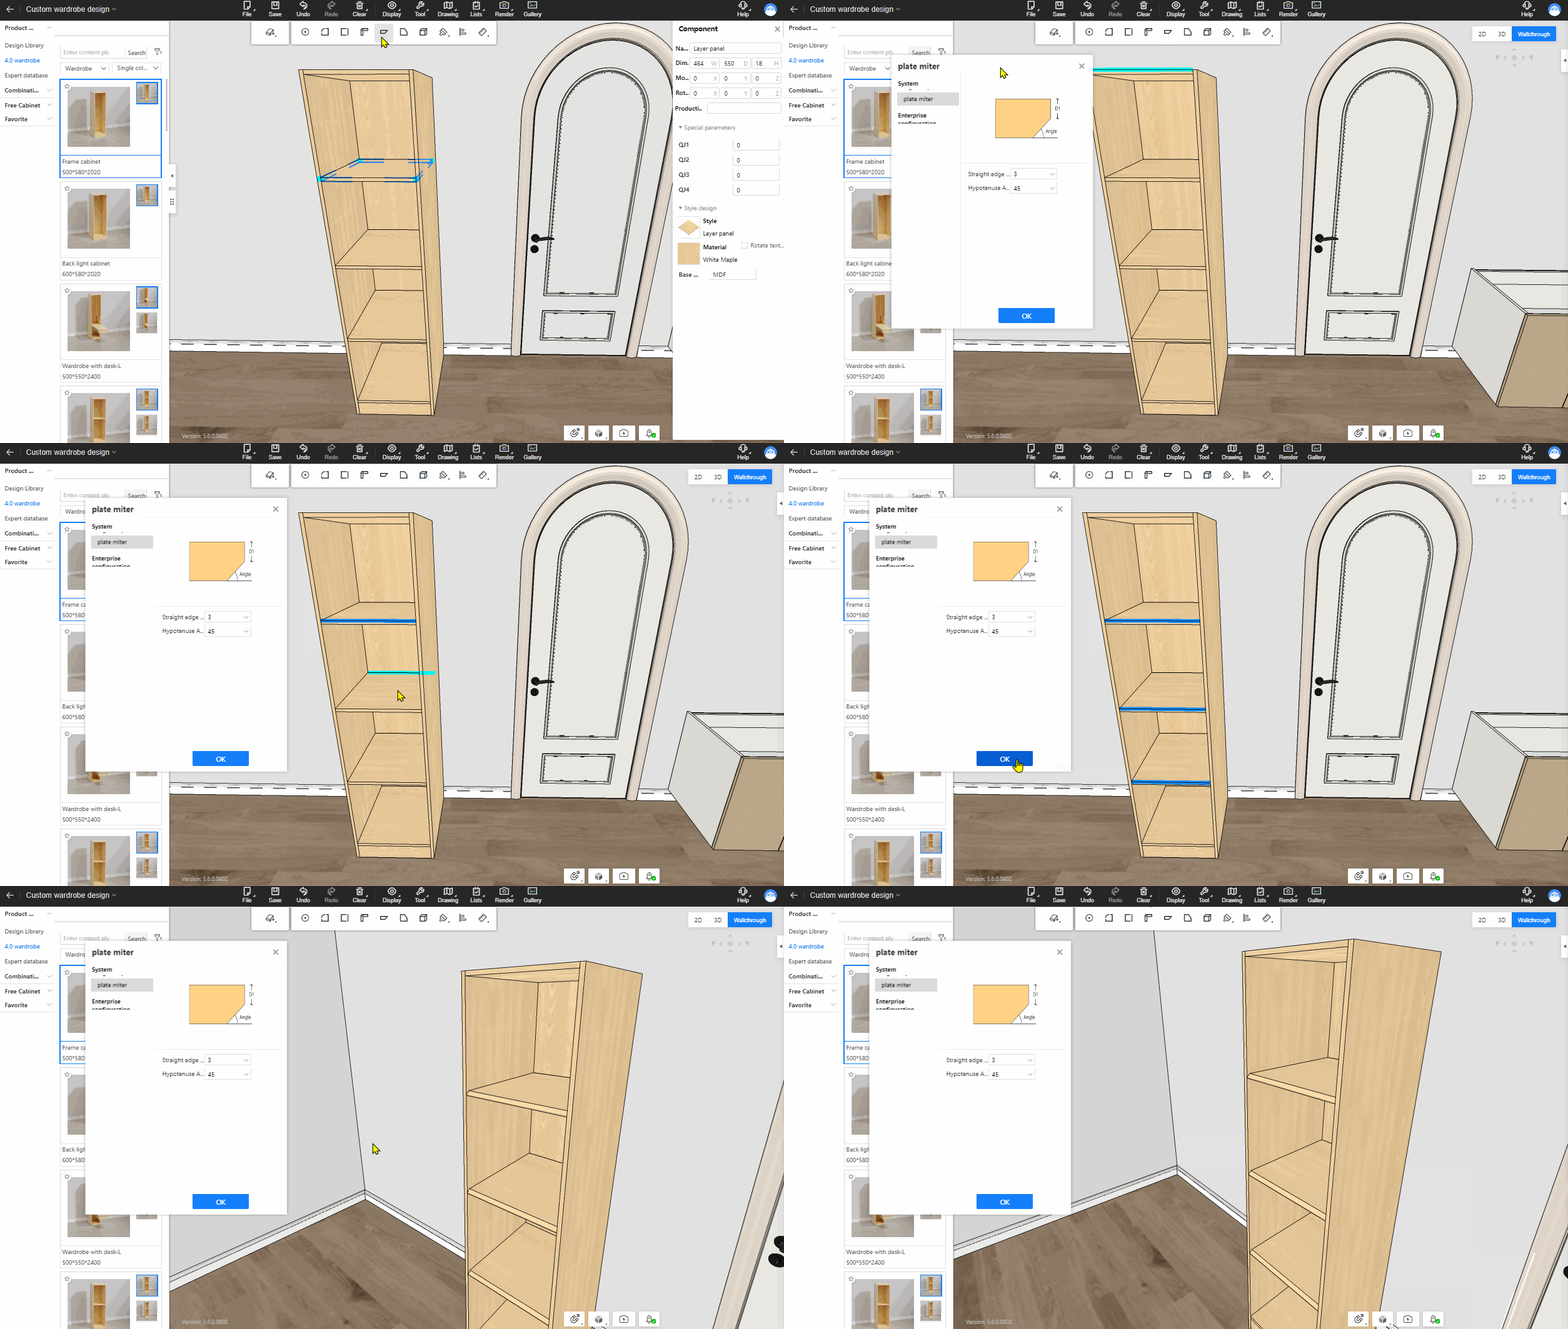
Feature Operation:
1.Open the cabinet custom mode
2.Enter panel selection mode (B), click on the top menu to enter miter mode, select the edge of the panel requiring miter in the scene, and set the desired miter process.
3.After confirming, the panel edge will be mitred according to the configured process settings.
Note: Personal users can directly apply the miter process. Enterprises users can configure the desired miter processes in the backstage (backstage-resource configuration-process configuration-plate miter configuration)
17 Customed material recognizing of the top molding (for all) ---Enhancement
Feature Introduction: Allow for designing door-wall cabinets in the wardrobe/whole wood custom module, ensuring proper display of door frames and wall panels without overlapping with the ceiling corner lines of the house layout.
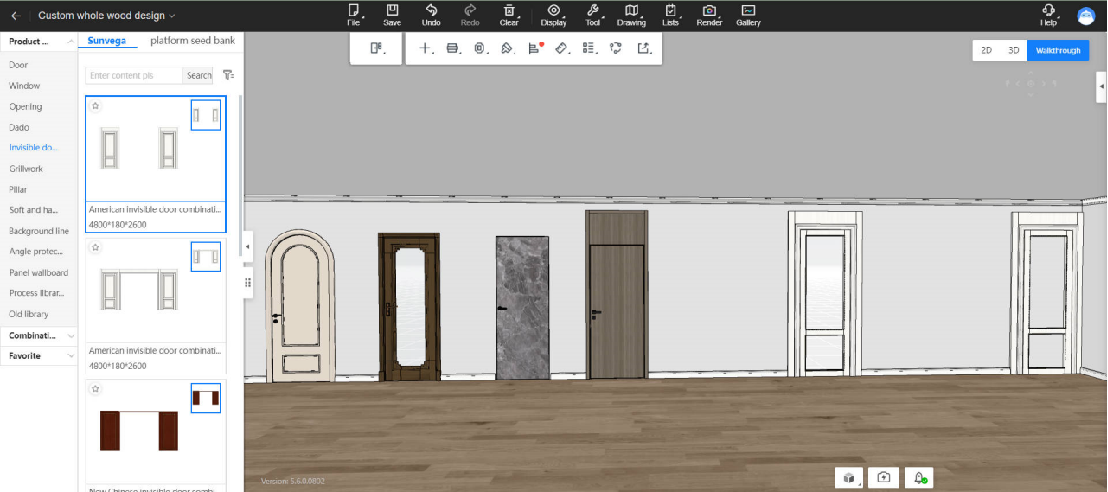
Feature Operation:
1.Open the customization mode (cabinet&whole wood module).
2.Drag and drop wooden doors/wall panels onto the wall and they will not overlap with the ceiling corner lines of the house layout.
18 Opening of Aluminum doors and windows custom mode (for all) ---New Feature
Feature Introduction: The custom mode for aluminum doors and windows is opening.
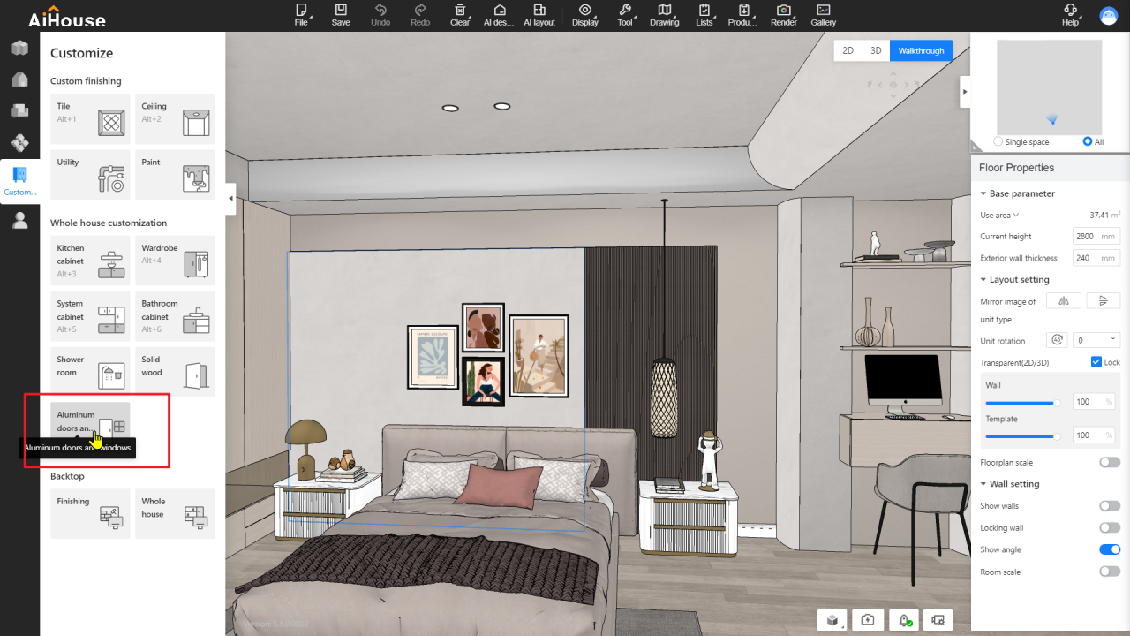
Feature Operation: Entry: Go to the left panel-customize-aluminum doors and windows