Feature Update Release - December 2024
01. Basic Operations Collection
1.Saving & Local Backup: When saving a project or exporting locally, the lighting scheme is now saved simultaneously.
2.Quick Collection in Cloud Library: Easily favorite assets for quick access.
3.Cloud Library Asset Details Page (Major Update): Enhanced asset preview and information display.
02. Lighting & Rendering Collection
1.Custom Material Texture Upload: Users can now upload their own textures for enhanced customization.
2.Texture History: View and reuse previously used textures in the material library.
03. Aluminum Doors & Windows Collection
1.New Equal-Division Markers: Center mullion drawing now supports three equal-division markers for precise placement.
2.Enhanced Snap Logic for Dragging Mullions: Mullions now snap into place, and batch adjustments are supported for mullions of the same height.
3.Adjustable Platform Height in Infinite Canvas Mode: Users can now input a platform height for display.
4.3D Preview Enhancements: Now supports wall model display for better visualization.
5.Quick Placement with Double-Click: Double-clicking the frame icon instantly places and generates the component.
6.Wrapped Frame Drawing: Supports customized frame wrapping for door and window designs.
04. AI Layout Collection
1.AI Layout Plans Can Be Shared: Users can now share layout plans with others.
05. Whole Home Customization Collection
1.Partitioning for Parametric Cabinets: Cabinets now support custom board division.
2.Multiple Asset Applications: The left-side panel now supports multiple asset circles for quick application.
3.Angled Cutting for Door Panels & Drawer Fronts: Supports precise slant cuts for custom panel designs.
4.Cabinet & Door Panel Review Filters: Users can now filter and select specific spaces during review.
5.Focused Review Mode: The design environment now supports focused review sessions.
6.Multi-Door Installation Editing: Allows front-end editing and removal of neutral panels.
7.Dropdown Selection for Width, Depth & Height: Improved usability for whole-wood customization (for enterprise users).
8.Default Base Material for Replacements: When replacing materials, the first base material is now set as default (for enterprise users).
9.Special Parameter Naming in Board Modeling: Special parameters now display their names for easier identification.
10.Character Limit Warning for Product Names: If a product name exceeds 30 characters, a warning prompt will appear.
11.Popup Reminder for Unlinked Assets in Combination Orders: If an order includes unlinked assets, a reminder will be displayed (only available in AiHouse Advanced).
12.New Node Selection Checkbox for Slot Data: Users can now specify whether a node is included in the slot data (only available in AiHouse Advanced).
13.Hole Positioning for Curved Panel Installation: Automatically generates hole positions for curved panel contact surfaces (only available in AiHouse Advanced).
06. Backend Library Management
1.Multi-Selection & Search for Material Packages: Users can now select multiple materials and search within material packages (for enterprise users).
2.Version History & Recycle Bin for Material Packages: Added version tracking and a recovery option for deleted material packages (for enterprise users).
01. Basic Operations Collection
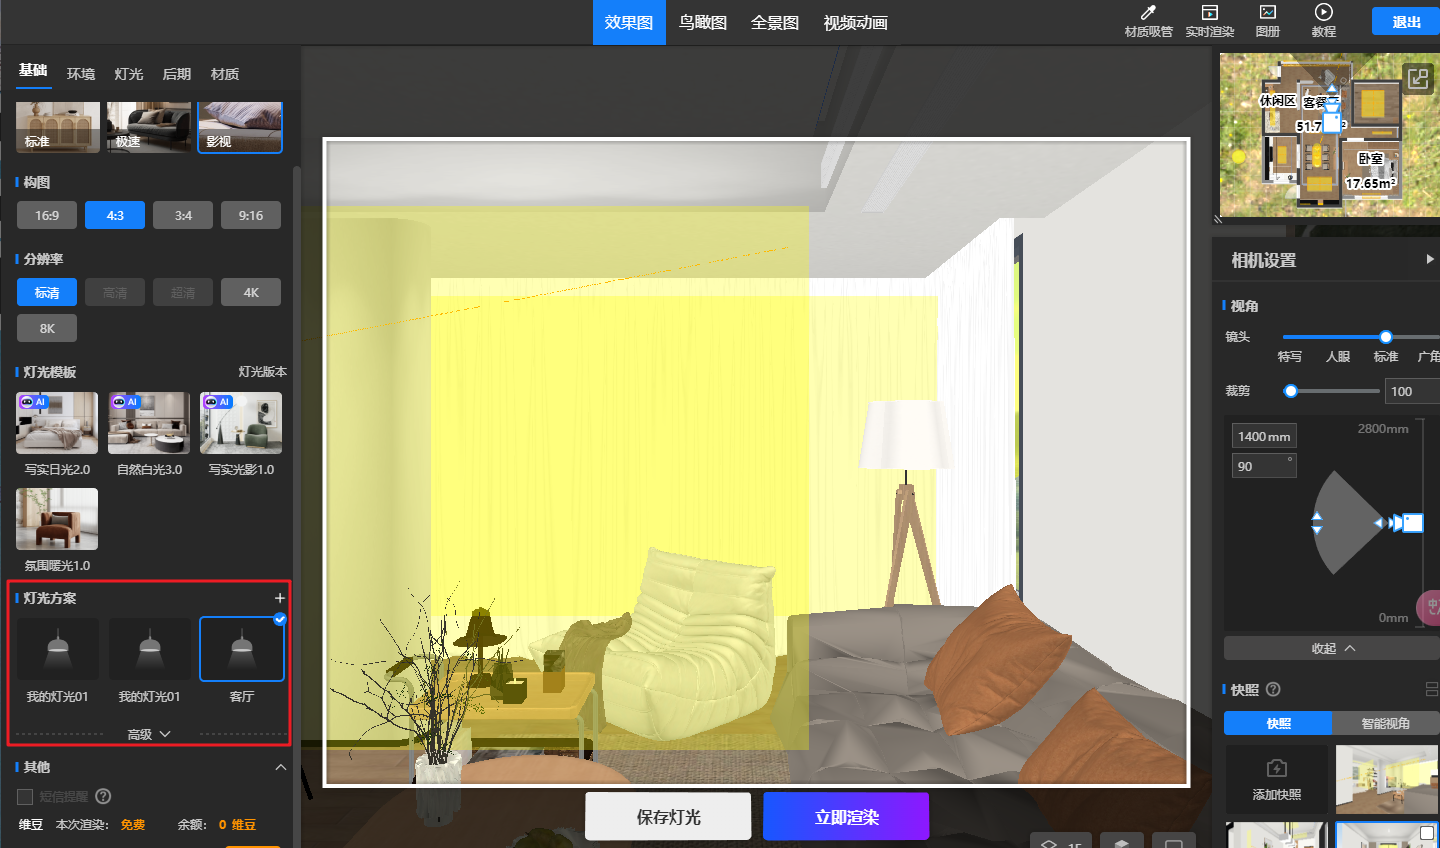
1. Save and Export with Lighting Scheme
Feature Highlights:
-
The lighting scheme is now saved along with the design, making it easier for future adjustments.
Problem Solved:
-
Previously, when users saved or exported their projects, the lighting templates were lost upon reopening.
Value:
-
Eliminates the need to reconfigure lighting every time a project is reopened.
2. Quick Collection in Asset Plaza
Feature Highlights:
-
One-click collection without having to manually select a category each time.
Value:
-
Simplifies the process of saving assets for quick access.
How to Use:
-
Access: Go to Asset Plaza via the left navigation menu.
-
Hover over an asset’s collection icon—a lightning-shaped "Quick Collect" icon will appear.
-
Click "Quick Collect" to automatically save the asset to the last selected category.
3. Enhanced Asset Details Page (Major Update)
Feature Highlights:
-
Group Model Display: View and switch between the full group model and individual components.
-
Drag Assets Directly: Drag assets from thumbnails or enlarged previews straight into the canvas.
-
Multiple Viewing Options: View model images, product images, and 720° previews.
-
User Interactions: Leave feedback, save, like, or edit assets.
-
Similar & Related Asset Suggestions: Easily discover similar or related assets.
Value:
-
Centralizes all asset-related functions in one place for easier navigation.
Before:
After:

How to Use:
-
Access: Open Asset Plaza via the left navigation menu.
-
Hover over an asset’s "Info" icon to open the details page.
-
Drag assets from thumbnails or enlarged previews directly onto the canvas.
-
Switch between views: Click on model images or product images, or enter 720° mode for an immersive preview.
-
Interact with assets: Provide feedback, save, or like assets.
-
Edit compatible assets: Click "Edit Model", modify it, and publish your updated version. The edited asset will be saved in "My Models" under Asset Plaza.
-
Discover related assets: Click "Similar Recommendations" or "Related Recommendations" to explore more options.
02. Lighting & Rendering Collection
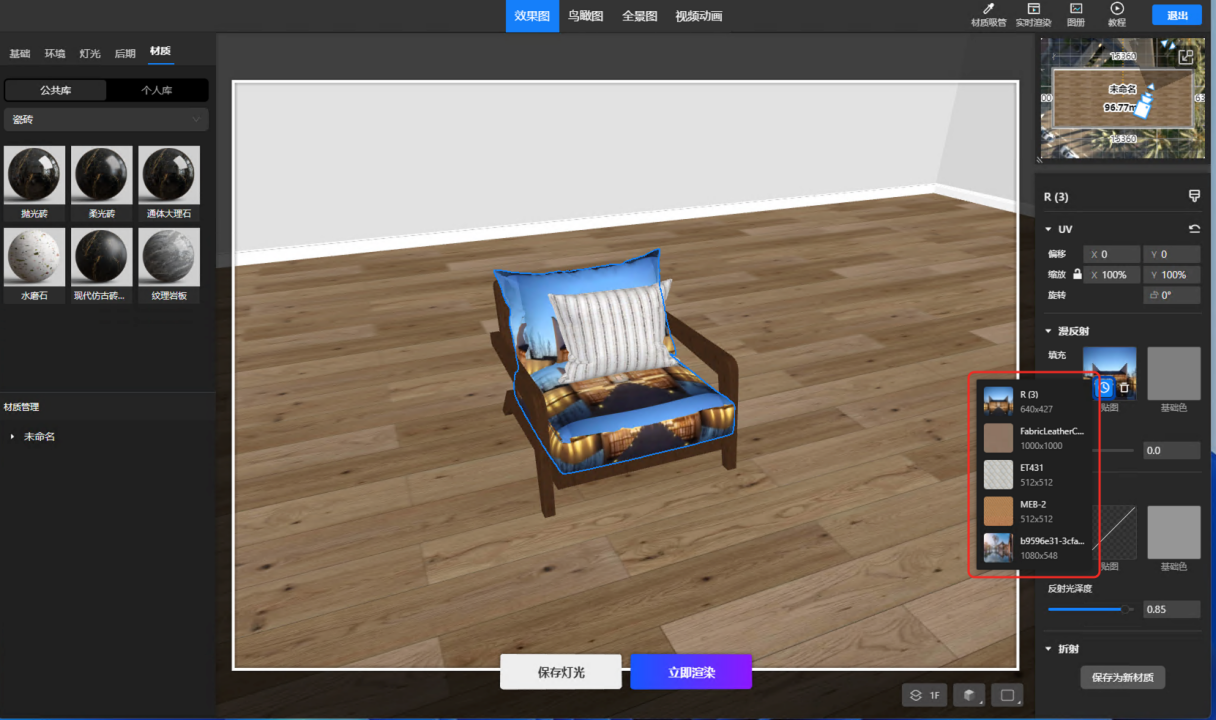
1. Custom Material Texture Upload
Feature Highlights:
-
Users can upload custom textures, removing reliance on the cloud asset library.
Problem Solved:
-
Addresses the limited texture selection in the cloud library.
-
Enables modification of material textures, which was previously restricted.
Value:
-
Provides greater control over material customization, making it easier to achieve the desired visual effects.


How to Use:
-
Open a project and enter the Rendering Module.
-
Select a model and click on the Material tab in the top-left.
-
Drag a material onto the surface you want to modify.
-
Open the Material Editing Panel (double-click the model if the panel isn’t visible).
-
Click on any texture attribute to open the Texture Replacement Panel.
-
Hover over the image display area, then select a local texture file.
-
Once uploaded, the texture will be applied to the model automatically.
2. Material Texture History
Feature Highlights:
-
Each material attribute now keeps a history of the last 5 used textures.
Value:
-
Speeds up material adjustments by allowing quick comparisons between previously tested textures.
How to Use:
-
Open a project and enter the Rendering Module.
-
Select a model and click on the Material tab in the top-left.
-
Drag a material onto the surface you want to modify.
-
Open the Material Editing Panel (double-click the model if the panel isn’t visible).
-
Click on any texture attribute to open the Texture Replacement Panel.
-
Replace textures multiple times to generate a usage history.
-
Hover over the texture attribute, and a small history icon will appear in the bottom-right corner.
-
Note: The history feature will only appear after multiple texture replacements. If textures haven’t been changed multiple times, there will be no history record.
03. Aluminum Doors & Windows Collection
1. New Equidistant Guide Points for Mullion Placement
Feature Highlights:
-
When placing mullions, equidistant guide points (thirds and quarters) are displayed.
-
The cursor snaps to these points for precise placement.
Problem Solved:
-
Eliminates the need for manual adjustments with rulers after placement.
-
Enhances efficiency when dividing areas evenly with mullions.
Value:
-
Speeds up the mullion placement process.
-
Improves overall window and door design efficiency.
2. Improved Mullion Dragging with Snapping & Batch Adjustment
Feature Highlights:
-
Mullions now snap to existing ones when dragged.
-
After placement, mullions align automatically with snapped objects.
-
Batch adjustments are available for mullions of the same height.
-
The system detects collisions between objects to ensure accuracy.
Problem Solved:
-
Previously, users had to manually adjust rulers for alignment.
-
Now, snapping and batch editing enable faster and more precise design adjustments.
Value:
-
Reduces time spent on setting mullion widths and heights.
-
Enhances the drag-and-drop interaction for smoother editing.
-
Batch adjustment minimizes repetitive work, significantly improving efficiency.

3. Floor Height Display in Infinite Canvas Mode
Feature Highlights:
-
Floor height indicators can now be set and displayed.
-
Users can customize floor height visibility (show/hide).
-
Supports up to 600mm height; if exceeded, sectional connections are displayed.
Problem Solved:
-
Previously, floor height settings were unclear, making placement difficult.
-
Now, visualized floor heights help users understand the real-world placement of windows and doors.
Value:
-
Enhances floor height visibility for better placement accuracy.
-
Syncs with 3D wall previews, providing a realistic view of the design.

4. 3D Preview Now Supports Wall Models
Feature Highlights:
-
3D preview now displays walls based on door and window placement.
-
Shows door/window alignment within walls (inner wall, center, outer wall).
-
Displays wall thickness alongside the 3D wall model.
Problem Solved:
-
The previous 3D preview lacked structural accuracy, making it hard to visualize installations.
-
Now, users can see a realistic representation of windows and doors in walls.
Value:
-
Enhances the 3D preview, providing a clearer and more realistic design representation.
5. Double-Click Frame Icon for Quick Placement
Feature Highlights:
-
Double-click a frame icon in the left asset panel to instantly place it.
-
The system automatically determines the placement area based on the current canvas view.
-
If the canvas is visible, the frame is placed at the center of the visible area.
-
If the canvas is outside the view, the view resets to center, and the frame is placed in the middle.
Problem Solved:
-
Streamlines frame placement, reducing manual adjustments.
Value:
-
Optimizes placement workflow, improving design efficiency.

6. Wrapped Frame Design
Feature Highlights:
-
In real-world construction, most doors and windows require wrapped frames that extend around the structure.
-
The system now allows users to wrap doors/windows based on wall thickness and design parameters, ensuring an aesthetic and structurally accurate result.
Problem Solved:
-
Previously, wrapped frames couldn’t be designed, limiting customization.
Value:
-
Expands design capabilities, improving software functionality.
-
Addresses a high-demand feature, increasing user satisfaction.

How to Use:
-
Open a project and enter the Aluminum Doors & Windows module.
-
Design the door/window first.
-
Apply the wrapped frame around it.
-
Complete the design.
04. AI Layout
1. AI Layouts Now Support Sharing
Feature Highlights:
-
AI-generated layout plans can be shared via a generated link. Clients can access the design on any device, including PC and mobile.
-
Link-sharing supports permission settings, expiration dates, and privacy controls.
Problems Solved:
-
Previously, layout plans couldn’t be shared or reused efficiently, limiting accessibility and hindering team collaboration.
-
This update improves the sharing and accessibility of AI-generated layouts.
Value:
-
Increases efficiency in sharing design proposals with clients and team members.
-
Enables real-time collaboration across different locations.
-
Enhances communication with clients by allowing seamless switching between different design proposals.

How to Use:
-
Open AI Layout, import the floor plan, apply a layout, and save it.
-
Click [Share] in the top-right corner and set link permissions (View Only / Copy Allowed).
-
Set the link’s validity period (1 day, 7 days, 30 days, or permanent).
-
(Optional) Set a password (either system-generated or custom).
-
Click [Copy Link] and share it as needed.
05. Whole-House Customization Collection
1. Parametric Cabinet: Panel Segmentation
Feature Highlights:
-
Designers can now divide and segment cabinet panels for better customization and production efficiency.
Problems Solved:
-
Previously, cabinets such as entryway units, corner dining cabinets, and open wardrobes had to be manually adjusted post-design due to manufacturing limitations.
-
This new feature automates the segmentation process, reducing rework.
Value:
-
Saves time by eliminating redundant cabinet redrawing.
-
Increases efficiency when preparing designs for manufacturing.

How to Use:
-
Open the kitchen/wardrobe design plan and switch to 3D mode.
-
In the top menu bar, switch to Panel Mode, select the panel to be divided, and right-click to choose Panel Segmentation.
-
In the segmentation panel, set the gap values and divide the panel accordingly. You can also choose a reference panel for quick segmentation and adjust alignment settings.
-
Click Confirm to finalize the segmentation.
Notes:
-
Once a named panel is segmented, it cannot be parameter-driven—use caution.
-
Segmentation can be undone but cannot be resized or reversed.
-
[Permission Control]: Available by default for retail users; enterprise users need to configure permissions manually.
2. Whole-House Customization: Support for Multiple Material Libraries in Circles
Feature Highlights:
-
Designers can now access and switch between different shared material libraries within design circles.
-
Companies can create multiple design circles and share their custom libraries in the left-side materials panel.
Problems Solved:
-
Previously, designers were limited to a single source of design materials.
-
Now, they can quickly switch between different company-specific material libraries to find diverse assets.
Value:
-
Expands material options for wardrobe and kitchen design.
-
Supports enterprise-level material sharing, improving the overall user experience.

How to Use:
-
Open a kitchen/wardrobe design plan and switch to 3D mode.
-
In the left-side materials panel, switch between Public Library, Enterprise Library, and Circle Library (new).
-
Once a circle library is selected, all associated assets, styles, material replacements, door installations, and global/technical parameters will be updated accordingly.
Note: Users must join a circle library to access its materials. For details, contact Xueming.
3. Cabinet Doors and Drawer Fronts Now Support Panel Beveling
Feature Highlights:
-
Designers can now directly apply bevel cuts to cabinet doors and drawer fronts.
Problems Solved:
-
Previously, users could only bevel individual panels, but not cabinet doors or drawer fronts.
Value:
-
Supports industry-standard manufacturing techniques for beveled doors and drawer fronts.
-
Enhances design flexibility and meets custom production needs.
How to Use:
-
Open a kitchen/wardrobe design plan and switch to 3D mode.
-
In the top menu bar, switch to Panel Mode, click Bevel Cut, and select the desired door or drawer front edge.
-
Click Confirm in the bevel cut panel to apply the effect.
4. Order Review & Cabinet Detection: Space-Based Filtering
Feature Highlights:
-
Users can now filter displayed elements when reviewing cabinet designs.
Problems Solved:
-
Previously, the order review system displayed all cabinet doors at once, making it difficult to verify design accuracy in multi-space projects.
-
Now, users can selectively hide or display cabinets for a clearer review.
Value:
-
Improves usability and streamlines the review process.

How to Use:
-
Open a kitchen/wardrobe design plan and switch to 3D mode.
-
In Cabinet Mode, click Detect → Cabinet / Door Panel to enter detection mode.
-
Click on individual cabinets or doors to toggle their visibility for focused review.
5. Focused Order Review Mode
Feature Highlights:
-
Designers can now isolate and review individual cabinets before finalizing an order.
Problems Solved:
-
Previously, checking a specific cabinet required manually hiding other elements, which was tedious and time-consuming.
Value:
-
Reduces errors and improves order accuracy by allowing a detailed review of individual cabinets.

How to Use:
-
Open a kitchen/wardrobe design plan and switch to 3D mode.
-
In Cabinet Mode, select a cabinet or leave it unselected, then click Detect → Focused Order Review.
-
In Focused Review Mode, users can toggle cabinet visibility, inspect hardware installation, and perform production checks.
Note: Production-related features require order permissions.
6. Multi-Door Installation: Streamlined Frontend Editing for Neutral Panels
Feature Highlights:
-
Users can now replace neutral panels directly within the editor, reducing interruptions.
Problems Solved:
-
Previously, when installing multiple cabinet doors, a default neutral panel material was displayed. Users had to manually delete or replace it each time.
-
Now, if a company has pre-configured a neutral panel material, it is applied automatically.
Value:
-
Reduces design disruptions and streamlines the cabinet configuration process.
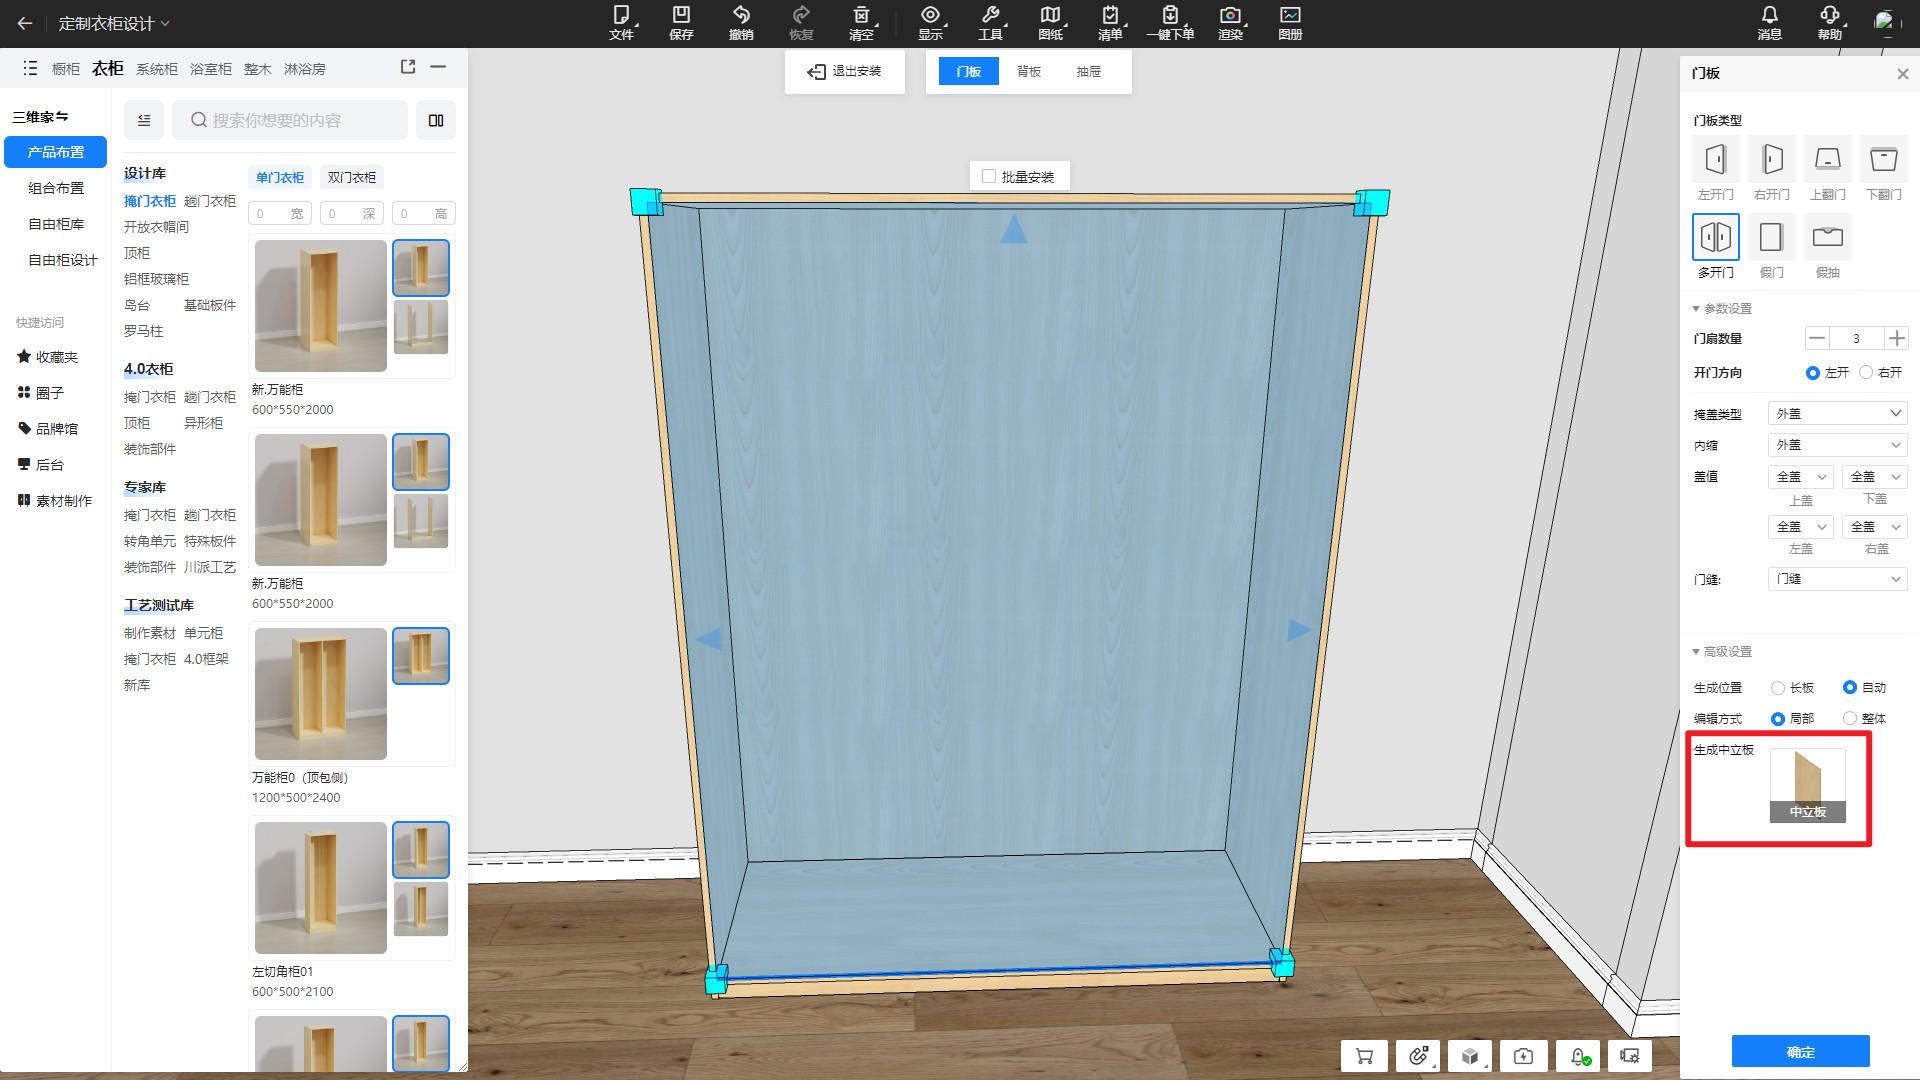
How to Use:
-
Open a kitchen/wardrobe design plan and switch to 3D mode.
-
Click Install Doors in the top menu.
-
If the company has pre-configured a neutral panel material, it will be applied automatically.
-
If no default material is set, users will be prompted to select one before installation.
-
-
Advanced settings allow users to add custom neutral panel materials.
Note:
-
If the Public Library is enabled, neutral panels cannot be deleted or modified.
-
Companies can configure whether to use the public or enterprise library for neutral panel settings.
7. Solid Wood Supports Width, Depth, and Height Dropdown Options (For Enterprise Users)
Feature Highlights:
-
Enables input and display of width, depth, and height parameters for solid wood assets.
Problem Solved:
-
Previously, solid wood assets couldn't include basic parameter options for dimensions.
Feature Value:
-
Allows efficient input and selection of key parameters for solid wood designs.

How to Use:
-
Open a kitchen or wardrobe project and switch to the Solid Wood module in 3D mode.
-
Drag and drop an asset with pre-configured width, depth, and height dropdown options.
-
Open the Product Layout Panel and select the desired dimensions from the dropdown.
8. Default First Substrate When Replacing Materials (For Enterprise Users)
Feature Highlights:
-
When a material has multiple substrate options, the system automatically applies the first substrate upon replacement.
Problem Solved:
-
Previously, when changing materials, designers had to manually select the substrate each time, leading to inefficiencies.
Feature Value:
-
Streamlines the design process by reducing unnecessary steps.

How to Use:
-
Open a kitchen or wardrobe project and switch to the 3D mode.
-
Select an asset, then use the Material Replace Tool or Format Brush - Material Brush to replace materials.
-
If the new material includes multiple substrates, the first one is automatically applied.
Note:
-
Enterprise users must enable this feature in the settings:
Workbench → Whole Home Backend Management → Customization Advanced Settings → 3D Function Settings → Material Management
9. Display Parameter Names in Special Shape Editing for Panels
Feature Highlights:
-
Displays parameter names in the panel shape editing interface for quick reference.
Problem Solved:
-
Previously, special parameters in public library panel shapes had no labels, requiring trial and error to understand their effects.
-
To support international users, labels will now be displayed alongside parameters.
Feature Value:
-
Saves time in panel shape editing and enhances the user experience.
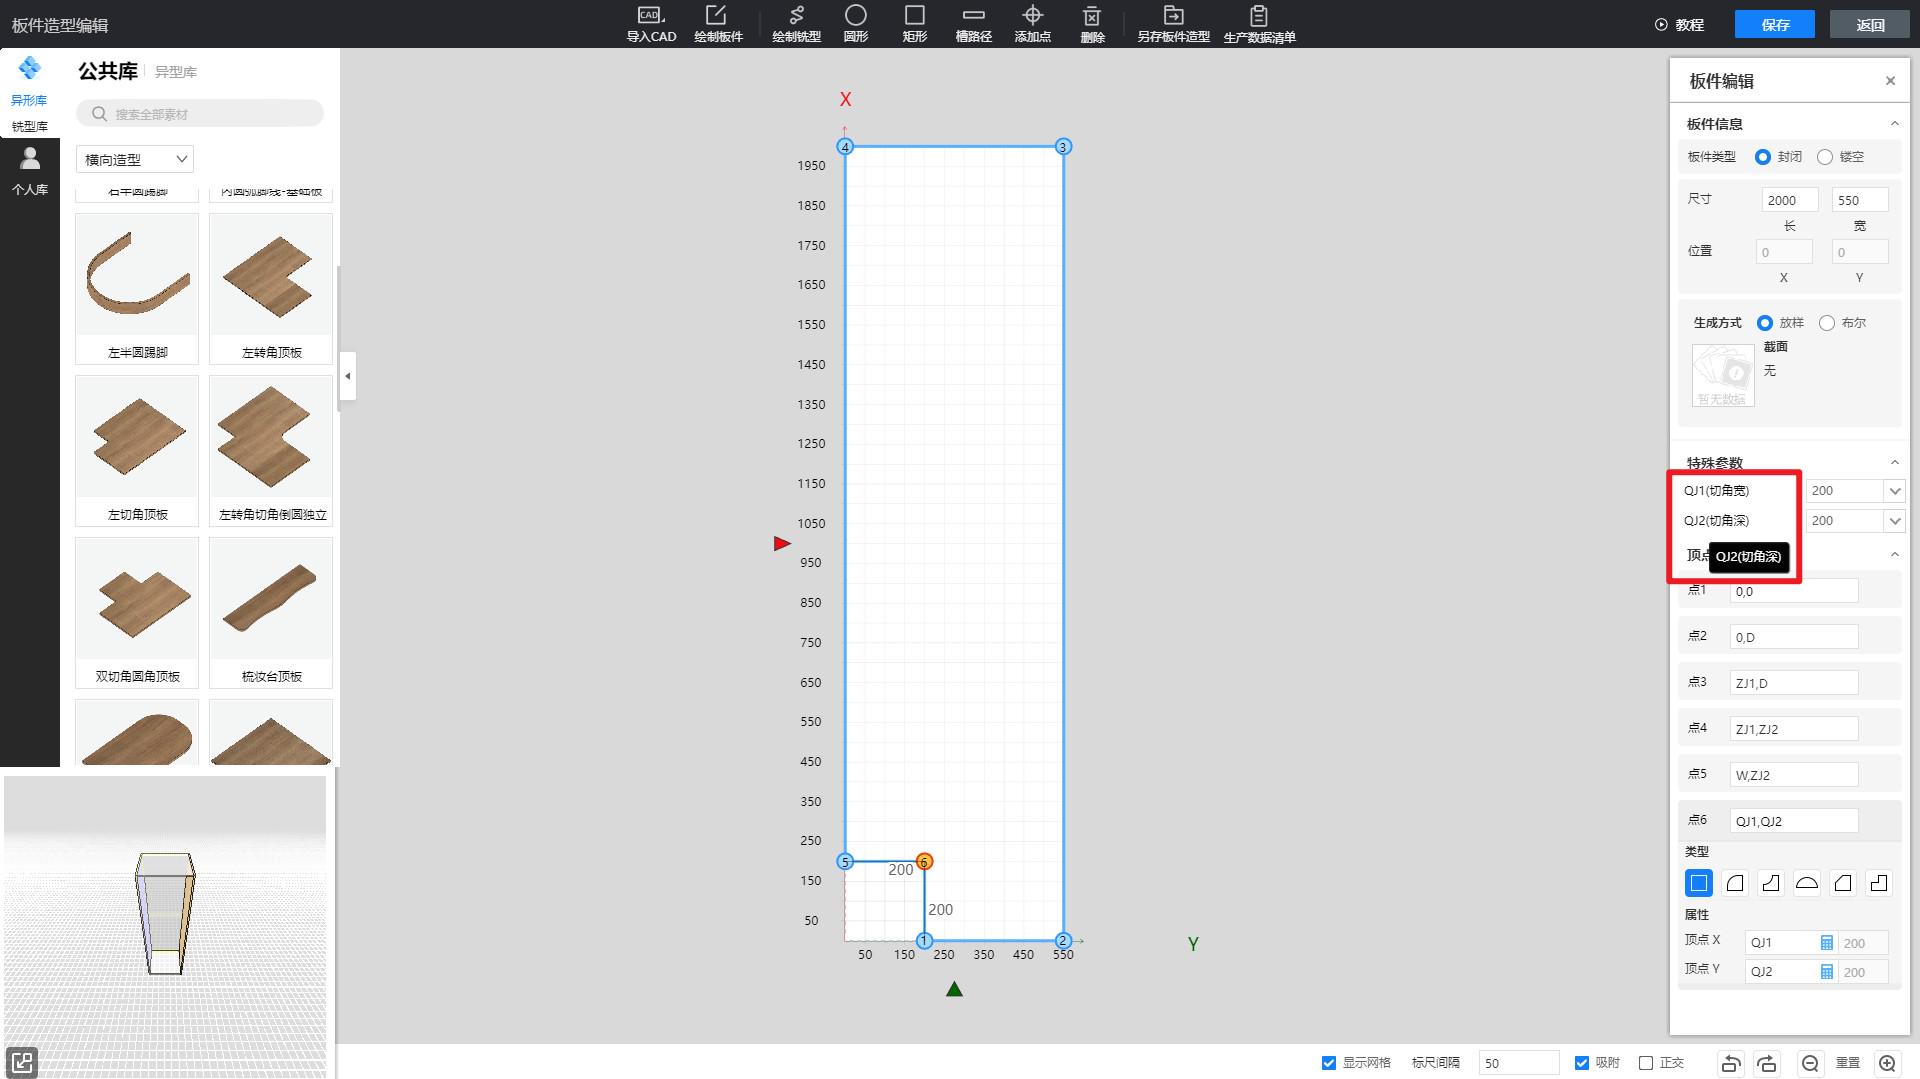
How to Use:
-
Open a kitchen or wardrobe project and switch to the 3D mode.
-
Switch to Panel Mode, right-click a panel, and enter Shape Editing Mode.
-
Add a Chamfer Shape from the Irregular Library on the left.
-
The Special Parameters panel on the right now displays parameter names.
-
Hover over long parameter names to view the full text.
10. Alert for Product Names Exceeding 30 Characters
Feature Highlights:
-
Displays a warning when a product name exceeds 30 characters.
-
Prevents orders from being placed if the name is too long.
Feature Value:
-
Ensures order accuracy and prevents missed orders due to excessively long names.

11. Uncombined Assets Notification During Group Ordering (Available in AiHouse Advanced)
Feature Highlights:
-
Clearly displays any assets that are not grouped when submitting a combined order.
-
Allows users to easily locate ungrouped assets within a project.
-
Organizes ungrouped assets by space category for better visibility.
Problem Solved:
-
Previously, complex cabinet structures often led to ungrouped panels being overlooked during selection, causing missing parts in production.
Feature Value:
-
Reduces errors in combined orders, minimizing the need for rework and additional production costs.

12. Added “Node or Not” Checkbox for Slot Data (Available in AiHouse Advanced)
Feature Highlights:
-
Allows users to choose whether to truncate slot outputs based on actual production needs.
Problem Solved:
-
Some milling operations require extended cutting paths, and automatic truncation caused incomplete output.
Feature Value:
-
Provides more accurate control over machining processes.
-
Enhances flexibility in slotting output.

13. Output Hole Position Data for Curved Panel Contact Surfaces (Available in AiHouse Advanced)
Feature Highlights:
-
Automatically generates hole position data for curved panels and curved doors.
Problem Solved:
-
Previously, round hole positions on curved panels or doors were not outputted correctly.
Feature Value:
-
Ensures proper hole data is available for manufacturing curved panels.
06. Backend Asset Management Updates
1. Multi-Select Material Packages for Association (For Enterprise Users)
Feature Highlights:
-
Allows users to associate multiple material packages at once.
Problem Solved:
-
Previously, material packages could only be associated one at a time, making the process inefficient.
Feature Value:
-
Improves efficiency in enterprise asset management.

How to Use:
-
Go to the Cabinet Backend, open Assets, and switch to Association.
-
Click Associate Material Package, hold
Ctrlto multi-select material packages in the panel. -
Click Save to associate multiple material packages in one action.
2. Version History and Recycle Bin for Material Packages + Search Function (For Enterprise Users)
Feature Highlights:
-
Records historical changes, including modifications, additions, deletions, and restorations, along with timestamps and operator details.
-
Deleted material packages are marked with a deletion timestamp and can be restored from the Recycle Bin.
-
Users can quickly search for material IDs or names to locate materials within a package.
Problem Solved:
-
Material package management lacked historical version tracking, making it difficult to trace edits or restore deleted items.
-
Frequent updates due to factory inventory changes often led to data confusion.
-
Searching for specific materials in large databases was inefficient.
Feature Value:
-
Reduces time spent on repeated material package edits.
-
Enhances error tracking and data recovery efficiency.

How to Use:
-
Go to the Cabinet Backend and navigate to Resource Configuration → Material Packages.
-
Open a material package and search for a keyword (e.g., “white”) to display all related materials.
-
After editing, click Save and check the Version History in the top right corner.
-
If a package is deleted, restore it from the Recycle Bin.
Excited About This Month’s AiHouse Feature Updates?
Can’t wait to try them out? Log into your account now and start exploring!