AIHOUSE SOFTWARE UPDATES - October 2024
I. BASIC OPERATIONS
1. Added walkthrough mode as default loading state when opening projects
2. Added search functionality to settings panel
3. Product property panel now supports arithmetic operations in input fields
4. New project creation - Configurable name and phone number fields (for enterprise users)
II. RENDERING & LIGHTING
1. Optimized material channel interaction
III. WHOLE-HOME CUSTOMIZATION
1. Custom lighting - Multiple lighting installations with individual/batch editing
2. Precision measurement - Supports measuring points, lines, and surfaces of inner contours
3. Wardrobe module - 2D placement of wardrobe panel doors
4. (UX improvement) Production notes text box now displays full content on hover
5. Improved zero-quantity accessory notification
6. Hinge solution auto-avoidance logic now applies to entities [Only available in AiHouse Advanced]
7. Panel mode drawer drive board value configuration
8. Optimized top menu styling for customization
9. Limit on number of openings in panel editing
IV. BACKEND LIBRARY MANAGEMENT
1. Added exclusion logic for material package associations (for enterprise users)
2. Wardrobe backend reads wall panel profile directory, configurable default material associations (for enterprise users)
V. ALUMINUM DOORS & WINDOWS
1. Screen mesh styles now visible and replaceable in frontend
2. Handles and locks now editable
3. Frontend now supports individual selection of door/window components
4. Optimized door/window generation with model contour preview during process
VI. AI LAYOUT FEATURES
1. Projected area calculation for custom cabinets
2. Enhanced diversity in spatial material matching
3. Optimized custom cabinet matching logic
4. Ceiling editing
--------------------------------------------------------------------------------------------------------------
I. Basic Operations Collection
1. [Basic Operations] Added Walkthrough Mode as Default Loading State
Key Feature:
Added walkthrough mode as default loading state when opening projects.
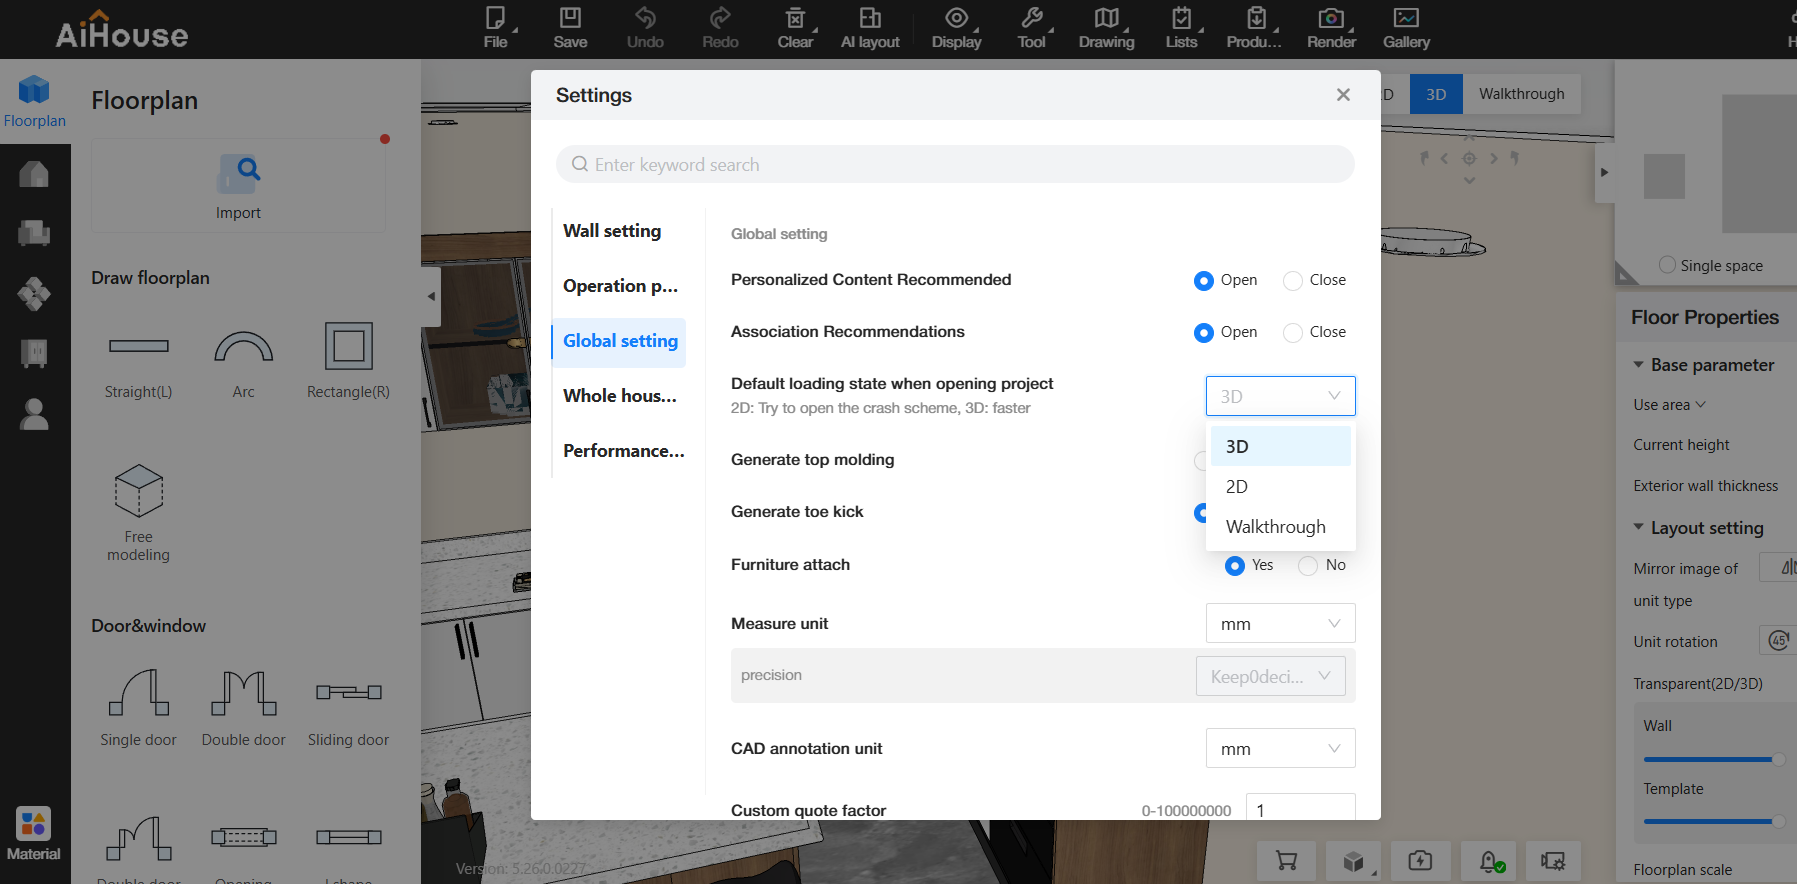
Steps:
-
Go to: Top menu → Tools → Settings → Panorama Settings
-
Select "Walkthrough" for [Default Loading State When Opening Projects]
-
Projects will now open in walkthrough mode by default
2. [Basic Operations] Added Search Functionality to Settings Panel
Key Feature:
Settings panel now includes search functionality.
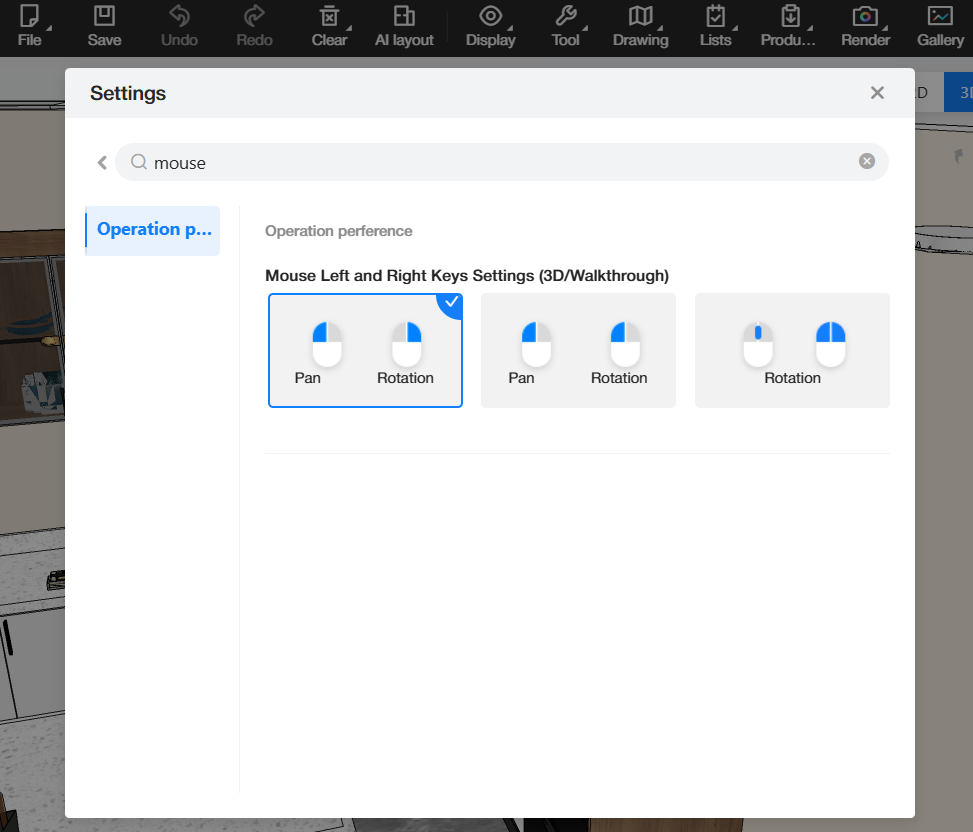
Steps:
-
Access via: Top menu → Tools → Settings
-
Enter search terms (e.g., "mouse") in the search box
-
All relevant operations containing the search term will be displayed
3. [Basic Operations] Product Property Panel Now Supports Arithmetic Operations
Key Feature:
Input fields in product property panel now support addition/subtraction operations.
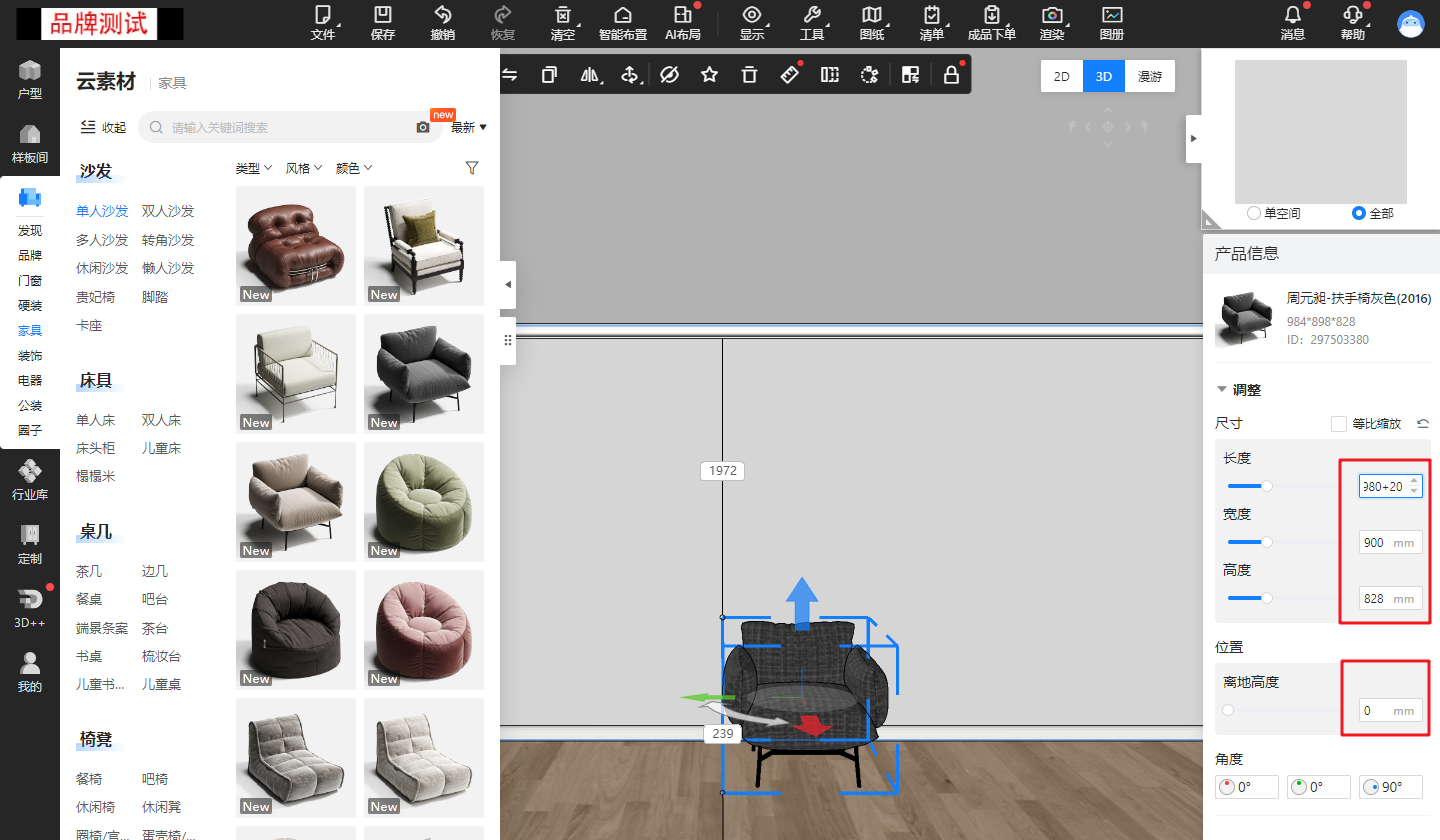
Steps:
-
Click on a model to open its [Product Information] property panel
-
Enter calculations directly (e.g., "+20") in input fields
-
Results will be calculated automatically
4. [Basic Operations] New Project Creation - Configurable Name and Phone Number Fields
Key Feature:
Enterprise accounts with advanced settings can configure whether to display name/phone number fields in new project dialogs.
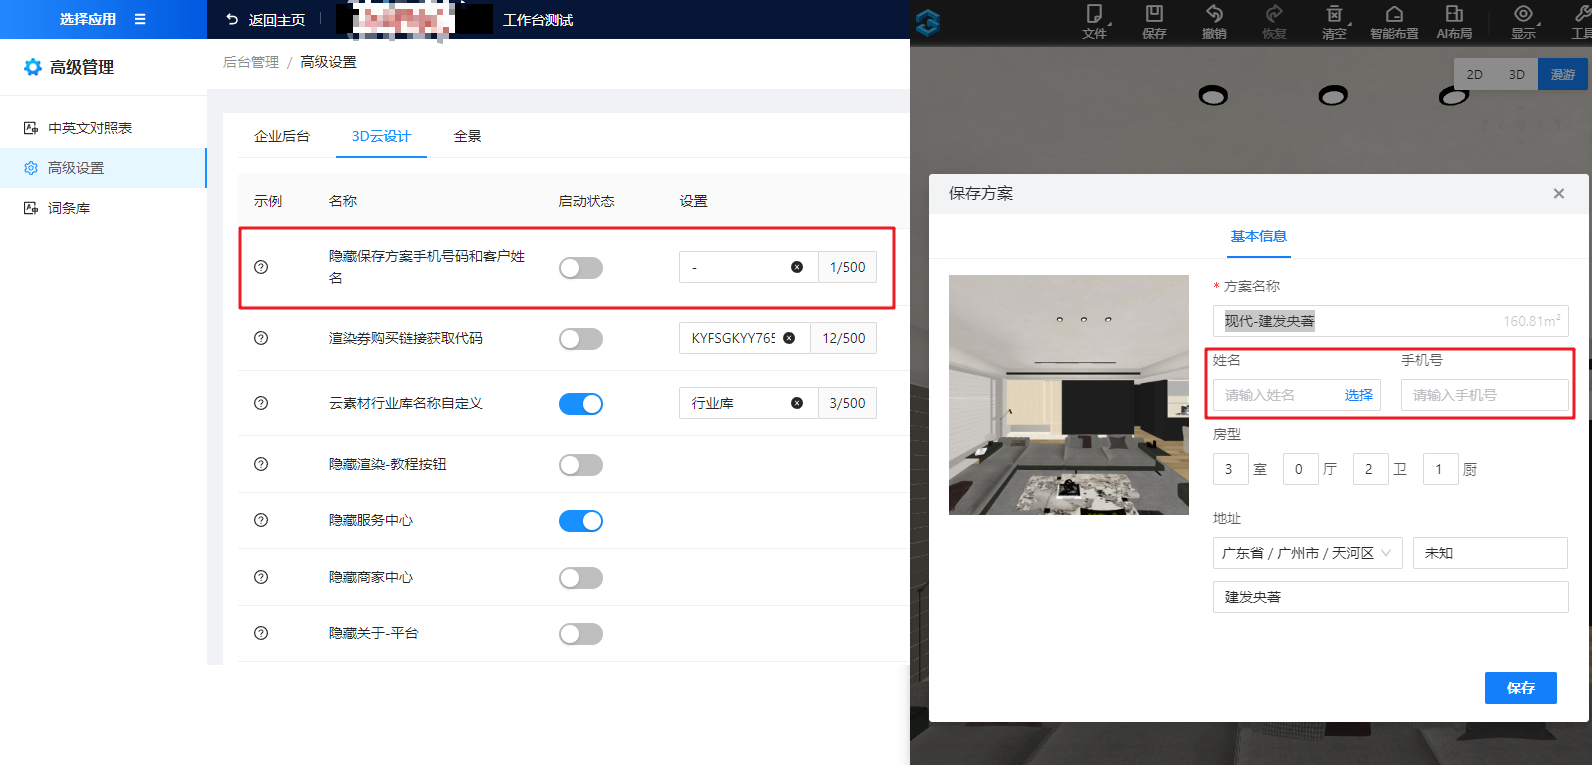
Frontend Operations:
When saving projects, fields will appear/hide based on backend advanced settings
Backend Configuration:
1.Access: Workspace → Advanced Management → Advanced Settings → 3D Cloud Design → [Hide Customer Name and Phone Number When Saving Projects]
2.Enable this setting to hide the fields in 3D save page
Note: This feature requires enterprise accounts with advanced settings privileges
II. Rendering & Lighting Features Collection
1. [Rendering & Lighting] Material Channel Interaction Optimization
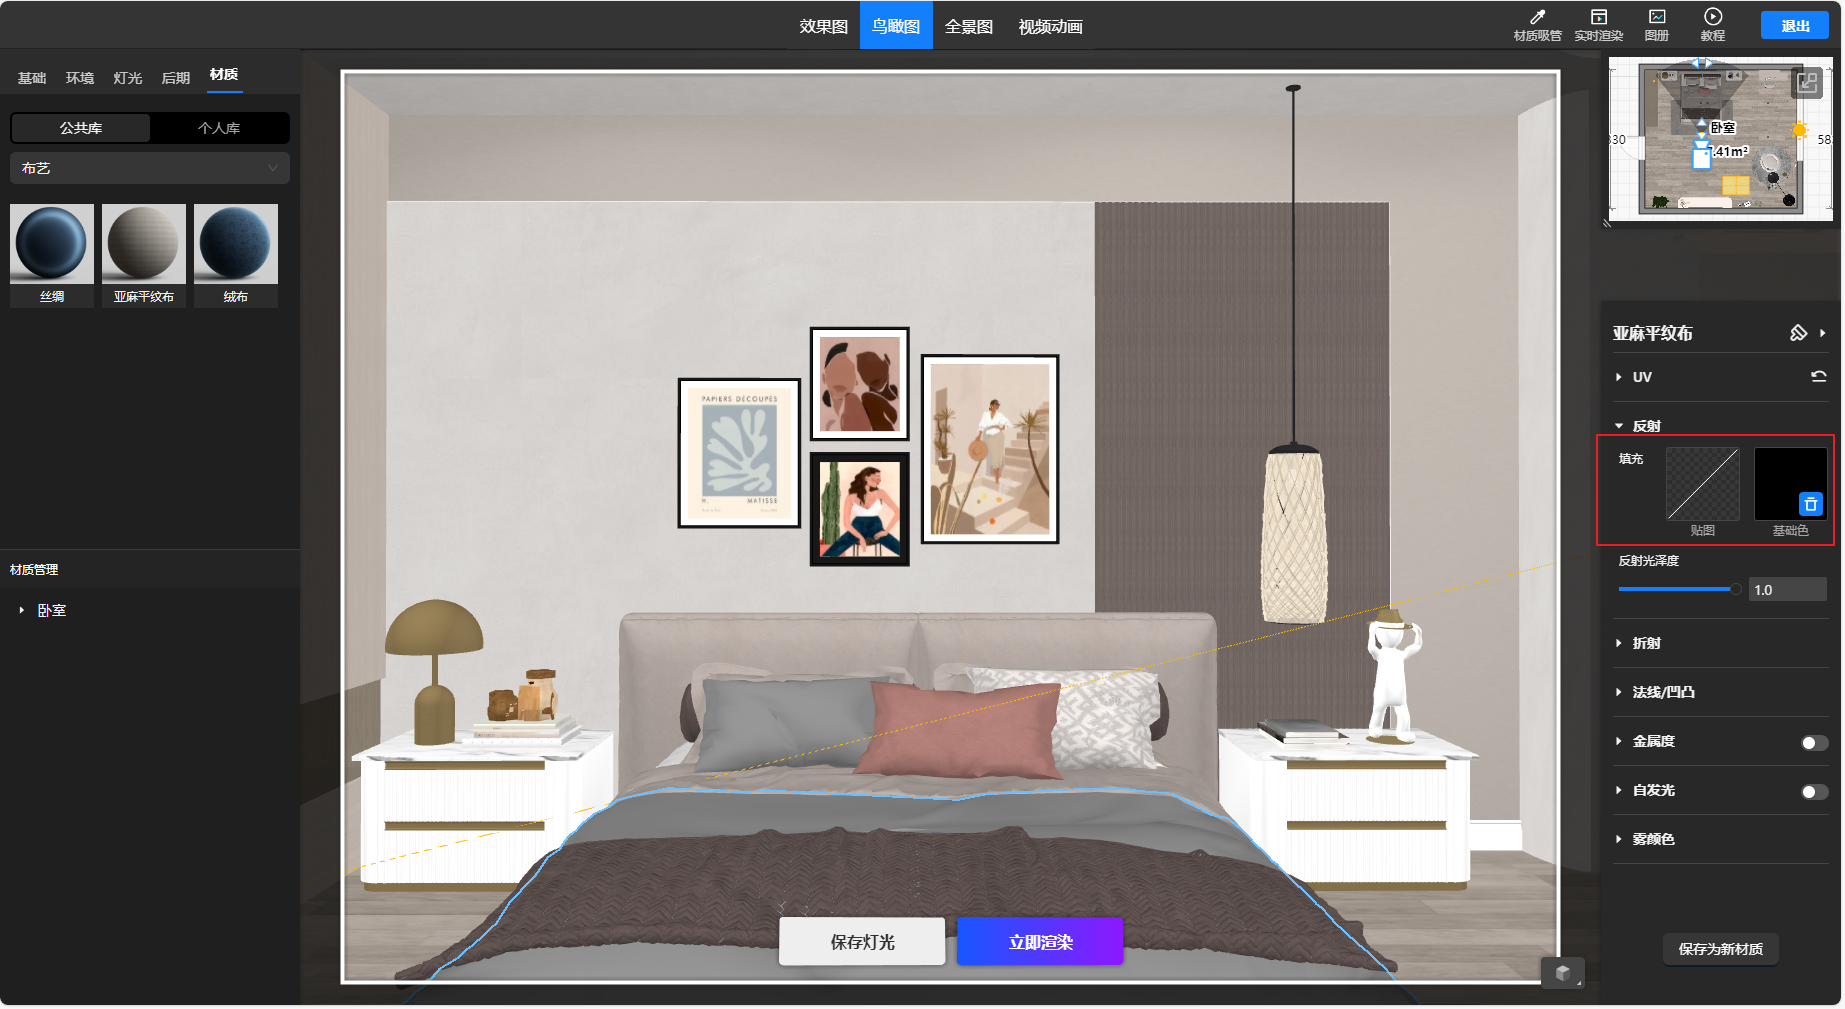
Key Feature:
Optimized material channel interaction with delete functionality
Issues Addressed:
Previous version only allowed adding/replacing material channel textures, not deletion;
Material channel texture display was too small for proper viewing.
Steps:
1.Enter rendering mode
2.Use material picker tool
III. Whole-Home Customization Features Collection
1. [Whole-Home Customization] Custom Lighting - Multiple Installations with Individual/Batch Editing
Key Feature:
Improved lighting installation efficiency with support for new double-sided lighting techniques
Issues Addressed:
Previous version only allowed one lighting element per panel, now supports double-sided lighting, corner lighting, and individual editing of multiple lights
Steps:
1.Open 3D project and enter cabinet customization module
2.Select cabinet/panel → install lighting via top menu or right-click → adjust settings → install multiple lights on same panel
3.Right-click cabinet/empty space → "Edit All Lights" for individual light adjustments
Note: Lights cannot overlap or intersect
2. [Whole-Home Customization] Precision Measurement - Supports Interior Contour Point/Line/Surface Measurement
Key Feature:
Enables precise measurement of interior contours for accurate cabinet design
Issues Addressed:
Previous version couldn't measure interior contours after panel cutting/milling
Steps:
1.Open 3D project and enter cabinet customization module
2.After creating cuts/milled shapes in panel mode, select "Precision Measurement" from top menu
3.Hover over interior contours to measure points/lines/surfaces
3. [Whole-Home Customization] Wardrobe Module - 2D Placement of Panel Doors
Key Feature:
Wardrobe doors can now be placed in both 2D/3D with visible opening direction
Issues Addressed:
Previously only supported 3D door placement, and 2D view didn't clearly show door opening position/direction
Steps:
1.Open 3D project and enter customization module
2.Switch to 2D view → drag panel doors from sidebar to walls (default: right-outside placement)
Note: Must follow platform library's wardrobe door specifications
4. [Whole-Home Customization] (UX Improvement) Production Notes Hover Preview
Key Feature:
Full production notes now visible on hover for designers/reviewers
Issues Addressed:
Long notes were difficult to view/edit quickly
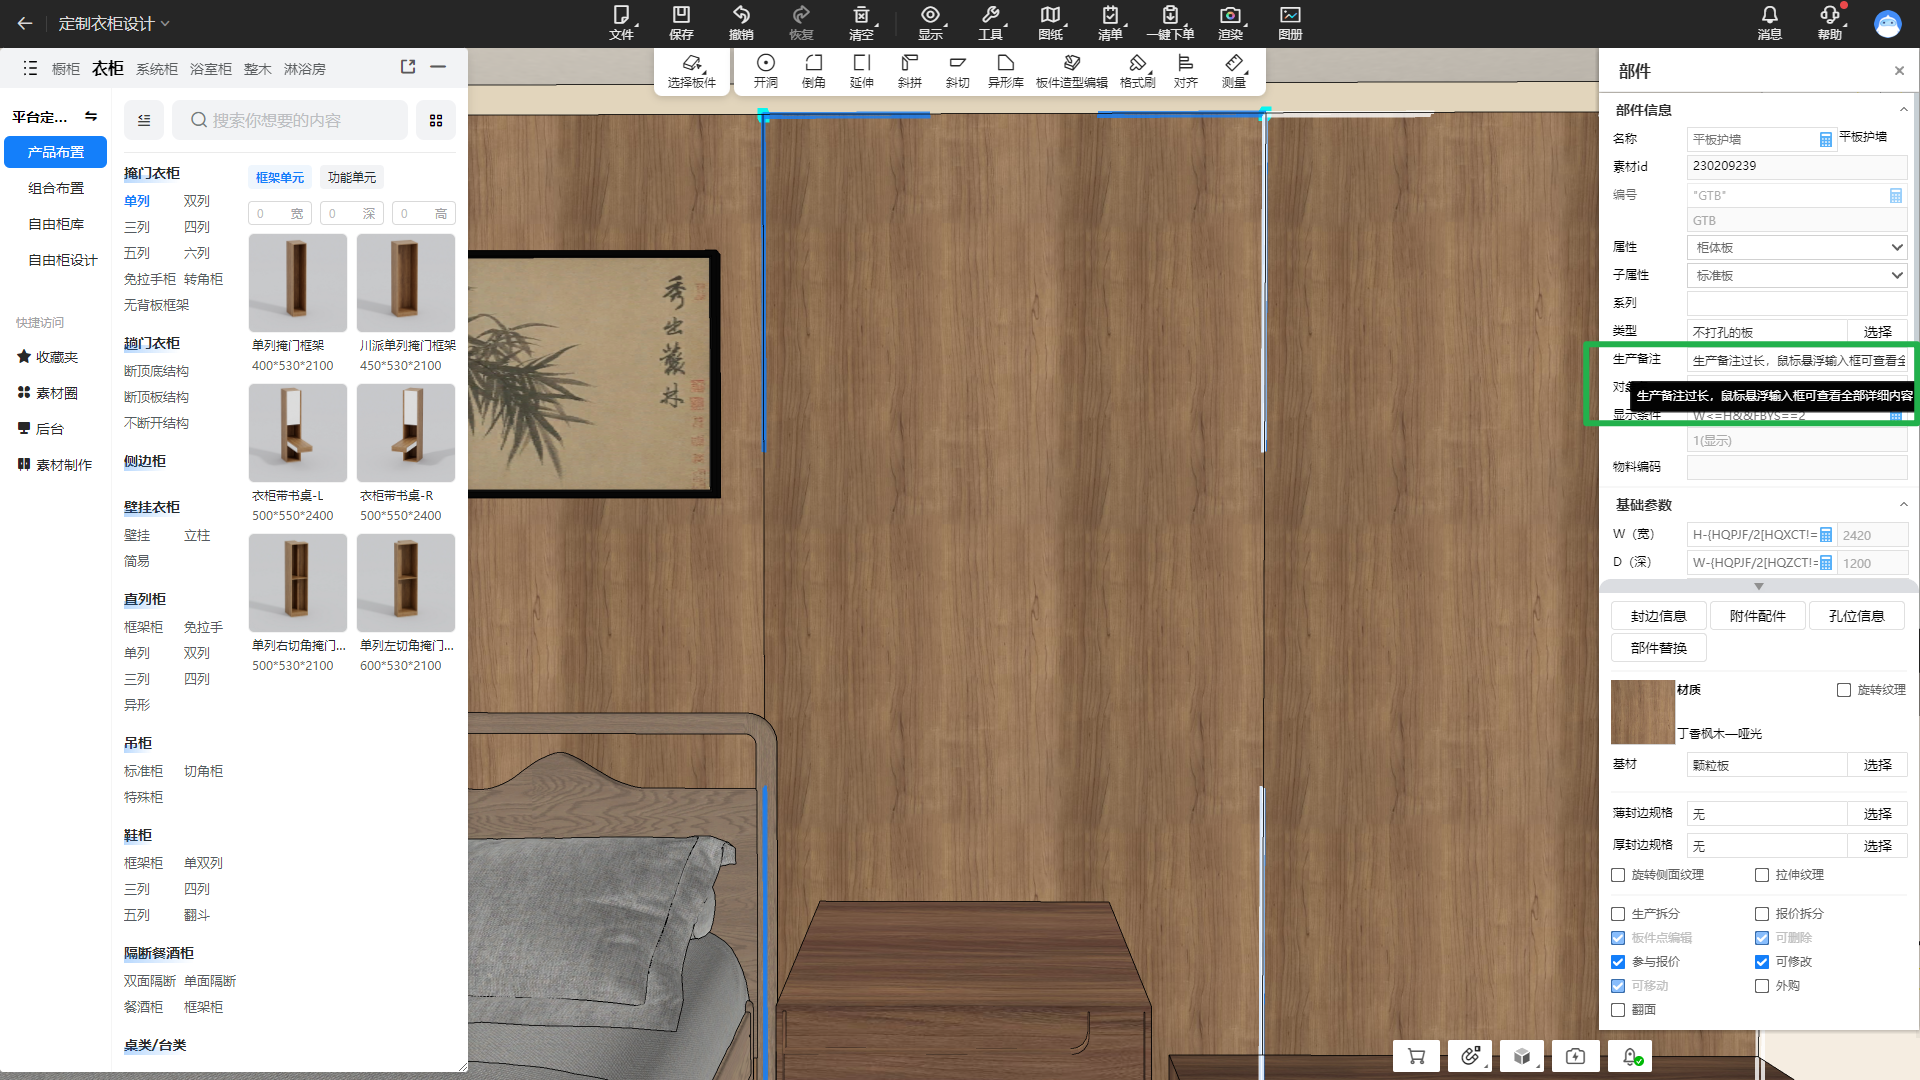
Steps:
1.Open 3D project and enter customization module
2.Select cabinet → hover over production notes field to view full content
5. [Whole-Home Customization] Zero-Quantity Accessory Alert (All Users)
Key Feature:Added prominent alerts for zero-quantity accessories
Issues Addressed:
Prevented after-sales issues from missed accessories
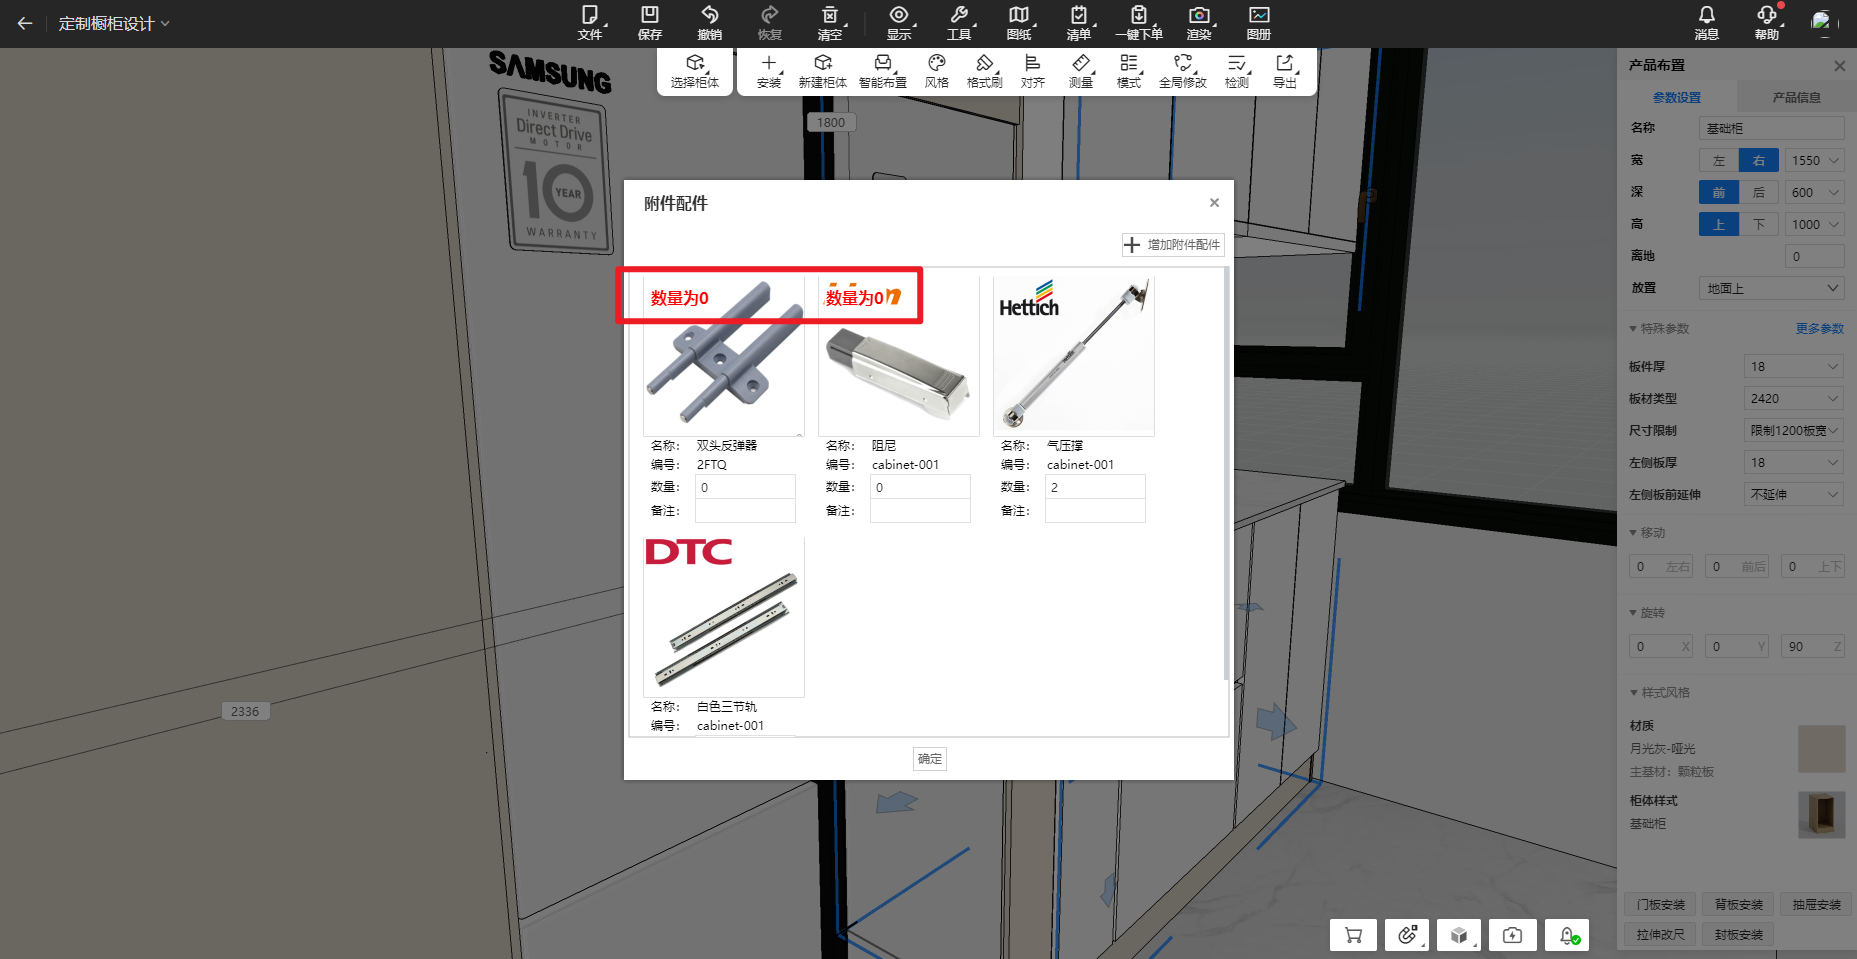
Steps:
1.Add accessories/components
2.Set quantity to 0 (via direct input or expressions)
3.Prominent alert appears on component icon
6. [Whole-Home Customization] Hinge Auto-Avoidance Logic Now Applies to Solid Objects (Only available in AiHouse Advanced)
Key Feature:
Enhanced hinge avoidance for glass shelves/drawers/drawer stoppers/wine racks and other solid objects
Issues Addressed:
Resolves failure in automatic avoidance of certain solid objects, improving design efficiency and reducing post-sale issues
Steps:
Proceed with hardware installation
7. [Whole-Home Customization] Drawer Drive Panel Reference Configuration in Panel Mode
Key Feature:
Configurable depth reference standard (functional component or base cabinet panel) when generating drawers in panel mode
Issues Addressed:
Inconsistency between legacy (v3.0/4.0) and current (v5.0/Design) versions during enterprise upgrades

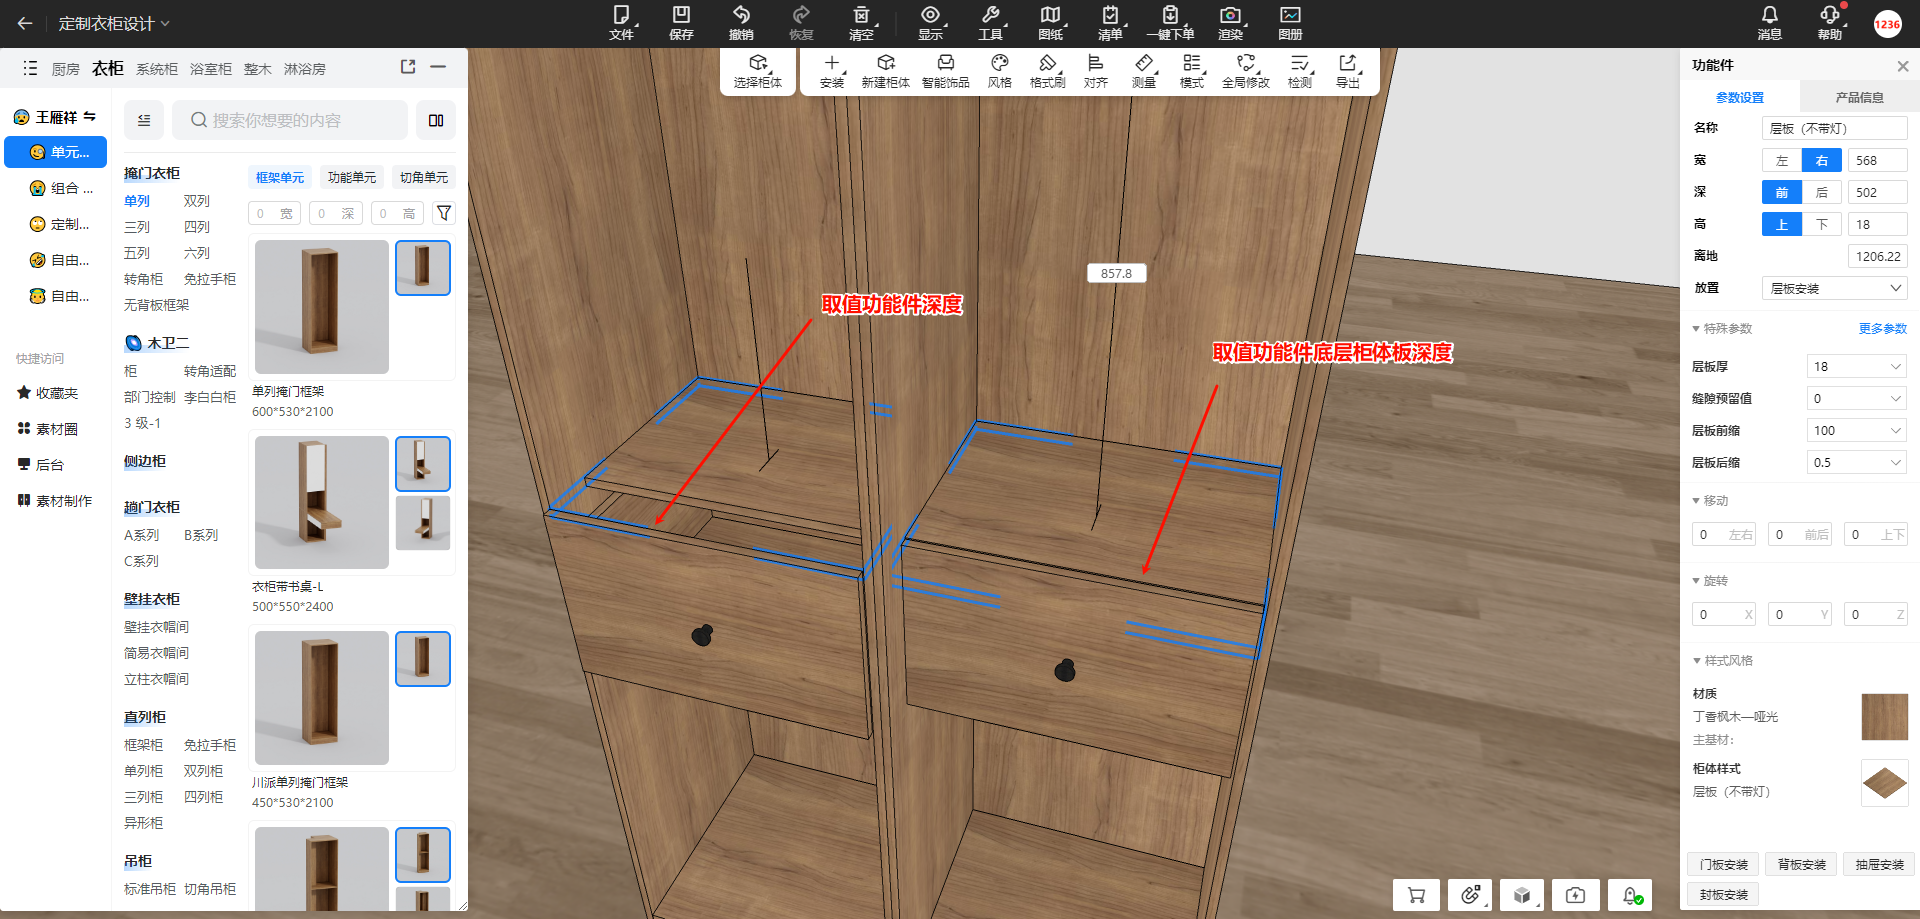
Steps:
Workspace → Whole-Home Backend Management → Custom Advanced Settings → 3D Function Settings → Generated Object Settings → Set depth reference standard
Note: Not recommended for enterprises without major version upgrades
8. [Whole-Home Customization] Top Menu Style Optimization
Key Feature:
More compact top menu layout with reduced workspace occupation
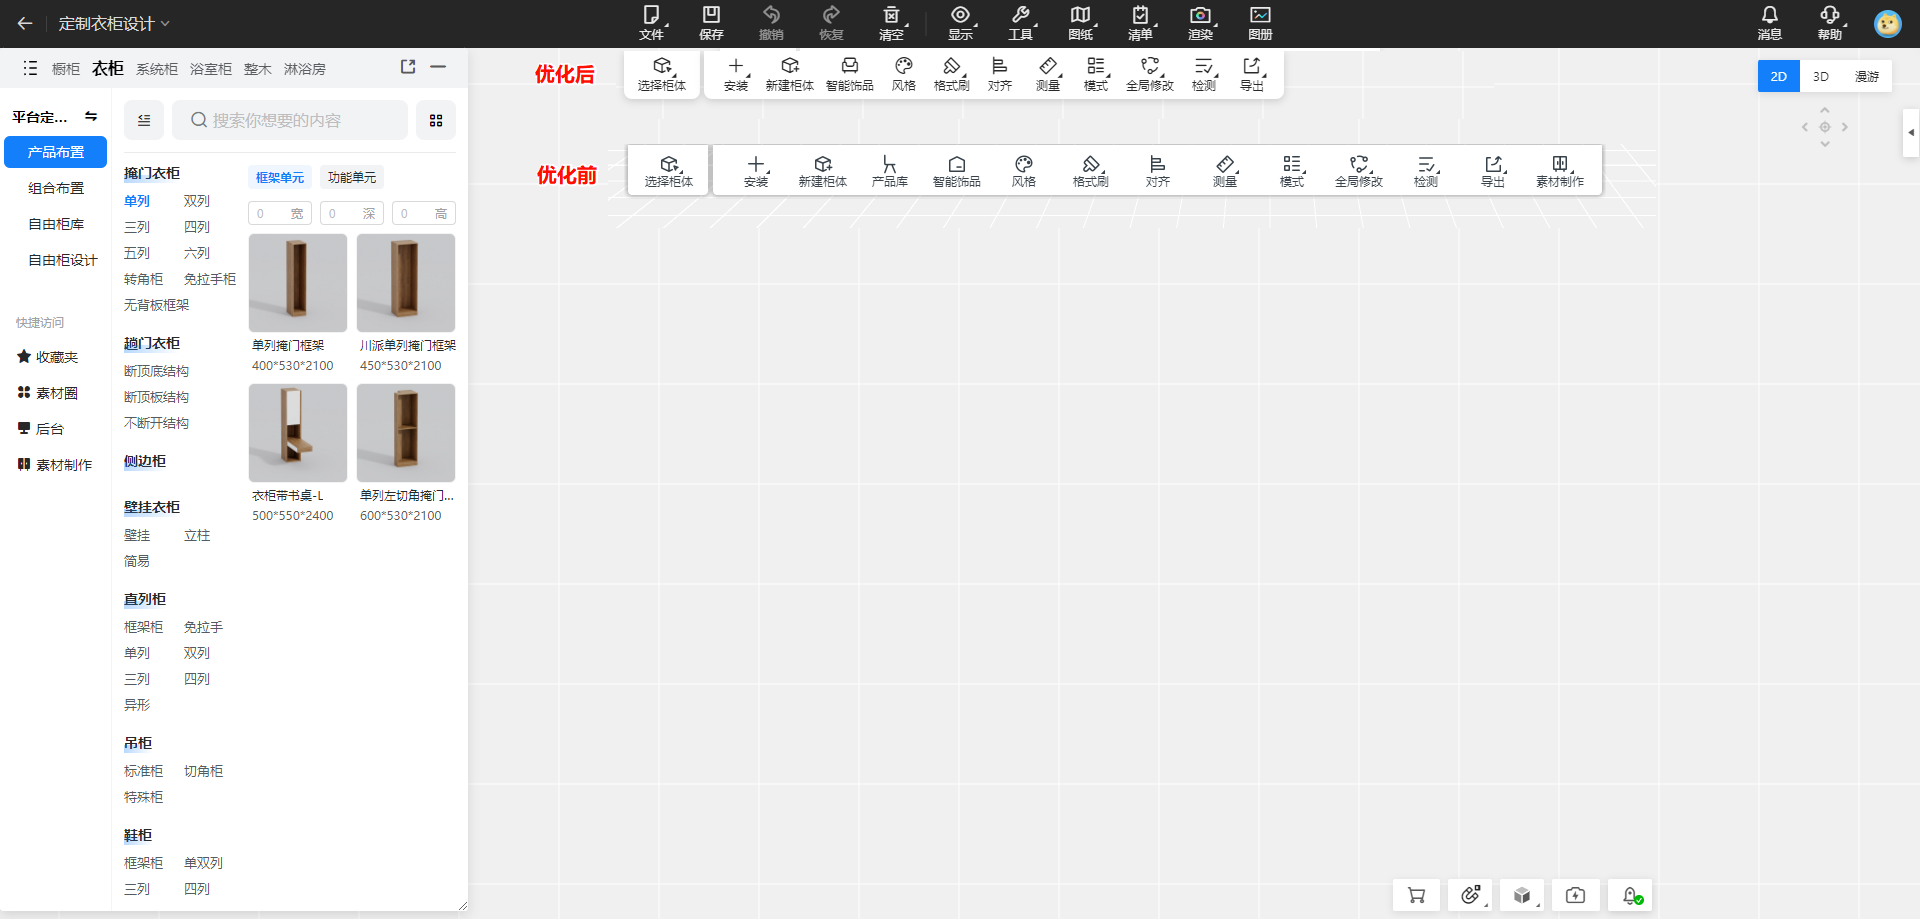
Issues Addressed:
Loose layout occupied excessive space
9. [Whole-Home Customization] Panel Cutout Quantity Limit
Key Feature:Maximum number of holes on one panel is 500
Issues Addressed:
Previous unlimited cutouts caused project crashes/long loading times
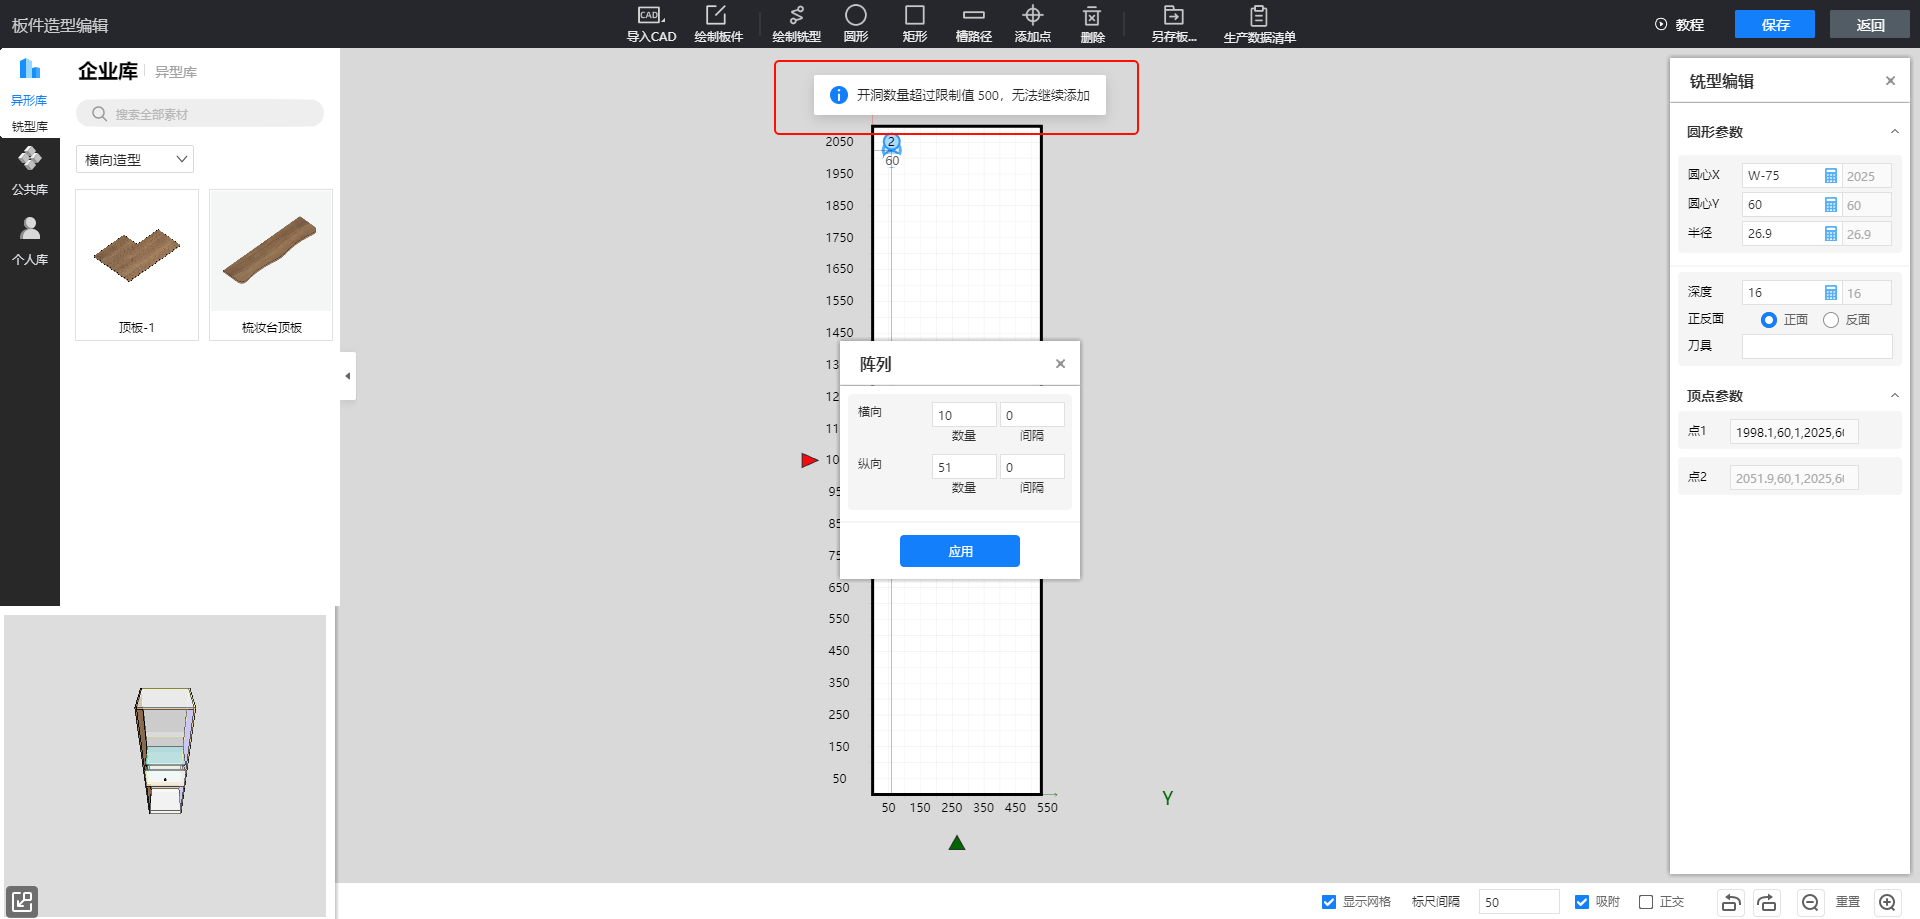
Steps:
- Open customization project → Select panel → Panel shaping edit
- System blocks additional cutouts when total exceeds 500 (including milling patterns/free-drawn shapes)
IV. Backend Library Management Features Collection
1. [Backend Library] Added Exclusion Logic for Material Package Associations (for enterprise users)
Key Feature:
New "exclude" relationship allows direct association while excluding specific materials
Issues Addressed:
- Streamlines material package maintenance and library management
- Eliminates manual exclusion processes
Steps:
- Open 3D design → Enter cabinet customization module → Access backend wardrobe/cabinet library
- When setting material package conditions, use the new notin operator to exclude specific materials
2. [Backend Library] Wardrobe Backend Now Reads Wall Panel Profile Directory with Configurable Default Material Associations
Key Feature:
- Pre-configured default materials for cross-sections improve designer efficiency
- Enables enterprise-standard material associations for profiles
Issues Addressed:
- Previously required manual material selection for each profile, slowing design workflow
- No systematic way to manage profile cross-section materials at enterprise level

Frontend Workflow:
- Open 3D design → Enter cabinet customization module
- After placing multiple wall panels:
- Click top menu → Install Wall Panel Profiles
- Default cross-section materials now auto-selected in profile settings
Backend Configuration:
- Access: Cabinet customization module → Backend wardrobe/cabinet library
- Navigate to: Top menu → Data Associations → Profile Cross-Section Associations
- Set default materials and establish material relationships per cross-section type
V. Aluminum Doors & Windows Features Collection
1. [Aluminum Doors & Windows] Screen Mesh Styles Now Visible and Replaceable in Frontend
Key Feature:
Frontend now supports viewing and replacing screen mesh configurations
Issues Addressed:
Previous version only allowed using series-default screen mesh styles without replacement options
Steps:
-
Enter 2D interface
-
Click on door/window to open right-side properties panel
-
In "Screen Mesh" section, click to replace mesh style
Note: Some series only have one associated mesh style - replacement may not be available in these cases
2. [Aluminum Doors & Windows] Handles & Locks Now Editable
Key Feature:
Handles/locks can now be positioned according to actual project requirements
Issues Addressed:
Fixed inability to adjust problematic default positions/orientations/spacing
Steps:
-
In 2D interface's component mode, select operable sash → open properties panel
-
Edit lock settings in "Hardware" section:
Editing Panel Functions:
-
Style Display & Replacement: Shows current style with click-to-replace
-
Offset: Adjusts vertical/horizontal position (positive=inward, negative=outward)
-
Orientation: Rotates hardware via angle selection
-
Mirror: Flips hardware horizontally/vertically
-
Height from Bottom: Sets distance between lock origin and sash bottom
-
Position: Locates hardware on top/bottom/left/right of operable sash
3. [Aluminum Doors & Windows] Frontend Now Supports Individual Component Selection
Key Feature:
Allows selecting individual door panels/operable sashes to view properties and control single-sash animations
Issues Addressed:
Previously couldn't view component properties or control single-sash opening/closing

Steps:
-
Press B in cloud design to enter component mode
-
Select target component (e.g., operable sash)
-
View properties in right panel + use O key to trigger single-sash open/close animation
4. [Aluminum Doors & Windows] Generation Optimization with Intermediate Contour Preview
Key Feature:
- Faster generation with real-time contour previews during creation
- Smoother wall penetration transitions
Issues Addressed:
- Slow generation speeds
- Visual "jumping" during wall penetration in previous version
Steps:
Automatically activates when returning to cloud design after 2D drawing completion
Note: Multiple simultaneous generations may require waiting due to computational load
VI. AI Layout Features Collection
1. [AI Layout] Custom Cabinet Projected Area Calculation
Key Feature:
New projected area display enhances accuracy, streamlines workflows, and improves client experience. Automatic calculations enable faster quotes with reduced human error.
Issues Addressed:
Eliminates manual calculation errors and improves initial quoting efficiency.

Steps:
-
Open AI Layout and create a layout
-
Select cabinets → View projected area in the right-side product information panel
2. [AI Layout] Enhanced Spatial Material Matching
Key Feature:
Diversified material matching for different scenarios, creating richer visual experiences.
Issues Addressed:
Previous version offered limited material matching options.

Steps:
1.Open AI Layout and create a layout
2.Click "Quick Style Match" to apply coordinated style sets
3. [AI Layout] Optimized Cabinet Matching Logic
Key Feature:
Improved parametric cabinet matching automatically selects optimal cabinet combinations based on layout dimensions.
Issues Addressed:
Resolves improper sizing and matching errors.

Steps:
-
Create a floor plan in AI Layout
-
Apply style sets to view optimized cabinet arrangements
4. [AI Layout] Ceiling Editing
Key Feature:
Manual ceiling area adjustment for better spatial coordination across design styles.
Issues Addressed:
Previously unavailable ceiling editing in floor plans.

Steps:
1.Open AI Layout → Select layout → Quick Style Match
2.Top menu → Display → Check "Ceiling"
3.Adjust highlighted ceiling areas (red→green when selected)
Ready to explore these updates?
Log in now to experience the new features!