Explore What's New in AiHouse 5 Plus: Rendering & Customization Module
Rendering
Added light template
1. Redesigned the cover image, name, and description for the lighting templates to make them more understandable to users. 2. Added Natural White Light 3.0 and incorporated the old lighting templates into the lighting version management. 3. Added five brightness levels to facilitate users in selecting the appropriate lighting template brightness for different spaces.

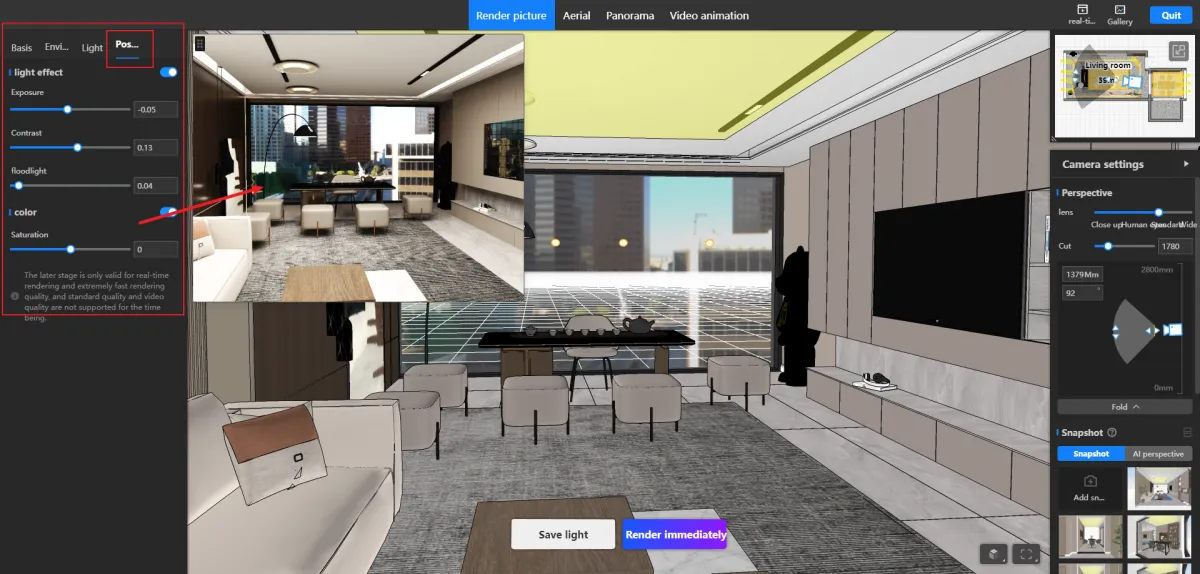
Changed real-time dimming position
1. Moved the real-time dimming function to the advanced settings under lighting post-processing. 2. Real-time dimming images will no longer be displayed in the catalog and will be grouped under lighting post-processing. [Value] Helps users render more smoothly and optimizes the usability logic of the real-time dimming function.
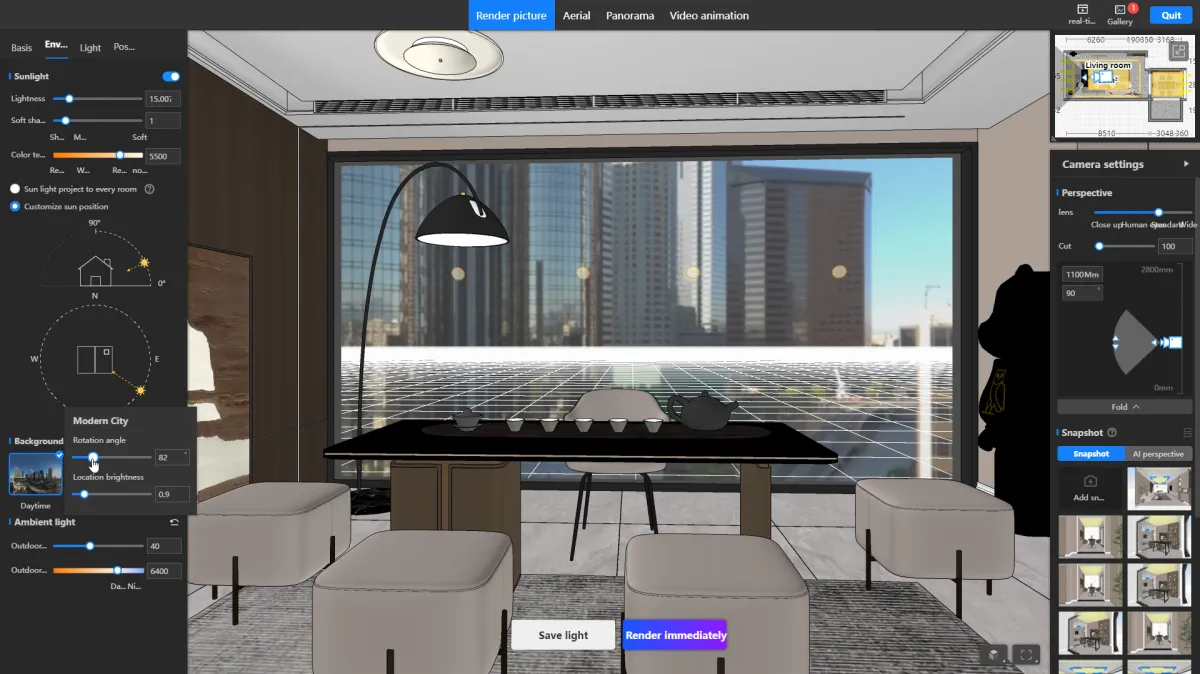
Upgrade exterior view module
Exterior views can now be rotated and their brightness adjusted, and the rendering interface allows real-time preview of exterior view status. [Value] 1. Previously, users couldn't see the status of the exterior view before rendering, and there was no way to adjust its rotation, making rendering results somewhat uncertain. Now, this problem is resolved. 2. By adjusting the brightness of the exterior view image, users can achieve various exterior effects such as dawn, dusk, and night scenes, enhancing the versatility of exterior renderings.
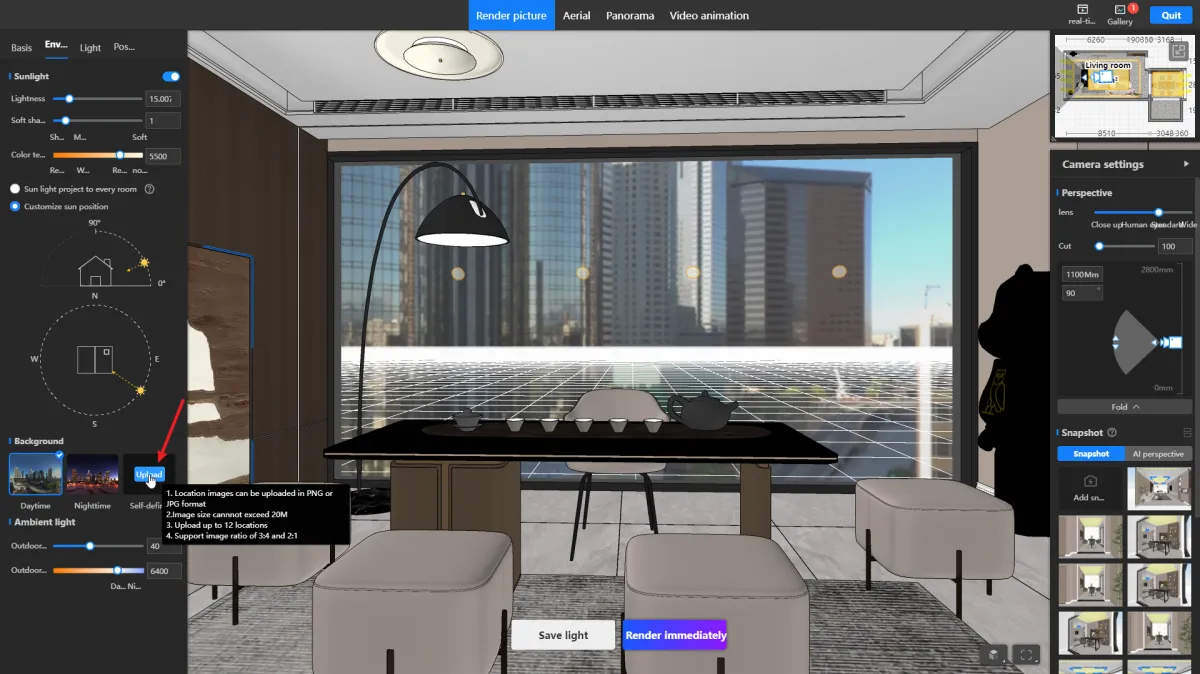
Custom upload location
Designers can now upload their own exterior views to meet a wider range of personalized exterior view needs.
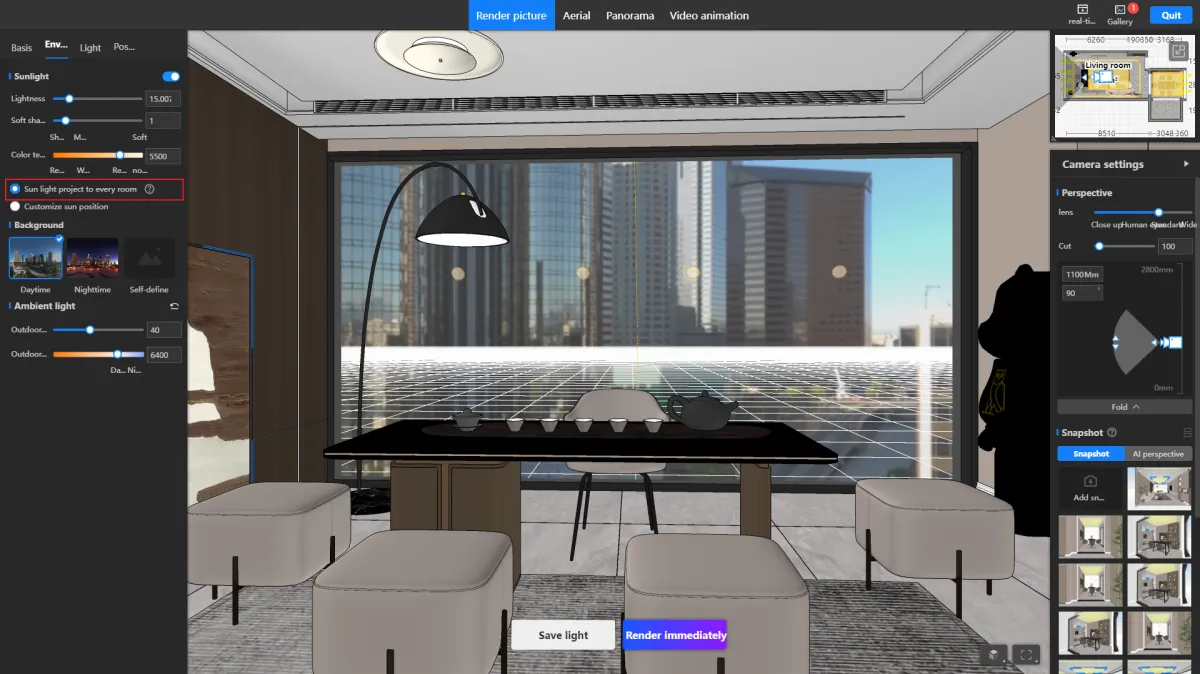
Sunlight automatically enters the room
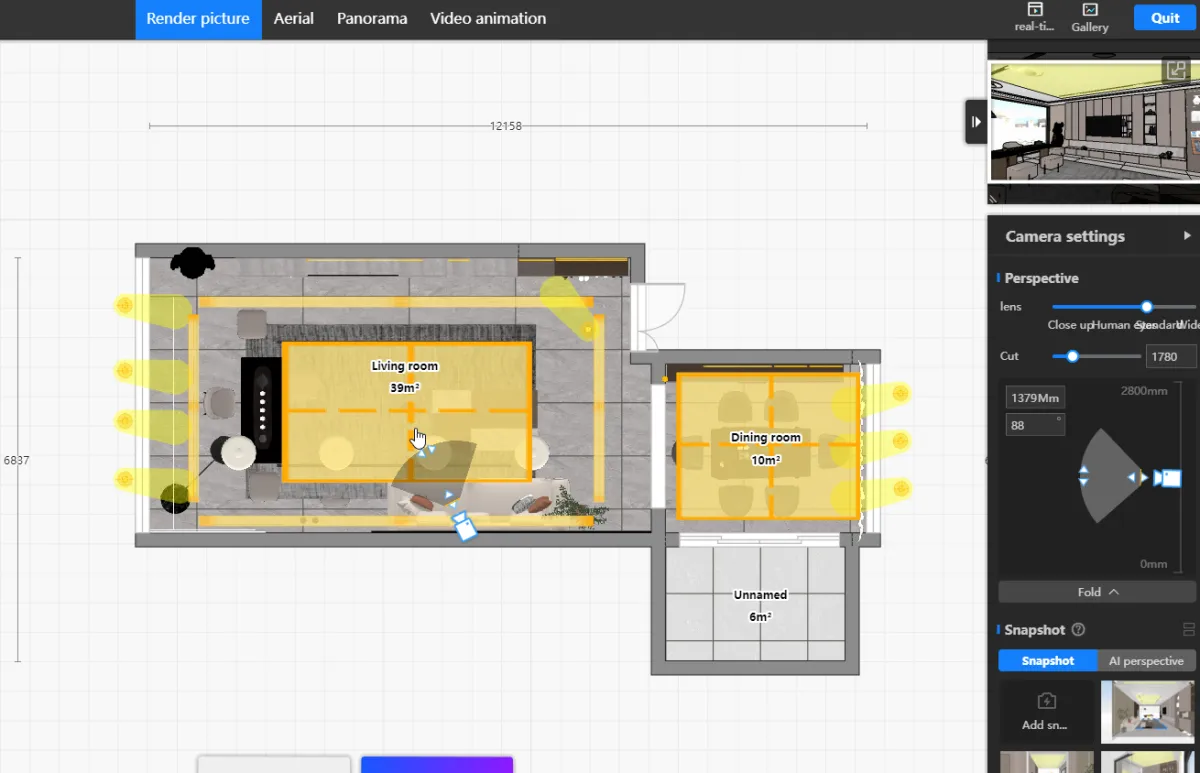
Clicking on the "Sunlight projected into each space" checkbox will enable automatic adjustment of the sunlight position based on the perspective, ensuring that each windowed space in the rendering has sunlight projection. [Value] 1. Helps users automatically generate suitable sunlight angles, avoiding the need for users to repeatedly adjust sunlight angles. 2. When used in conjunction with "Realistic Lighting and Shadow" lighting templates, it will make the rendered images more natural.
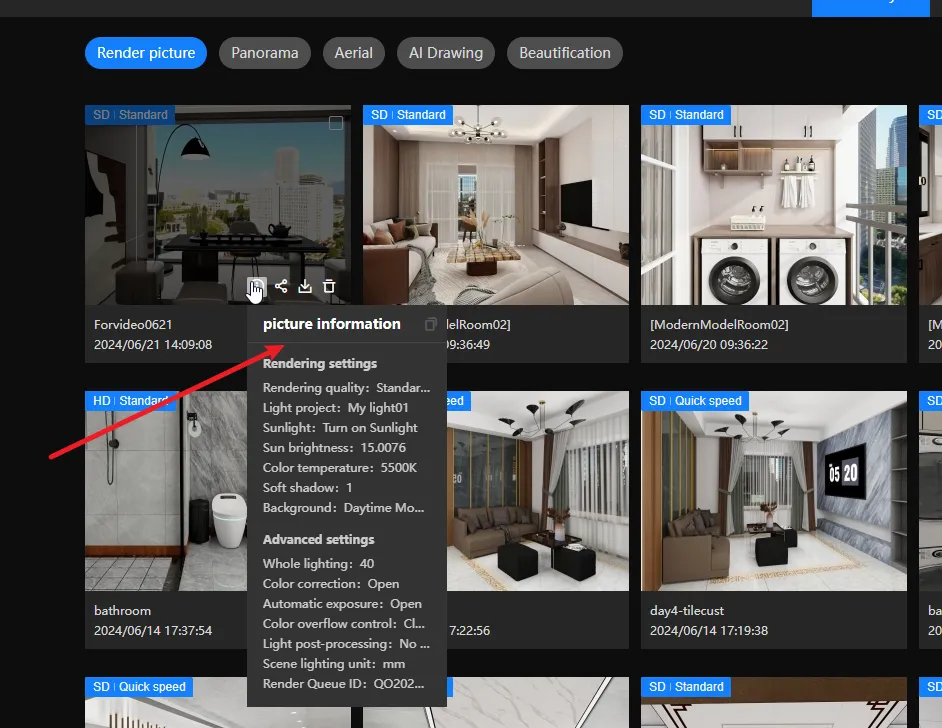
Image information
Record information and rendering parameters related to images. [Functional Operation] 1. Makes it easier to find the parameters set during rendering when there are many rendered images. 2. Facilitates communication with customer service and helps technical support identify and resolve issues more efficiently.
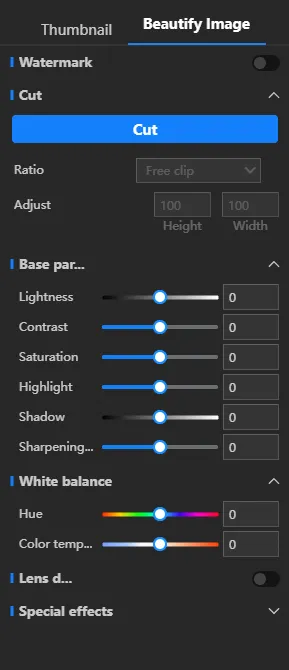
Add adjustment parameters for image enhancement
Add commonly used post-processing parameters for interior design renderings: - Color temperature - Highlights - Shadows - Lens vignetting (both dark and bright edges) [Value] This helps users enhance their images directly within the 3D Home platform, allowing for overall tonal adjustments without needing to download the images and use Photoshop for further editing.
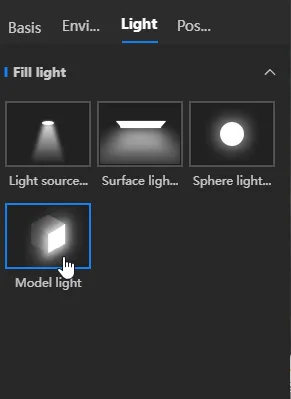
Model light-self illumination
Address the need for users to achieve self-illumination effects. [Functional Operation] 1. Rendering - Custom Fill Light. 2. Click "Model Light," drag it into the viewport, and support surface highlighting of the attached model light. Release to apply the effect.
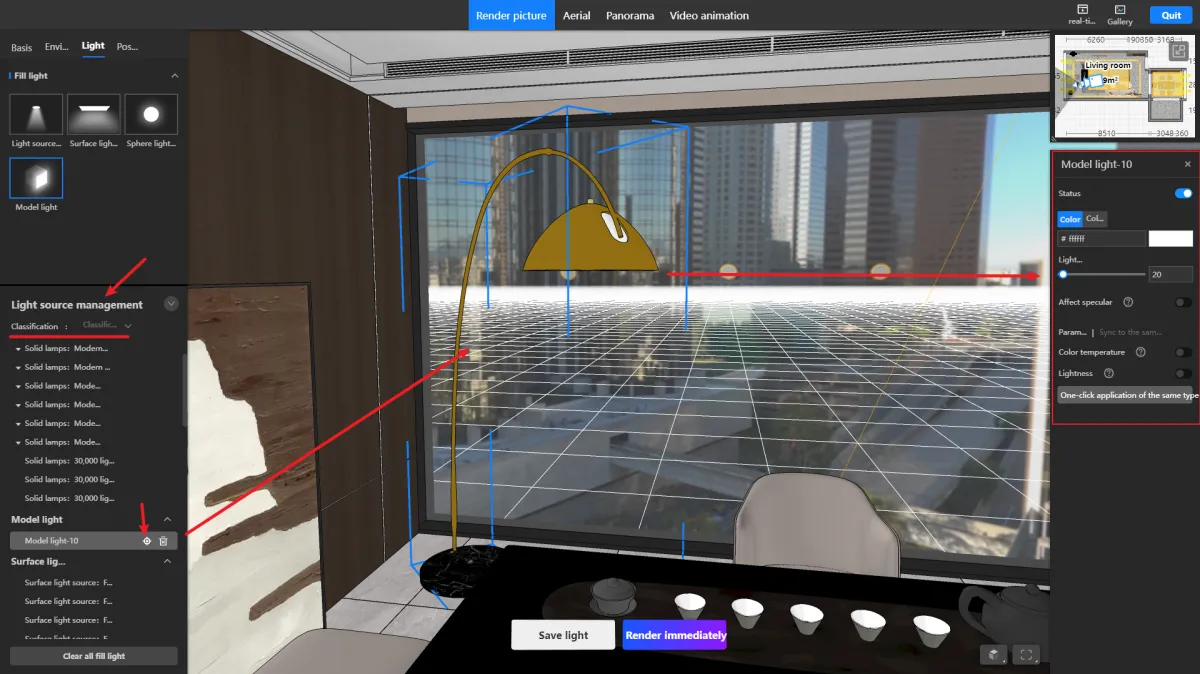
Light source management
1. The light source manager allows unified control of all lights in the project, including both physical lights and virtual fill lights. 2. Two classification methods: by space and by light source type. 3. Adjust the brightness of physical light sources directly in the rendering interface to avoid repeatedly switching between design and rendering interfaces. 4. Use the focus function to quickly locate the position of the lights.

Optimize brightness of outdoor ambient light and add color temperature parameters
Previously, there were significant issues for users to understand when outdoor brightness was enabled, as it would use user-defined values, and when disabled, it defaulted to preset values. To enhance user comprehension, the optimization now sets initial default brightness upon entering a design scheme. Additionally, outdoor color temperature functionality has been added for rendering nighttime scenes.
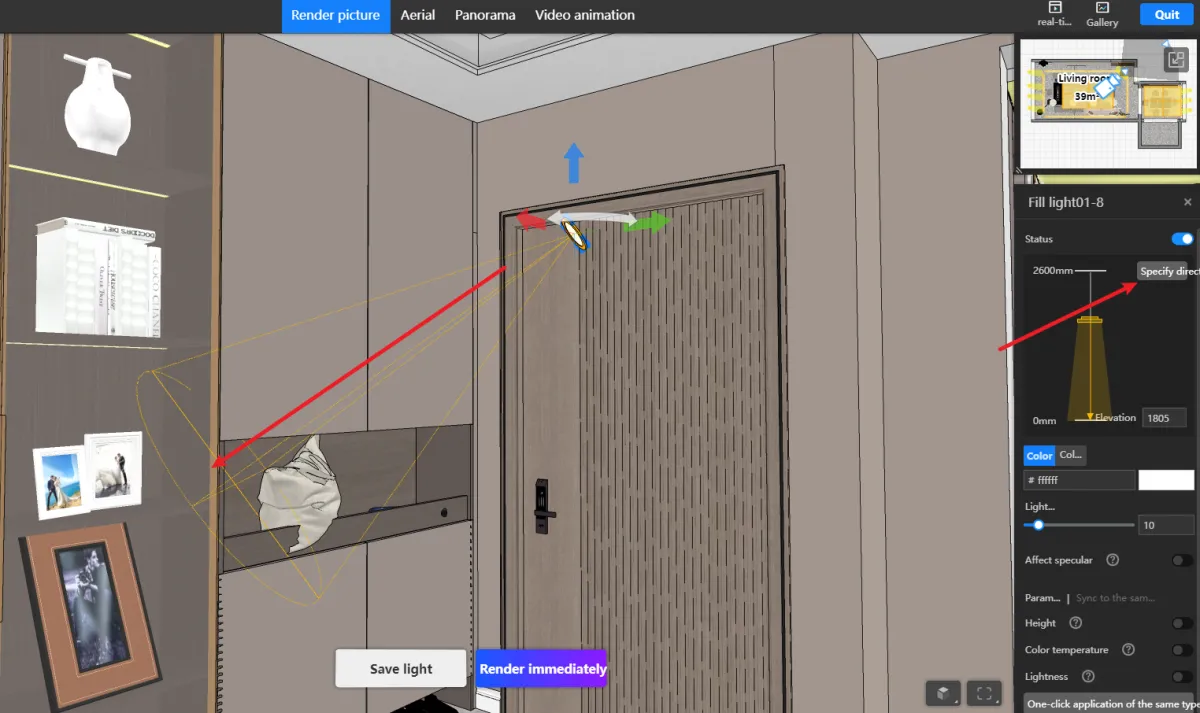
Fill light specifies the direction of illumination
Previously, adjusting the direction of the rotating fill light was challenging to illuminate specific areas. Now, users can simply click to select the desired direction for illumination.
Press shift when rotating the 2D perspective camera to adsorb specific angle
Implement the functionality to position the camera angle perpendicular to cabinets or walls.
Real-time rendering
Enabling real-time rendering effects directly in the browser significantly enhances the efficiency of lighting design for users, addressing the long-standing issue of difficulties in lighting setups based on ongoing client feedback. This solution aims to minimize the number of discarded renders to the maximum extent possible. (The complimentary package does not include permission for this feature.)
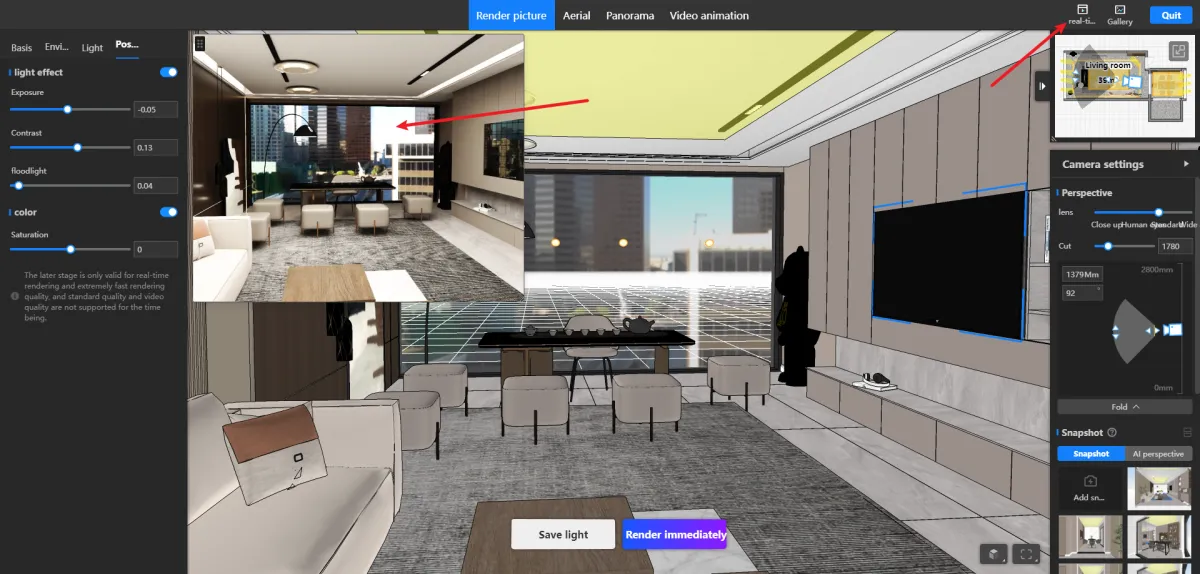
Post parameter adjustment
By integrating real-time rendering, users can preview and confirm the final rendering effect before the rendering process begins. This approach ensures that the real-time rendering results are exactly what the user desires, eliminating the need for subsequent image enhancement.
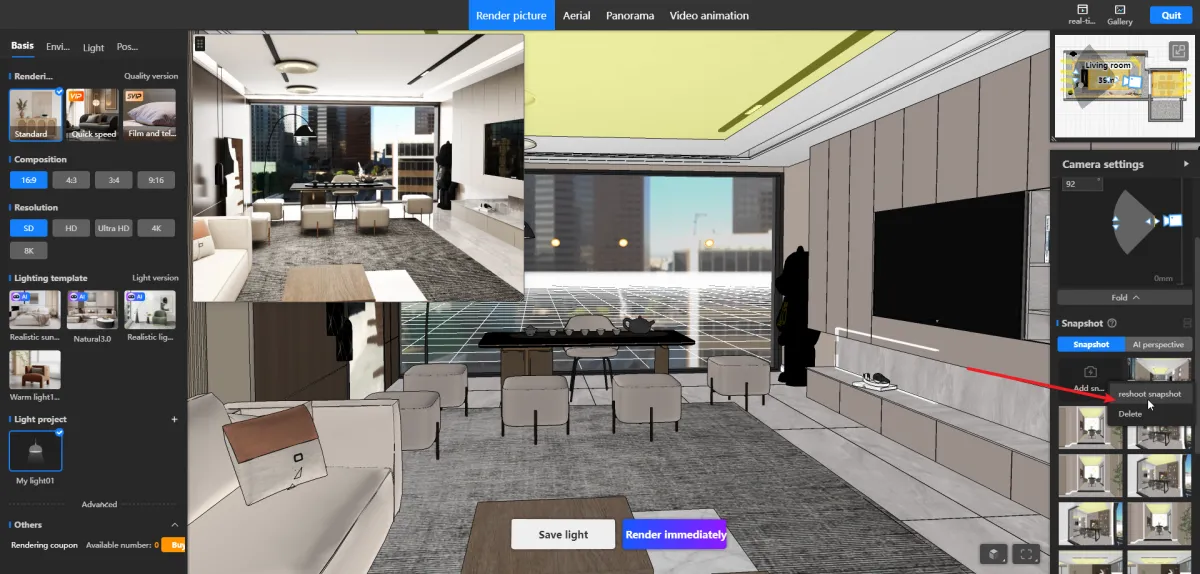
Snapshot retake function
Users can now reshoot viewpoints without the need to create a new one and delete the old one. This new feature of reshooting viewpoints saves time and simplifies the process.
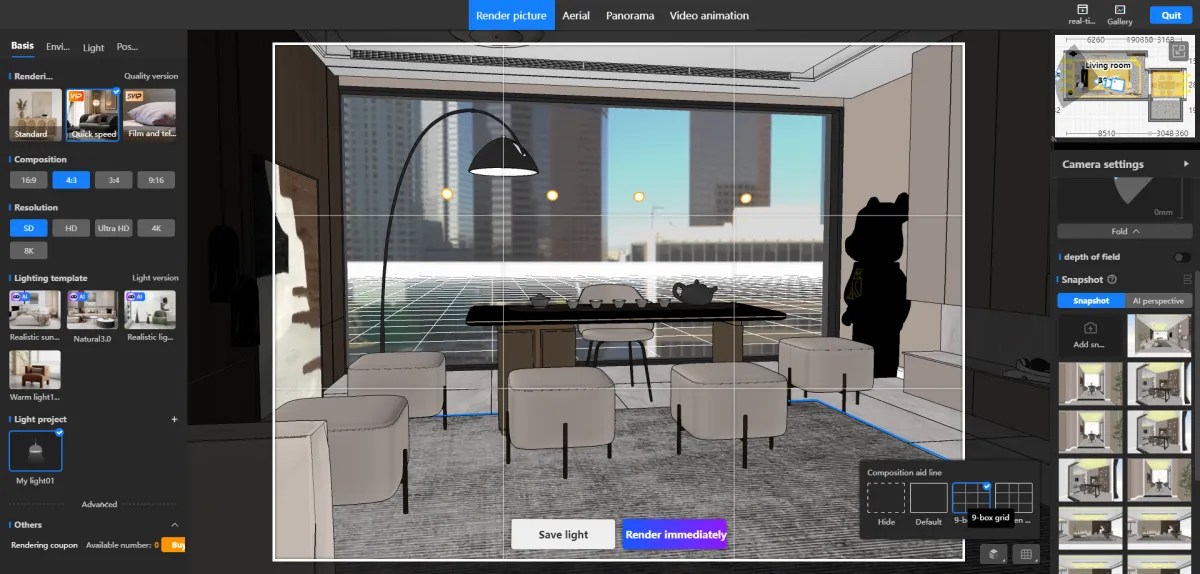
Optimize snapshot interaction
1. Adjusting the snapshot preview viewport size and black border coverage makes it easier for users to identify the snapshots they desire. 2. Adding the option to change the size of the snapshot preview window. 3. Optimizing the button for adding snapshots. 4. Introducing additional options for post-snapshot actions upon right-clicking. [Problem Solution] Enhancing user convenience for identifying desired snapshots.
Customization Module
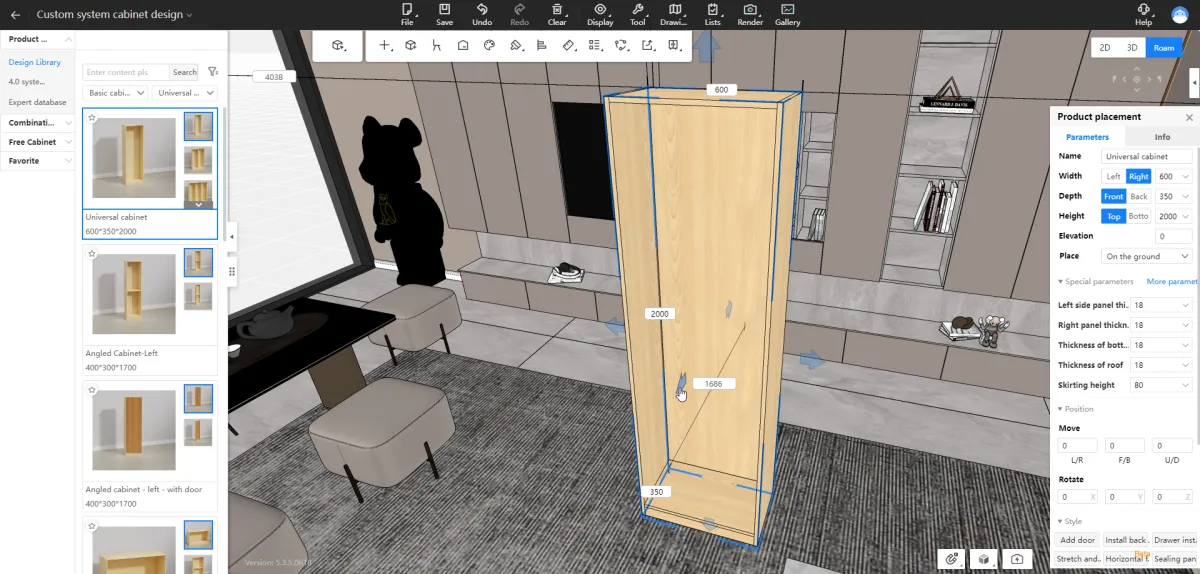
Default activation of stretching, moving, and rotating
When selecting cabinets or groups, the stretch, move, and rotate controls will activate automatically, eliminating the need to switch modes in the top menu "Mode," which addresses the issue of a hidden entry point and a long operation path.
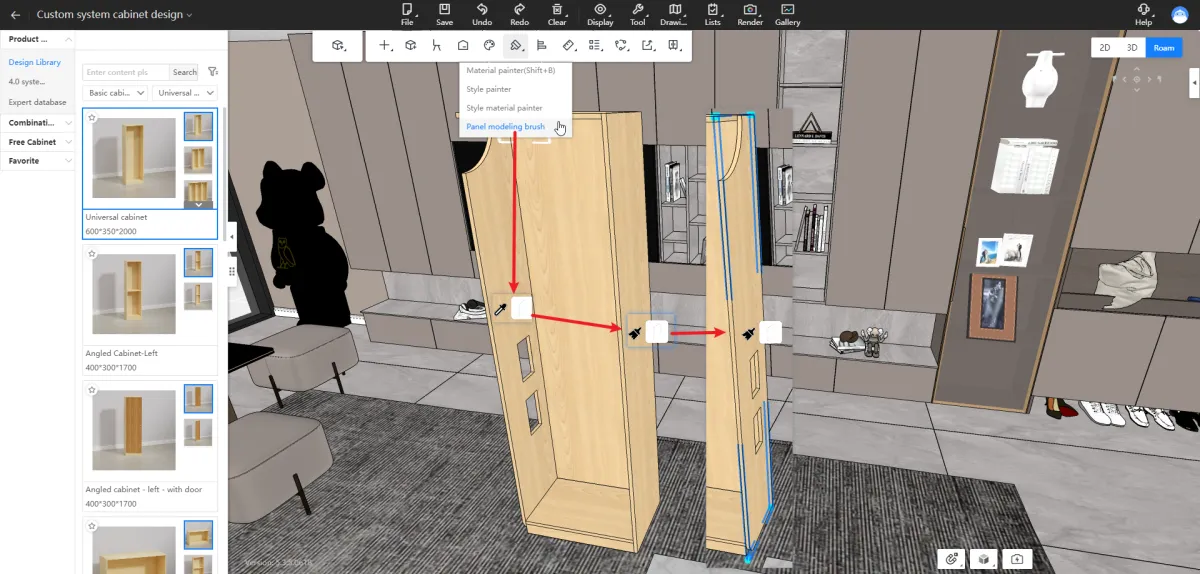
Panel styling brush
You can use the panel styling brush to apply the style of Panel A to Panel B. 2. You can brush the internal outline, external outline, or both outlines of a panel separately.

Installation of lights on special panels
Addressed the issue where irregular-shaped panels couldn't have lighting installed; users had to install lighting before cutting angles or editing panel pieces.

Solid wood mutually brushed with wardrobe module
You can quickly unify the materials and styles of different modules throughout the entire house using the format painter.
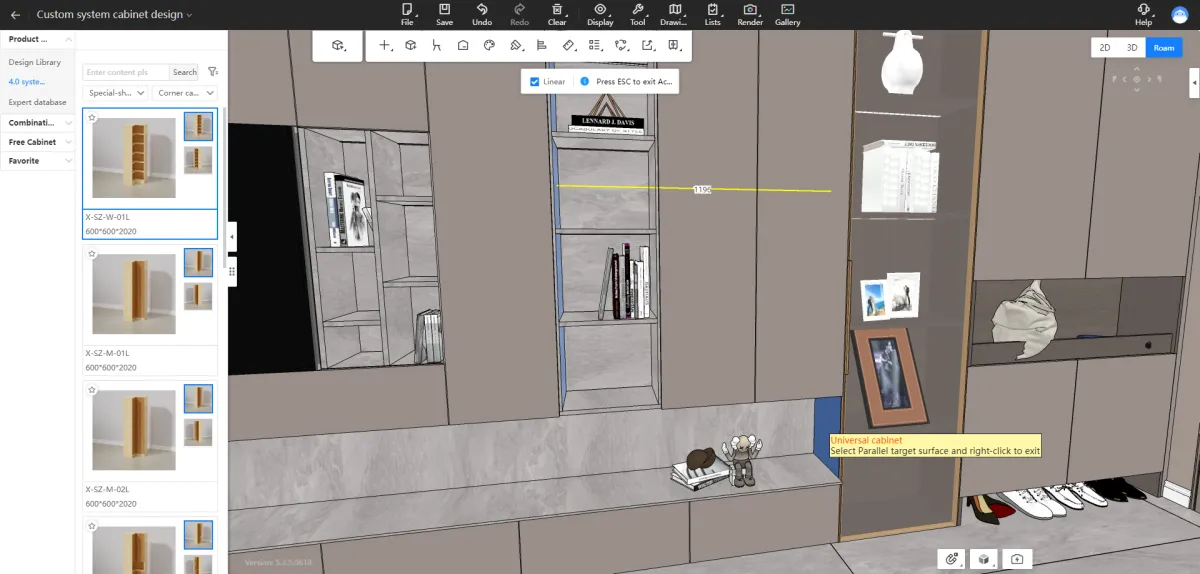
[Accurate Measurement] Point, line and surface measurement & point measurement orthogonal
Address the issue where users need to measure the orthogonal distance between surfaces, lines, and points when encountering certain craftsmanship details.
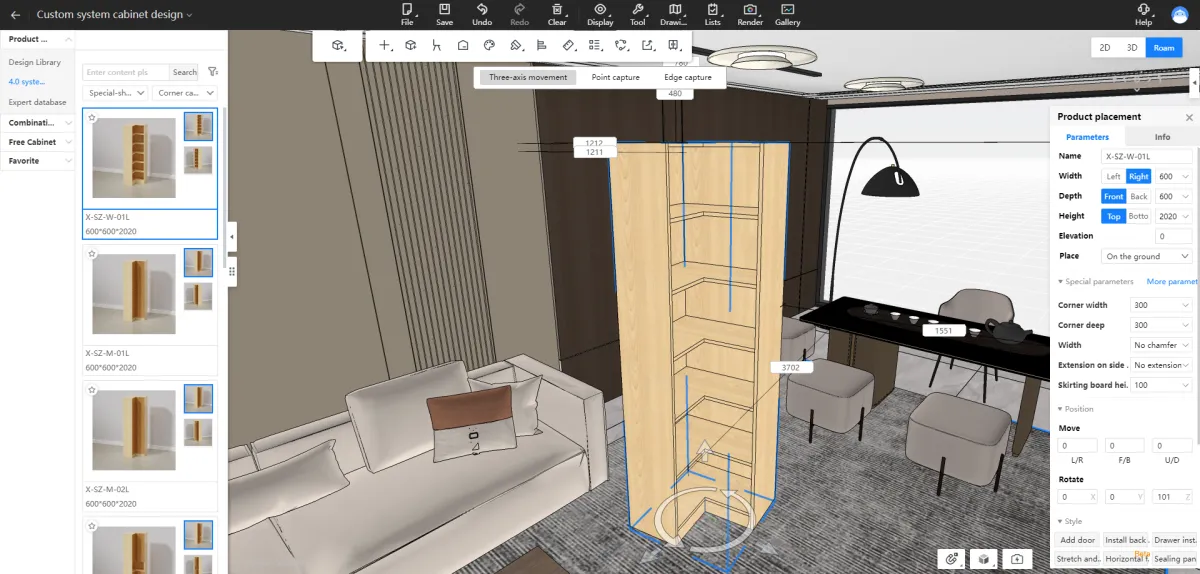
Cabinet rotation shortcut key
Provide multiple angles and diverse reference points to facilitate designers in rotating cabinets. Support designers in rotating cabinets clockwise along the Z-axis and rotating cabinets around their center points, thereby enhancing operational precision and design efficiency.
.png?x-oss-process=image/resize,w_1200/format,webp)
Alignment function (surface, line, point)
Enable precise cross-module movement for face-to-face, line-to-line, and point-to-point alignments. For instance, cabinets can be quickly aligned to walls, the front side of cabinets can be quickly aligned to faces, or when dealing with flipped cabinets, quick alignment can be achieved through 3 points.
Panel editing-vertex breakup
Allow the vertices with types to be decomposed into ordinary vertex types for secondary editing, resolving the issue of having to draw vertices multiple times when drawing irregular panels and reducing the number of operation steps.
Edit cabinets across sections
Enable cross-module (kitchen cabinets, wardrobes, system cabinets, bathroom cabinets) editing of cabinet dimensions and positional information.
.png?x-oss-process=image/resize,w_1200/format,webp)
Display scale (cabinet/inner space/panel)
1. Designers often need to repeatedly select objects for measurement when confirming the dimensions of cabinets, panels, and interior spaces, making it difficult to quickly and intuitively obtain these dimensions. 2. Measurement - Two-board Distance: It can display panel dimensions, but requires checking to display dimensions, which is not intuitive enough. It should facilitate designers and order reviewers in quickly confirming cabinet interior dimensions without the need for complex operations, thus improving design efficiency and accuracy.

Cabinet stretching and resizing
After completing the design, adjusting dimensions or batch modifying cabinet sizes can be cumbersome and involve multiple steps. Batch modifying cabinet sizes through stretch resizing would simplify and streamline this process.
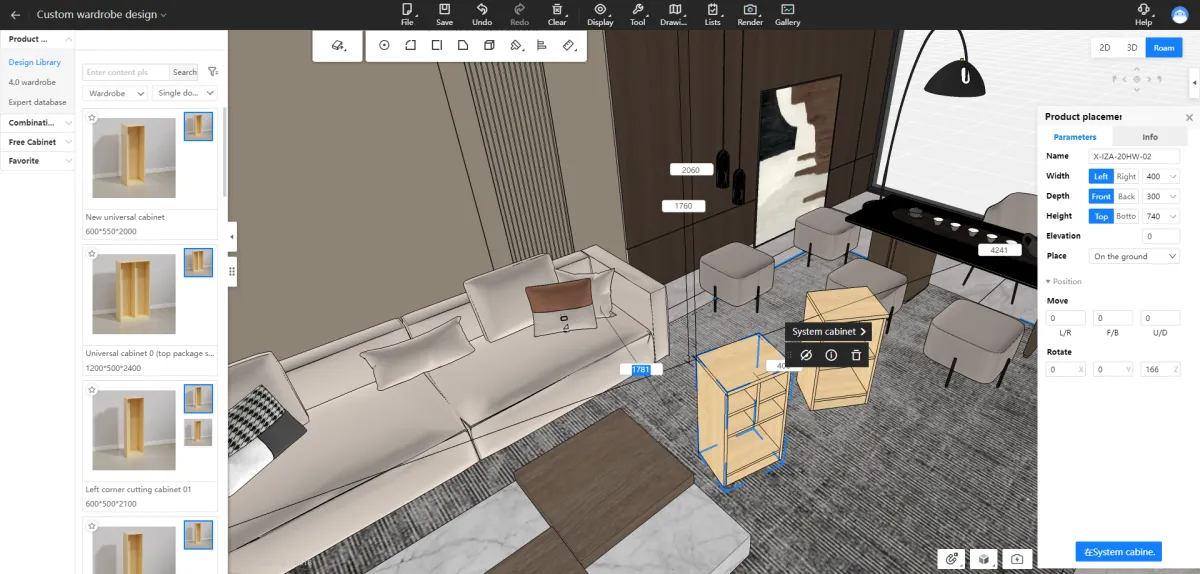
Drag and drop functional parts to the cabinet door panel can automatically hide
When placing functional components, if there are cabinet doors, they need to be hidden first before placement. Now, when placing functional components and encountering cabinet doors, the doors will be automatically hidden.
Added switch control
Add a toggle switch to control the automatic hiding of cabinet doors when placing functional components or decorations. [Problem Solved] In scenarios like designing tatami, it's necessary to keep the doors visible as reference panels.

Scene filter
The original quick selection feature had poor user experience, lacking substrate filtering and the inability to batch modify materials after filtering. After optimizing it into the "Scene Filter," users can now quickly filter selected materials to focus on batch inspection and modification of attributes like material, substrate, and style for units, doors, and panels.
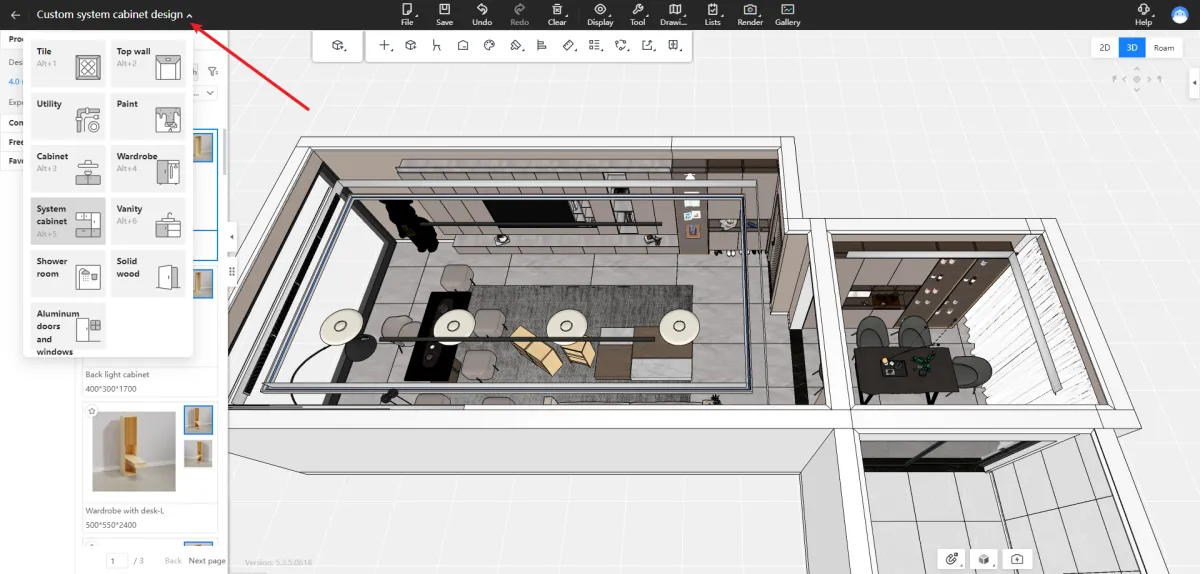
Added quick entry to customized modules to the top menu
Optimize user pathways by adding a shortcut entry for the customization module to the top menu.
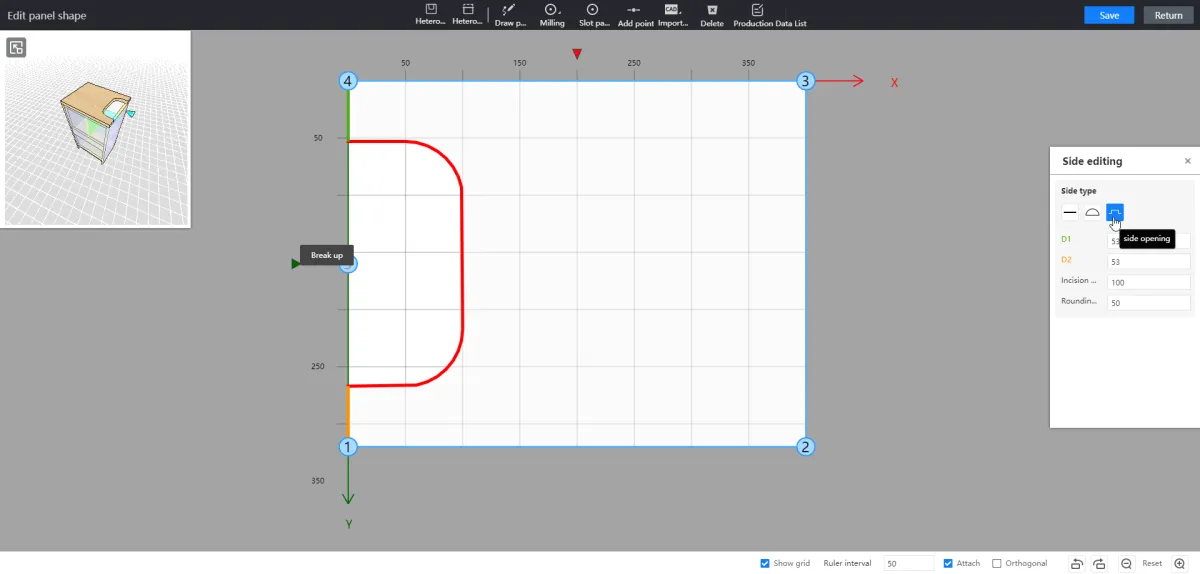
Panel shape editing: edge opening
Allow selecting the edges of panel pieces to create openings. [Problem Solved] Address the difficulty and complexity of creating openings along the edges of panel pieces by streamlining the process. (The previous method required adding 4 vertices, setting coordinates for each vertex, and then setting vertex types to achieve the goal.)
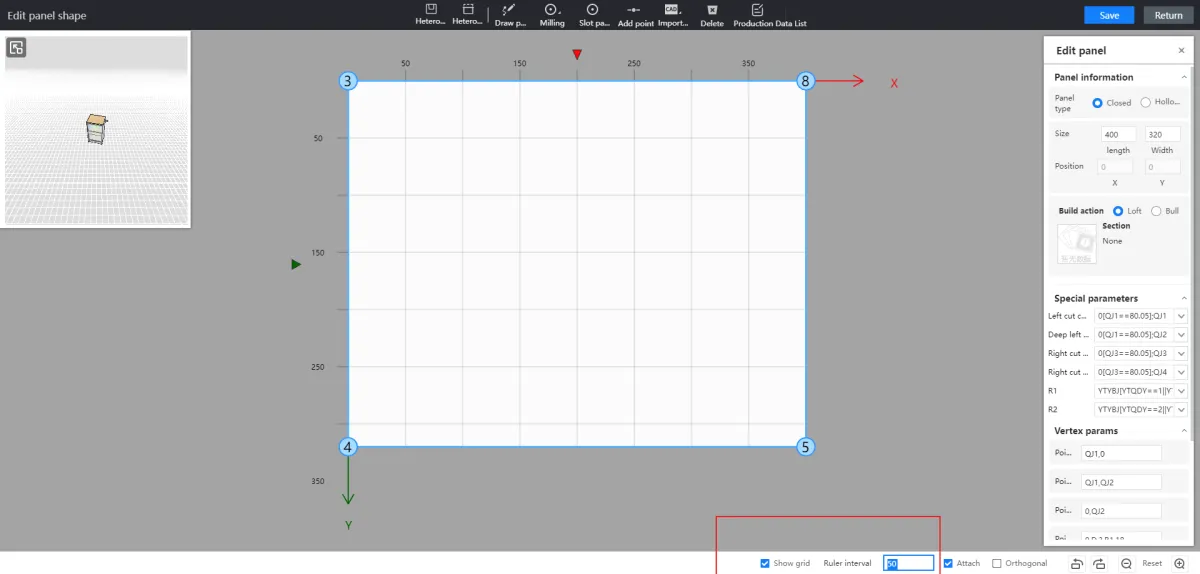
Panel shape editing: ruler interval, grid settings
In 2D mode of panel styling editing, allow setting ruler spacing and displaying grids. [Problem Solved] When drawing complex contours, it's difficult to control the spacing of snapping points, and there's no grid reference for drawing points.
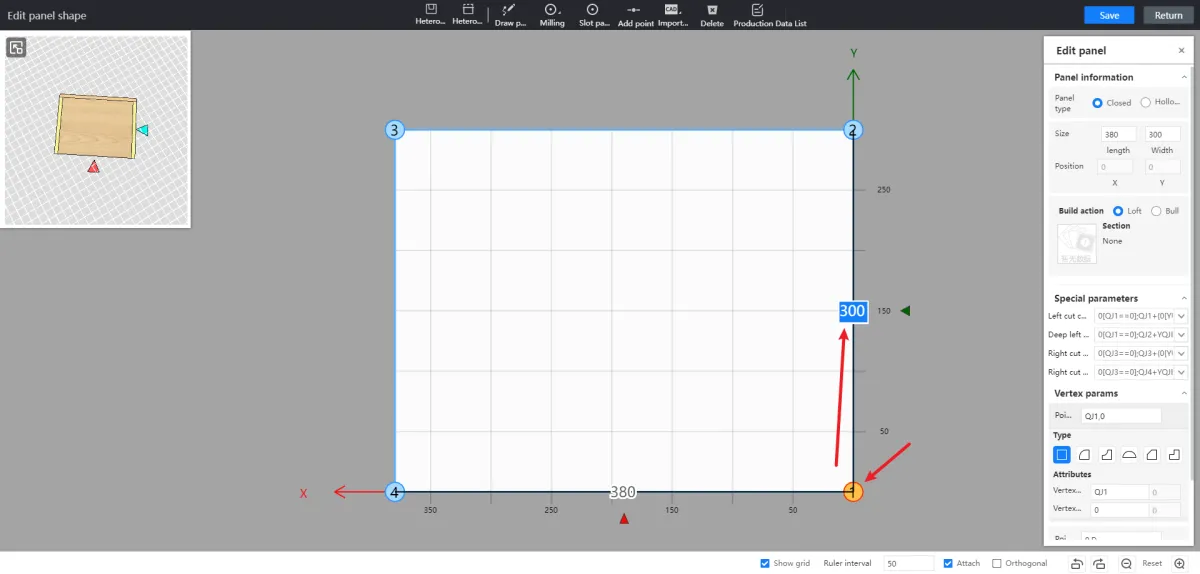
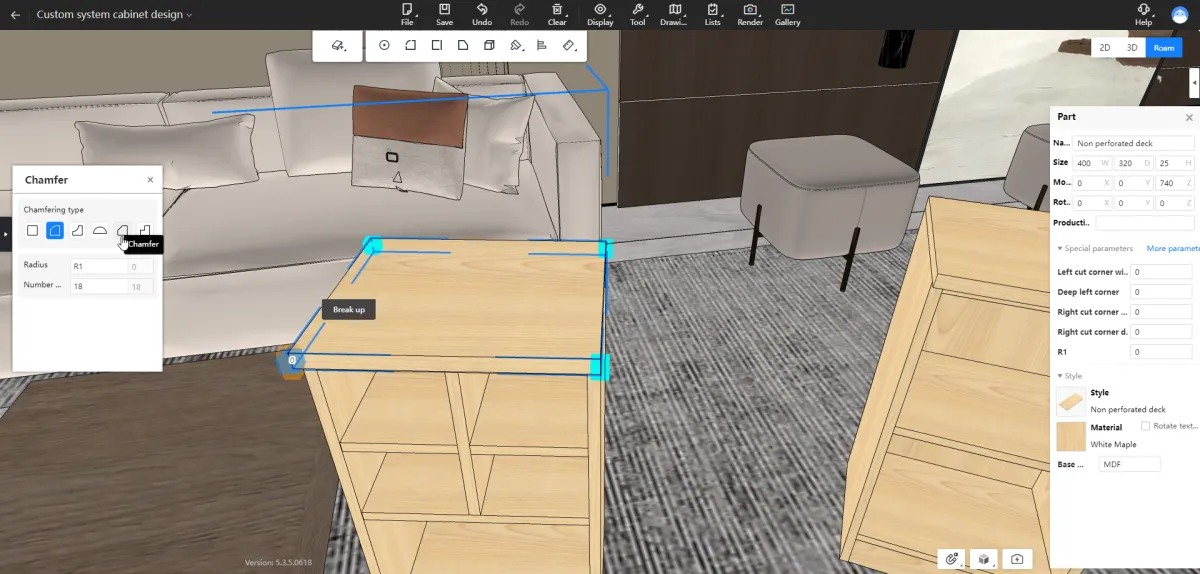
Panel shape editing: select points to increase the ruler and modify distance
In the 3D scene, selecting a panel will display its endpoints for direct chamfering. In both 2D and 3D scenes, selecting right-angle points will display a ruler showing the distance between the current point and the previous and next points. Users can modify the ruler values to change the endpoint position. Selecting chamfer types of points will display chamfer radii or tangent values. [Problem Solved] Addressed the issue of excessive operations required to edit endpoint positions.

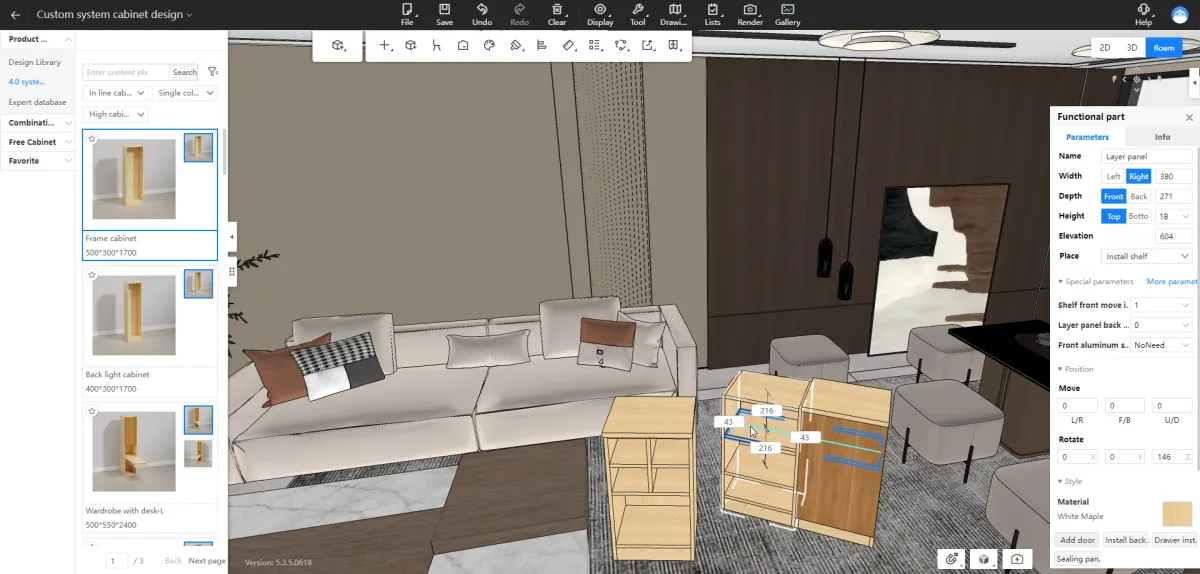
Detailed and concise mode for function ruler setting
1. The ruler for functional components can be set to display in either a simplified mode (only showing distances to adjacent panel pieces) or a detailed mode (in addition to the simplified mode, it will also display distances to the top, bottom, left, or right of the cabinet). 2. Rulers will also be displayed when functional components under a combined functional component are selected. [Problem Solved] 1. Simplifying the ruler display mode when the cabinet structure is complex to reduce design interference caused by excessive ruler displays. 2. Enabling rulers to adjust positions for objects under combined functional components, making it easier to locate them.

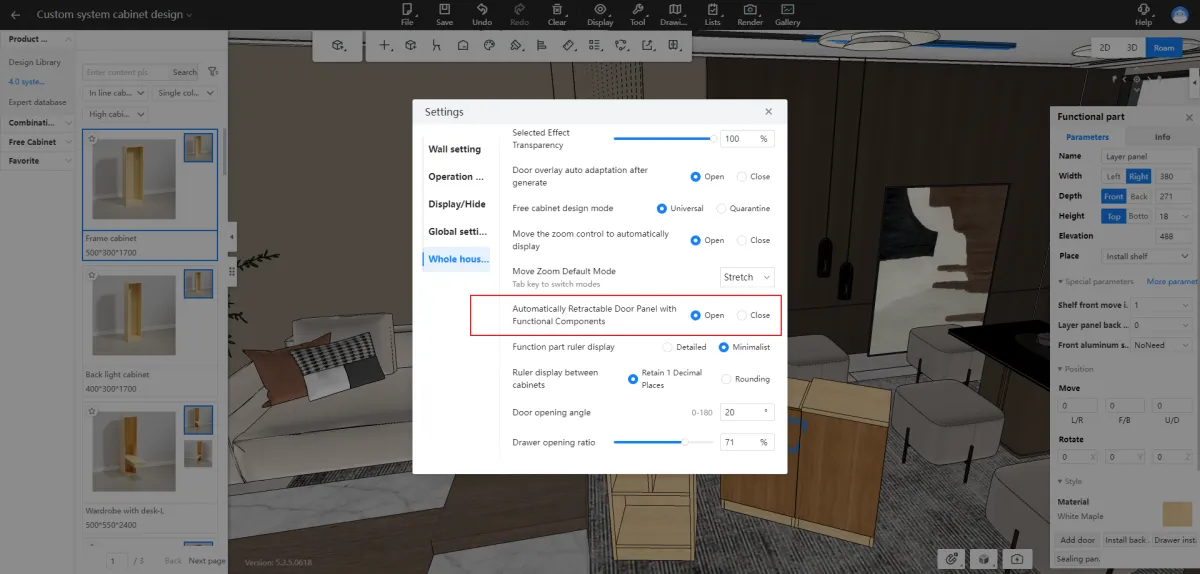
The components inside the cabinet are retracted according to the door panel covering method and hardware accessories
1. When modifying the inset of the door panel, it will check for interference with internal cabinet panels. If interference occurs, it will prompt whether internal cabinet panels should automatically recess to avoid the door panel. 2. Door panels with hardware fittings such as handles will support configuring the recess value for the layer panel. [Problem Solved] 1. When changing the inset of the door panel, manual adjustment is required if there is interference between internal cabinet panels and the door panel. 2. Manual adjustment is required for interference between hardware fittings like handles on the door panel and internal cabinet panels.

Opening angle of closing door and drawer opening ratio settings
The default values for the opening angle of swing doors and the opening proportion of drawers can be set globally. [Problem Solved] 1. The fixed 60° opening angle for door panels requires repetitive settings for custom angles each time, which can be inconvenient. 2. The inability to set the opening proportion for drawers.

Added new stepped opening on generating drawer
The drawer generation now includes an opening animation, supporting a step-by-step opening, addressing the previous issue where drawers could only be rendered in a fully open position, which affected the aesthetic appeal of the rendered images.